Sep 282013
 

A person (which I believe is the author of another similar product, thus that other product is nagware and /or payware versus Tiny PXE Server being fully freeware) has been truly harrassing / spamming me over the last days claiming the ownership (if not copyright) around the kernel parameters I used for Ubuntu Live booting (cifs, nfs, etc) in previous articles.

I will recommend this page if you wish to understand more about which kernel parameter does what.

I consider syntax around products like grub4dos, syslinux, ipxe, distros kernels to be public knowledge and therefore free for everyone to copy paste, modify, re use.
Actually there are tons of forums and web sites out there experimenting and sharing findings and knowledge about this.
Some of my favorite forums being http://reboot.pro or iPxe.

Any dev guy claiming copyright over this syntax would (IMHO) look like a fool.

I will not approve comments over my blog around this topic.
Why? Because I can.

I purposedly will not mention or quote that guy harassing me simply.
Why? Because I do not want to encourage such behaviors and because that person does not deserved to be mentionned.

Topic closed…

 Posted by at 13 h 53 min
Sep 252013
 

We already saw earlier how to boot ubuntu over ipxe with NFS

Howeber, setting an NFS server in windows is not always a given.

Hence, lets see now how to do it with a CIFS share i.e a simple windows share which Tiny PXE Server can manage for you.
Side note :
-I could make it work only with ubuntu 12.10, not 13.04.
-I could make it work only in plain DHCP mode, not proxydhcp mode.

needed :
ipxe
tiny pxe server
ubuntu

1/ open ubuntu.iso in winrar

(or any other iso reading capable tool)

extract casper folder to x:\pxe\iso\ubuntu.12.10 (or any path that suit you)


2/use the below ipxe script :

#!ipxe
set boot-url http://${dhcp-server}
kernel ${boot-url}/ubuntu.12.10/casper/vmlinuz showmounts toram root=/dev/cifs boot=casper netboot=cifs nfsroot=${cifs-server}/pxe/ubuntu.12.10 NFSOPTS=-ouser=username,pass=password,ro ip=dhcp ro
initrd ${boot-url}/ubuntu.12.10/casper/initrd.lz
boot

In the script above, adapt the username and password.
name it ubuntu.ipxe and put it in x:\pxe

Note :
About that syntax, as there is a controversy, be aware that I did not make it up.
Google it and you’ll find tons of similar examples and/or variants.
See my latest post abou this here.


3/put ipxe-undionly.kpxe in x:\pxe


4/modify config.ini with the following

(so that Tiny PXE Server will create a PXE share automatically for you pointing to your root folder) :
[dhcp]
smb=1


5/launch tiny pxe server with the following settings

(leave other settings untouched) :
tick « httpd »
boot filename = ipxe-undionly.kpxe (use the browse files and folders « … » button)
tick « filename if user-class=gPXE or iPXE » = http://${dhcp-server}/ubuntu.ipxe
push the online button


6/pxe boot your computer and here we go

7/ Notes

The same can be achieved with LinuxMint.

Extract the content of the iso to mint folder and use the ipxe script below :

#!ipxe
set boot-url http://${dhcp-server}
kernel ${boot-url}/mint/casper/vmlinuz showmounts toram root=/dev/cifs boot=casper netboot=cifs nfsroot=${cifs-server}/pxe/mint NFSOPTS=-ouser=username,pass=password,ro ip=dhcp ro
initrd ${boot-url}/mint/casper/initrd.lz
boot

 Posted by at 12 h 47 min
Sep 242013
 

needed :
tiny pxe server
gParted

open gparted.iso in winrar (or any other iso reading capable tool).
extract live folder to x:\pxe\iso\gparted

use the below ipxe script :

#!ipxe
set boot-url http://${dhcp-server}
kernel ${boot-url}/ISO/gparted/vmlinuz boot=live config union=aufs noswap noprompt vga=788 fetch=${boot-url}/ISO/gparted/filesystem.squashfs
initrd ${boot-url}/ISO/gparted/initrd.img
boot

name it gparted.ipxe and put it in x:\pxe

put ipxe-undionly.kpxe in x:\pxe

launch tiny pxe server with the following settings (leave other settings untouched) :
tick « httpd »
boot filename = ipxe-undionly.kpxe (use the browse files and folders « … » button)
tick « filename if user-class=gPXE or iPXE » = http://${dhcp-server}/gparted.ipxe
push the online button

pxe boot your computer and here we go


Gparted

 Posted by at 18 h 51 min
Sep 222013
 

In  a previous article, we have seen how to use RF433 chips with Arduino.

Pros for these chips are they are cheap and easy to use, cons is that they provide little or no tuning.

Hence, lets play a bit now with 2 texas cc1101 : with this component, we can play with the frequency (from 315 to 915), the modulation (ask, fsk, etc) and tons of other parameters.

You can use smartRF (optional) to dive into parameters.

First lets start with the pins of the cc1101.

spi

Here how it will connect to the arduino uno board (see here for other boards) :

cc1101_2_bb

To use the CC1101, you will need the panstamp library here.

Note that it will also work with the elechouse library here.

The initial thread on the Arduino forum.

Now lets have a look at the sketches.

Sending

#include "EEPROM.h"
#include "cc1101.h"

CC1101 cc1101;

// The LED is wired to the Arduino Output 4 (physical panStamp pin 19)
#define LEDOUTPUT 7

// counter to get increment in each loop
byte counter;
byte b;
//byte syncWord = 199;
byte syncWord[2] = {199, 0};

void blinker(){
digitalWrite(LEDOUTPUT, HIGH);
delay(100);
digitalWrite(LEDOUTPUT, LOW);
delay(100);
}

void setup()
{
Serial.begin(38400);
Serial.println("start");

// setup the blinker output
pinMode(LEDOUTPUT, OUTPUT);
digitalWrite(LEDOUTPUT, LOW);

// blink once to signal the setup
blinker();

// reset the counter
counter=0;
Serial.println("initializing...");
// initialize the RF Chip
cc1101.init();

//cc1101.setSyncWord(&syncWord, false);
cc1101.setSyncWord(syncWord, false);
cc1101.setCarrierFreq(CFREQ_433);
cc1101.disableAddressCheck();
//cc1101.setTxPowerAmp(PA_LowPower);

delay(1000);

Serial.print("CC1101_PARTNUM "); //cc1101=0
Serial.println(cc1101.readReg(CC1101_PARTNUM, CC1101_STATUS_REGISTER));
Serial.print("CC1101_VERSION "); //cc1101=4
Serial.println(cc1101.readReg(CC1101_VERSION, CC1101_STATUS_REGISTER));
Serial.print("CC1101_MARCSTATE ");
Serial.println(cc1101.readReg(CC1101_MARCSTATE, CC1101_STATUS_REGISTER) & 0x1f);

Serial.println("device initialized");
//Serial.println("done");
}

void send_data() {
CCPACKET data;
data.length=10;
byte blinkCount=counter++;
data.data[0]=5;
data.data[1]=blinkCount;data.data[2]=0;
data.data[3]=1;data.data[4]=0;
//cc1101.flushTxFifo ();
Serial.print("CC1101_MARCSTATE ");
Serial.println(cc1101.readReg(CC1101_MARCSTATE, CC1101_STATUS_REGISTER) & 0x1f);
if(cc1101.sendData(data)){
Serial.print(blinkCount,HEX);
Serial.println(" sent ok :)");
blinker();
}else{
Serial.println("sent failed :(");
blinker();
blinker();
}
}

void loop()
{
send_data();
delay(4000);
}

Receiving

#include "EEPROM.h"
#include "cc1101.h"

// The LED is wired to the Arduino Output 4 (physical panStamp pin 19)
#define LEDOUTPUT 4

// The connection to the hardware chip CC1101 the RF Chip
CC1101 cc1101;

byte b;
byte i;
byte syncWord = 199;
long counter=0;
byte chan=0;

// a flag that a wireless packet has been received
boolean packetAvailable = false;

void blinker(){
digitalWrite(LEDOUTPUT, HIGH);
delay(100);
digitalWrite(LEDOUTPUT, LOW);
delay(100);
}

/* Handle interrupt from CC1101 (INT0) gdo0 on pin2 */
void cc1101signalsInterrupt(void){
// set the flag that a package is available
packetAvailable = true;
}

void setup()
{
Serial.begin(38400);
Serial.println("start");

// setup the blinker output
pinMode(LEDOUTPUT, OUTPUT);
digitalWrite(LEDOUTPUT, LOW);

// blink once to signal the setup
blinker();
// initialize the RF Chip
cc1101.init();

cc1101.setSyncWord(&syncWord, false);
cc1101.setCarrierFreq(CFREQ_433);
cc1101.disableAddressCheck(); //if not specified, will only display "packet received"
//cc1101.setTxPowerAmp(PA_LowPower);

Serial.print("CC1101_PARTNUM "); //cc1101=0
Serial.println(cc1101.readReg(CC1101_PARTNUM, CC1101_STATUS_REGISTER));
Serial.print("CC1101_VERSION "); //cc1101=4
Serial.println(cc1101.readReg(CC1101_VERSION, CC1101_STATUS_REGISTER));
Serial.print("CC1101_MARCSTATE ");
Serial.println(cc1101.readReg(CC1101_MARCSTATE, CC1101_STATUS_REGISTER) & 0x1f);

attachInterrupt(0, cc1101signalsInterrupt, FALLING);

Serial.println("device initialized");
}

void ReadLQI()
{
byte lqi=0;
byte value=0;
lqi=(cc1101.readReg(CC1101_LQI, CC1101_STATUS_REGISTER));
value = 0x3F - (lqi & 0x3F);
Serial.print("CC1101_LQI ");
Serial.println(value);
}

void ReadRSSI()
{
byte rssi=0;
byte value=0;

rssi=(cc1101.readReg(CC1101_RSSI, CC1101_STATUS_REGISTER));

if (rssi >= 128)
{
value = 255 - rssi;
value /= 2;
value += 74;
}
else
{
value = rssi/2;
value += 74;
}
Serial.print("CC1101_RSSI ");
Serial.println(value);
}

void loop()
{
if(packetAvailable){
Serial.println("packet received");
// Disable wireless reception interrupt
detachInterrupt(0);

ReadRSSI();
ReadLQI();
// clear the flag
packetAvailable = false;

CCPACKET packet;

if(cc1101.receiveData(&packet) > 0){
if(!packet.crc_ok) {
Serial.println("crc not ok");
}

if(packet.length > 0){
Serial.print("packet: len ");
Serial.print(packet.length);
Serial.print(" data: ");
for(int j=0; j<packet.length; j++){
serial.print(packet.data[j],hex);
serial.print(" ");
}
serial.println(".");

 }
}
 // Enable wireless reception interrupt attachInterrupt(0, cc1101signalsInterrupt, FALLING);
}
}
Voila :)
You know should not a bit better on the cc1101 pins, on how to connect it to the arduino and you have basic code to developp your projects.
 Posted by at 18 h 14 min
Sep 142013
 

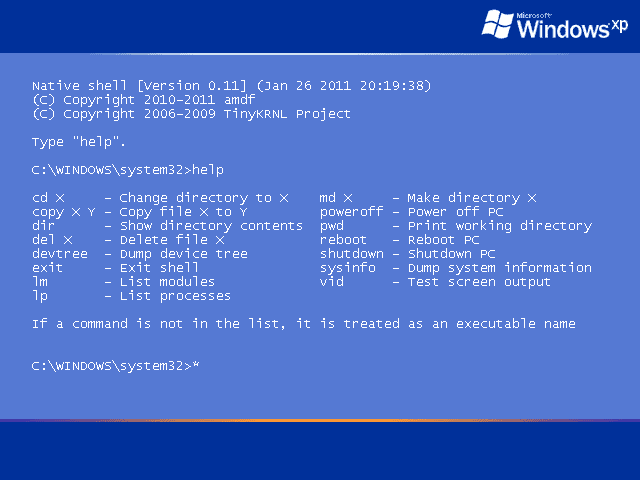
Native shell is a program for experiments with a Native API mode of Windows. Native mode is a mode, where chkdsk starts at the boot time before login screen appears. It is used by chkdsk utility to check and correct errors in the system partition. The Native mode itself is a blue screen (it is blue in Windows XP, another color in other versions of Windows), which appears before the Windows login screen. See the image (click the picture to zoom it):

Windows XP Native mode. Native shell application is running. 
Windows XP Native mode. Native shell application is running.

The program is a shell (a command line interface). It can perform some basic operations with Windows files and directories. Program runs before starting of main Windows components, so we have access to the entire file system and registry without many restrictions. All operations are implemented through the Native API (ntdll.dll).

 Posted by at 13 h 37 min  Tagged with:
Sep 072013
 

Description

SwiftSearch is a lightweight program whose purpose is to help you quickly find the files you need on your Windows machine without ever requiring you to index your drives. Most search utilities that achieve similar speeds do so by indexing drives while the computer is idle, but because idleness detection is so difficult to get right, in practice they end up slowing down the whole system just to speed up search. SwiftSearch works differently: given administrator privileges, it completely bypasses the file system (only NTFS supported) and reads the file table directly every time, which speeds up search by many orders of magnitude. Typically searches yield full results in ~10 seconds or less, a significant speedup for many users. As a bonus, this program also supports path-based search (for example, you can search for « *Program*\Windows* »), regular expressions (just start the search name with ‘>’ character), and full directory sizes. Its goal is to be simple, swift, and intuitive to use.

Get it here

swiftsearch

 Posted by at 16 h 21 min