Juil 212026
 

A long time ago i had set a water mater which i used from jeedom.

Looking past, it was overkill : an arduino + a sdcard reader + an ethernet port + a cpl to plug back to my network.

Too many possible failures, too man,y restart/fixing.

Since i dropped jeedom and moved on with Homeassistant, i decided to rebuild my water meter.

This time i used a simple esp32 card (with builtin wifi), flashed esphome (from my windows and python esphome library) and used the simple yaml below.

and here it is : a simple integration in homeassistant.

esphome:
  name: web-ca9a1c

esp32:
  board: esp32dev
  framework:
    type: arduino

wifi:
  ssid: "dd-wrt24iot"
  password: "mypassword"
  min_auth_mode: WPA
  fast_connect: true

  manual_ip:
    static_ip: 192.168.1.244
    gateway: 192.168.1.250
    subnet: 255.255.255.0

api:

ota:
  - platform: esphome

web_server:
  port: 80

sensor:
  # 1. Compteur d'eau (Débit + Totalisateur intégré)
  - platform: pulse_counter
    pin:
      number: GPIO12
      mode: INPUT_PULLUP
    use_pcnt: false # Obligatoire pour dépasser les 13us sous ESP-IDF
    name: "Débit d'eau instantané"
    id: debit_eau_brut
    update_interval: 60s
    internal_filter: 50ms # Filtre antirebond physique pour l'ampoule Reed
    count_mode:
      rising_edge: DISABLE   # On ignore quand le contact s'ouvre
      falling_edge: INCREMENT # On compte UNIQUEMENT quand l'aimant ferme le contact (passage à la masse)
    filters:
      - multiply: 1.0 # 1 impulsion/min = 1 L/min (K=1)
    unit_of_measurement: "L/min"
    
    total:
      name: "Compteur d'Eau Index Total Eau"
      unit_of_measurement: "L"
      state_class: total_increasing
      device_class: water
      icon: mdi:pulse

  # 2. Force du signal Wi-Fi (dBm)
  - platform: wifi_signal
    name: "Signal Wi-Fi Garage"
    update_interval: 60s

  # 3. Durée de fonctionnement brute (secondes)
  - platform: uptime
    name: "Uptime Garage"
    id: uptime_sensor
    update_interval: 60s

text_sensor:
  # 4. Conversion de l'Uptime en format lisible, compatible avec ESP-IDF
  - platform: template
    name: "En ligne depuis"
    lambda: |-
      int seconds = id(uptime_sensor).state;
      int days = seconds / 86400;
      seconds %= 86400;
      int hours = seconds / 3600;
      seconds %= 3600;
      int minutes = seconds / 60;
      return esphome::str_sprintf("%dd %02dh %02dm", days, hours, minutes);
    icon: mdi:clock-start
    update_interval: 60s

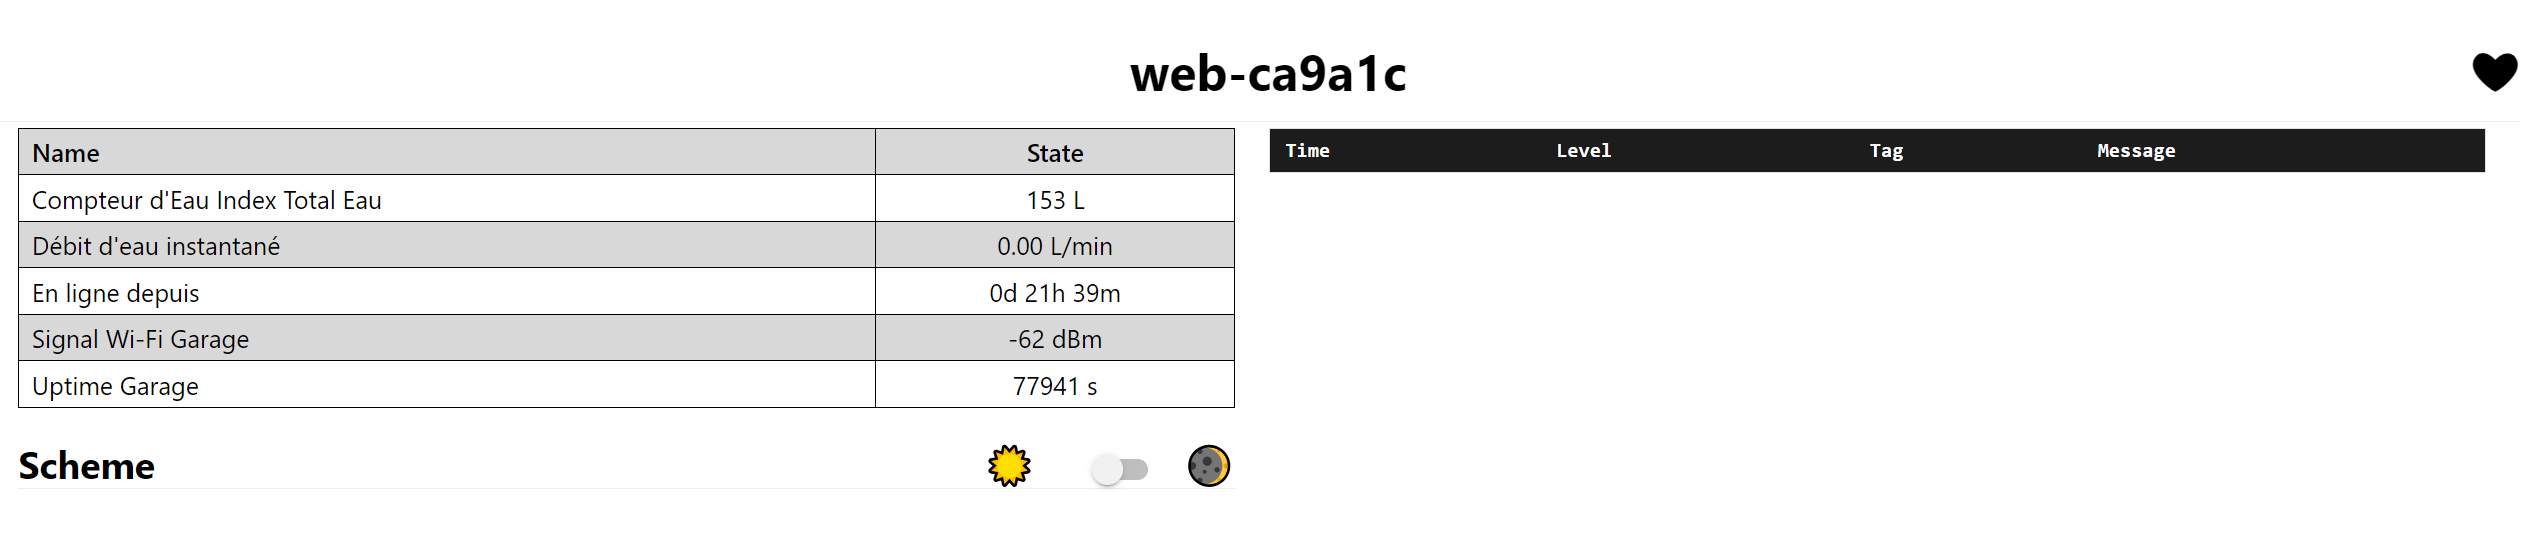
The esphome webpage.
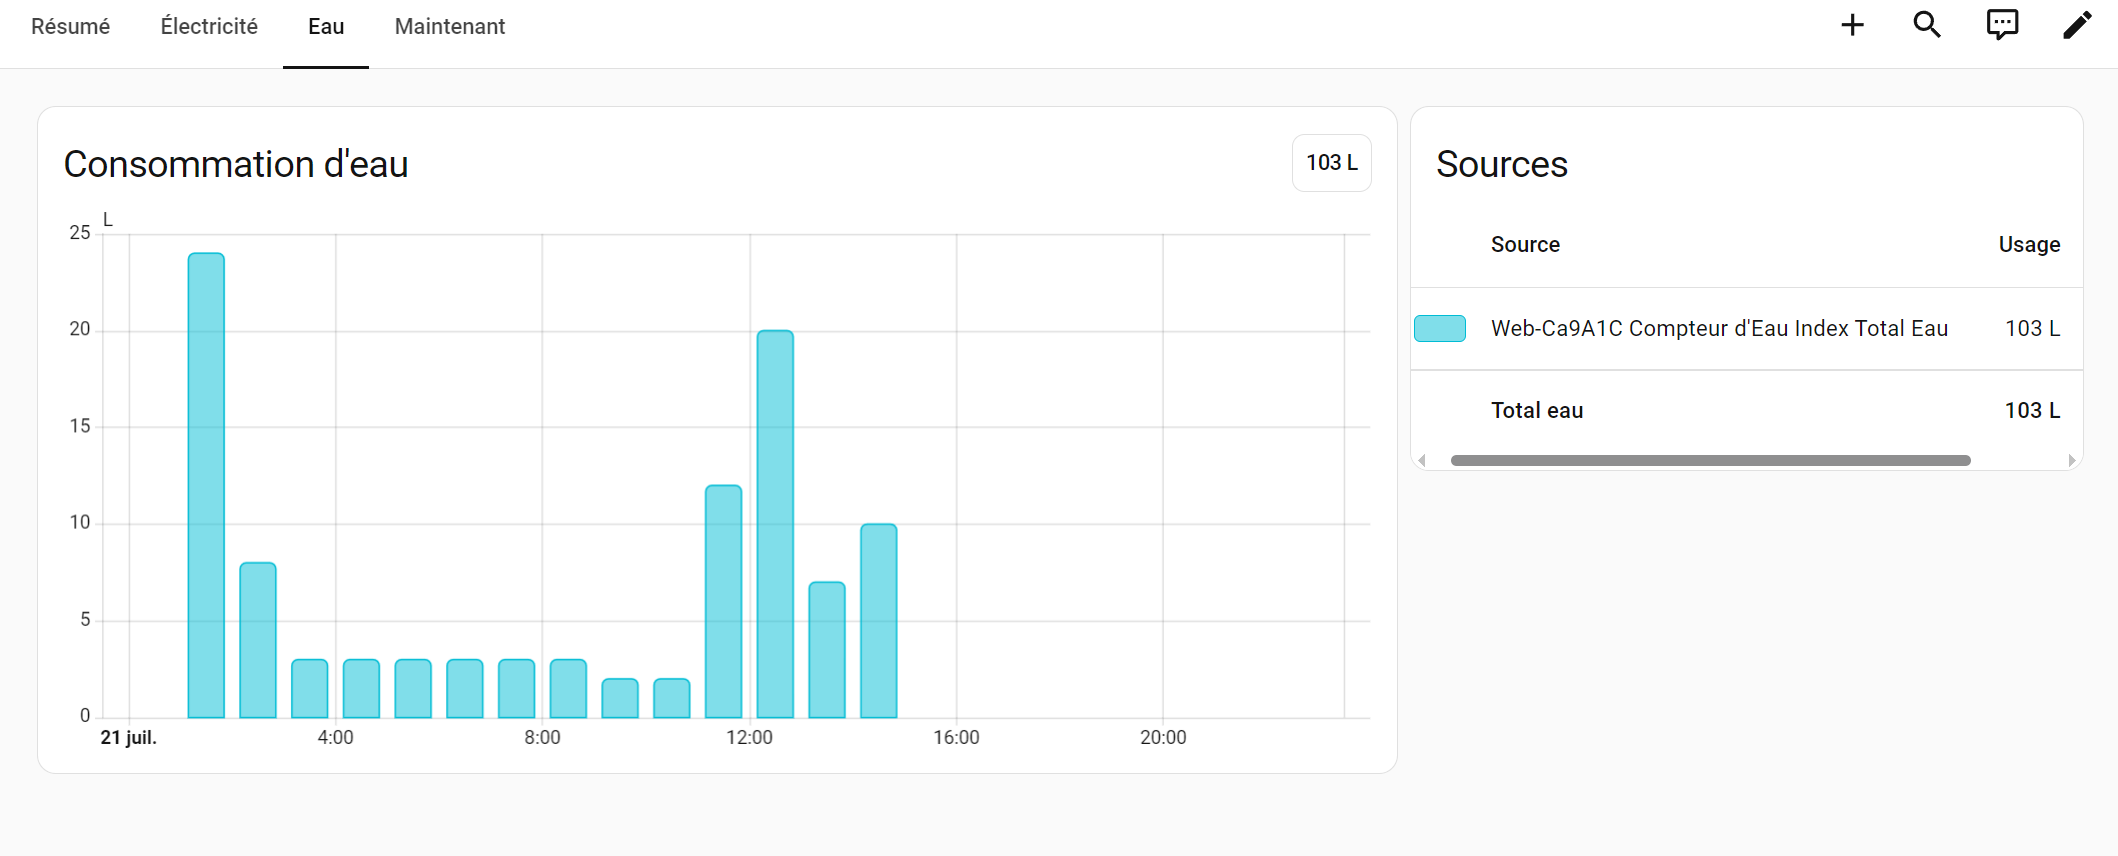
The HA integration.
Jan 182026
 

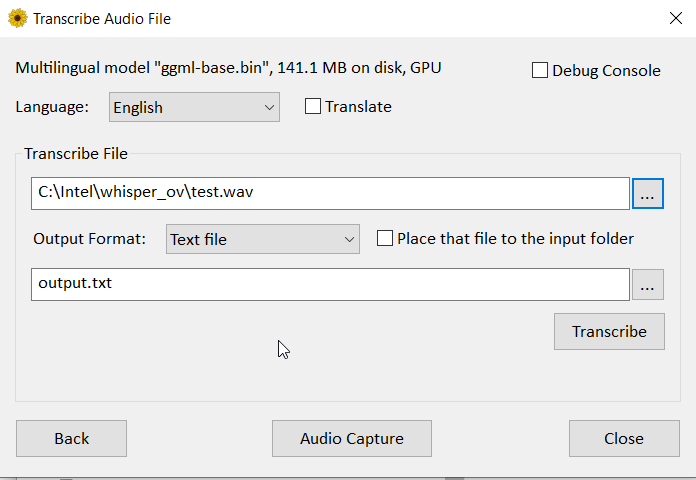
Find it here.

This version will use your gpu and is about 3 to 4 times faster.

Although quality is slightly lower compared to CPU.

I am getting good results (i.e less hallucinations & loops) thus with the below parameters.

If the idea is to use the transcript to have an IA turn into minutes/summary, it is plenty acceptable.

In your prompt then, mention the transcript has been generated by an IA with possible hallucinations, loops, etc and also provide a bit of context (it was a meeting about X and Z with person/function A and person/function B) : it usually provides very good results.

whisper-cli.exe -m "../ggml-base.bin" -f "../output.wav" -osrt --language fr --max-context 50 --beam-size 3 --temperature 0 --temperature-inc 0.2 --threads 8 --split-on-word

Jan 142026
 

I have done some benchmark on a 22 minutes wave file (radio interview from 1971 with medium quality recording).

I have then asked Copilot to assess the quality.

According to whisper the GPU version + small model is the sweet spot (CPU+Small being the best).

For the record the processing time (in seconds) below.

CPUtiny174
CPUbase248
CPUsmall796
GPUtiny26
GPUbase43
GPUsmall120

Beware thus that this is very hardware dependant, quality wise and for now I have mixed feeling about GPU although the ratio processing time/quality is clearly (on my hardware) promoting GPU+Small.

To be continued.

Jan 112026
 

Because at work I cannot enjoy the full copilot version and therefore cannot get transcripts (and minutes) from my teams meeting, i decided to give it a go with other tools.

I then discovered Whisper : « Whisper is an open‑source speech‑to‑text model designed by OpenAI to deliver accurate transcription across many languages. It handles real‑world audio remarkably well, even when recordings include background noise, accents, or imperfect microphone quality. Because it runs locally, it offers strong privacy and full control over your workflow. Its different model sizes—from tiny to large—let you balance speed and accuracy depending on your hardware and needs. »

Models can be downloaded here : tiny, base and small models are giving already really good results (before considering medium and large).

It is all about finding the right balance between time to process and accuracy.

Command line:

whisper-cli.exe --model "ggml-base.bin" --file "interview.wav" --output-txt --output-file "interview.txt" --threads 4 --language auto

I strongly recommend to also look at this GUI version here : it uses an older whisper version which is delivering at first look better results (it uses GPU) compared to the latest ggml-org whisper versions : standard, blas (preferred) or cublas (you need cuda installed and a nvidia card).

I might give it a try to openvino in a near futur (time to settle the proper python environement, script, models, etc).

Déc 302025
 

8 years ago I had come with a dirty solution to graph my router bandwidth usage (here).

Now, we have AI (chatgpt here) and with a single prompt (« over ssh, retrieve my ddwrt bandwidth usage »), it provided me with a neat script/solution.

I then get a web page, refreshed hourly.

#!/bin/bash
set -e

# ==================================================
# Configuration
# ==================================================
ROUTER_IP="192.168.1.250"
ROUTER_USER="root"
SSH_KEY="$HOME/.ssh/id_ed25519"
OUTPUT_HTML="/var/www/html/traffic.html"

MONTH=$(date +%m)
YEAR=$(date +%Y)
NVRAM_KEY="traff-$MONTH-$YEAR"

GENERATED_AT=$(date '+%d/%m/%Y à %H:%M')

# ==================================================
# Récupération des données depuis le routeur
# ==================================================
RAW_DATA=$(ssh -i "$SSH_KEY" -q "$ROUTER_USER@$ROUTER_IP" "nvram get $NVRAM_KEY")

# Total mensuel [incoming:outgoing]
TOTAL=$(echo "$RAW_DATA" | grep -o '\[.*\]')

# Données journalières uniquement
DATA=$(echo "$RAW_DATA" | sed 's/\[.*\]//')

# ==================================================
# Génération de la page HTML (écriture root)
# ==================================================
sudo tee "$OUTPUT_HTML" > /dev/null <<EOF
<!DOCTYPE html>
<html lang="fr">
<head>
<meta charset="UTF-8">
<title>Trafic DD-WRT - $MONTH/$YEAR</title>
<script src="https://cdn.jsdelivr.net/npm/chart.js"></script>
<style>
  body {
    font-family: Arial, sans-serif;
    background: #f4f4f9;
    margin: 40px;
  }
  h1 {
    text-align: center;
  }
  #chart-container {
    max-width: 1100px;
    margin: auto;
  }
  .generated {
    position: fixed;
    bottom: 10px;
    right: 15px;
    font-size: 0.85em;
    color: #666;
  }
</style>
</head>
<body>

<h1>Trafic journalier DD-WRT – $MONTH/$YEAR</h1>

<div id="chart-container">
  <canvas id="trafficChart"></canvas>
</div>

<p style="text-align:center; font-size:1.1em;">
  <strong>Total du mois :</strong> $TOTAL MB (incoming : outgoing)
</p>

<div class="generated">
  Généré le $GENERATED_AT
</div>

<script>
const rawData = "$DATA";

const incoming = [];
const outgoing = [];

rawData.trim().split(' ').forEach(pair => {
  const [inVal, outVal] = pair.split(':').map(Number);
  incoming.push(inVal);
  outgoing.push(outVal);
});

const labels = Array.from({ length: incoming.length }, (_, i) => 'Jour ' + (i + 1));

const ctx = document.getElementById('trafficChart').getContext('2d');
new Chart(ctx, {
  type: 'bar',
  data: {
    labels: labels,
    datasets: [
      {
        label: 'Incoming (MB)',
        data: incoming,
        backgroundColor: 'rgba(54, 162, 235, 0.7)'
      },
      {
        label: 'Outgoing (MB)',
        data: outgoing,
        backgroundColor: 'rgba(255, 99, 132, 0.7)'
      }
    ]
  },
  options: {
    responsive: true,
    plugins: {
      legend: { position: 'top' },
      tooltip: {
        callbacks: {
          label: ctx =>
            ctx.dataset.label + ': ' + ctx.raw.toLocaleString() + ' MB'
        }
      }
    },
    scales: {
      x: { stacked: true },
      y: {
        stacked: true,
        beginAtZero: true,
        title: {
          display: true,
          text: 'MB'
        }
      }
    }
  }
});
</script>

</body>
</html>
EOF
Déc 212025
 

In previous articles, i have shared how to backup/restore files using Rclone.

Now for fun (and no profit) lets decrypt these files outside of Rclone using the password and salt from the rclone config (in rclone.conf).

Have a look at this github repo here.

Déc 212025
 

In previous article, i have explained how to rclone one local folder to a remote folder.

While doing so i had enable filename encryption.

It appears that it brings nothing but complexity (content encryption is all that matters to me) and i now want to revert to original filenames while not having to reupload it all.

Here below a dry run script (to test safely) and a real run script – all this from the synology command line.

Note that we need to suffix files with .bin or else rclone will not recognize the files as encrypted.

#!/bin/bash

REMOTE_CRYPT="ovhcrypt:"
REMOTE_RAW="ovhftp:/backup/"

echo "=== DRY RUN (DECRYPT NAMES + ADD .BIN) ==="

rclone lsf -R "$REMOTE_RAW" | while read -r path; do

    # Ignore les dossiers
    [[ "$path" == */ ]] && continue

    # Sépare dossier et fichier
    dir="${path%/*}"
    filename="${path##*/}"

    # Filtre : noms chiffrés rclone (base32, >=16 chars)
    if ! [[ "$filename" =~ ^[a-z0-9]{16,}$ ]]; then
        echo "Skip (not encrypted): $path"
        continue
    fi

    # Décrypte uniquement le nom du fichier
    decfile=$(rclone cryptdecode "$REMOTE_CRYPT" "$filename" 2>/dev/null | awk '{print $NF}')

    if [[ -z "$decfile" ]]; then
        echo "Skip (cryptdecode failed): $path"
        continue
    fi

    # Ajoute l'extension .bin
    decfile_bin="${decfile}.bin"

    # Reconstruit le chemin final
    if [[ "$dir" == "$path" ]]; then
        decpath="$decfile_bin"
    else
        decpath="$dir/$decfile_bin"
    fi

    echo "DRY RUN: Would rename: $path  -->  $decpath"

done

#!/bin/bash

REMOTE_CRYPT="ovhcrypt:"
REMOTE_RAW="ovhftp:/backup/"

echo "=== REAL RUN (DECRYPT NAMES + ADD .BIN) ==="

rclone lsf -R "$REMOTE_RAW" | while read -r path; do

    # Ignore les dossiers
    [[ "$path" == */ ]] && continue

    # Sépare dossier et fichier
    dir="${path%/*}"
    filename="${path##*/}"

    # Filtre : noms chiffrés rclone (base32, >=16 chars)
    if ! [[ "$filename" =~ ^[a-z0-9]{16,}$ ]]; then
        echo "Skip (not encrypted): $path"
        continue
    fi

    # Décrypte uniquement le nom du fichier
    decfile=$(rclone cryptdecode "$REMOTE_CRYPT" "$filename" 2>/dev/null | awk '{print $NF}')

    if [[ -z "$decfile" ]]; then
        echo "Skip (cryptdecode failed): $path"
        continue
    fi

    # Ajoute l'extension .bin pour compatibilité ovhcrypt2
    decfile_bin="${decfile}.bin"

    # Reconstruit le chemin final
    if [[ "$dir" == "$path" ]]; then
        decpath="$decfile_bin"
    else
        decpath="$dir/$decfile_bin"
    fi

    echo "Renaming: $path  -->  $decpath"

    # Renommage optimisé et OVH-friendly
    rclone moveto "$REMOTE_RAW$path" "$REMOTE_RAW$decpath" \
        --transfers 1 \
        --checkers 1 \
        --multi-thread-streams 0 \
        --ftp-concurrency 1 \
        --low-level-retries 3 \
        --retries 3 \
        --stats 10s

    # Petite pause pour éviter les 421
    sleep 0.2

done

Note, once all crypted filenames have been renamed to non encrypted filenames (with .bin extension), i stopped using ovhcrypt remote and switched to ovhcrypt2 remote.

my command is rclone sync /volume1/photo ovhcrypt2: –progress .

[ovhcrypt]
type = crypt
remote = ovhftp:/backup
directory_name_encryption = false
password = xxx
password2 = xxx

[ovhftp]
type = ftp
host = ftp.xxx.fr
user = username
pass = password

[ovhcrypt2]
type = crypt
remote = ovhftp:/backup
filename_encryption = off
directory_name_encryption = false
password = xxx
password2 = xxx
Déc 202025
 

For near 20 years, i am backuping my photos onto my synology (ds10x, ds20x, and now ds21x).

The risk is to lose them all because of crash or during a migration from one disk/model to another disk/model.

I decided to use rclone (running on my synology) to backup this local storage to a remote storage.

               ┌──────────────────────────────────────────┐
               │              Synology NAS                │
               │------------------------------------------│
               │  /volume1/photo                          │
               │     (unencrypted)                        │
               └───────────────┬──────────────────────────┘
                               │
                               │  rclone copy / sync
                               │  (unencrypted)
                               ▼
               ┌──────────────────────────────────────────┐
               │               rclone                     │
               │------------------------------------------│
               │  Remote 1 : ovhftp:                      │
               │     → FTP connection tp OVH              │
               │     → primary                            │
               │                                          │
               │  Remote 2 : ovhcrypt:                    │
               │     → crypt layer                        │
               │     → AES‑256 CTR + scrypt               │
               │     → content crypted                    │
               │     → based on : ovhftp:/backup          │
               │                                          │
               │  rclone.conf                             │
               │     → contains keys + remotes config     │
               └───────────────┬──────────────────────────┘
                               │
                               │  crypted files
                               │  (filenames scrambled)
                               ▼
               ┌──────────────────────────────────────────┐
               │                OVH FTP                   │
               │------------------------------------------│
               │  /backup                                 │
               │     (crypted scrambled)                  │
               │     ex :                                 │
               │       8sd7f9sd7f9sd7f9sd7f9sd7f          │
               │       7f8sd9f8sd9f8sd9f8sd9f8sd          │
               └──────────────────────────────────────────┘

Some useful commands:

rclone listremotes
rclone lsd ovhftp:/backup
rclone lsd ovhcrypt:
rclone config file
rclone copy /volume1/photo ovhcrypt: --progress

Restore would work as below:

OVH /backup (crypted files)


rclone (ovhcrypt:) → automatically decrypt


/volume1/photo (unencrypted restored files)

rclone copy ovhcrypt: /volume1/photo --progress

Avr 132025
 

Despite latest tuning (see previous article), the battery drain was still there, less severe, but still..

There I decided to root the tablet and install magisk.

Download the APK, copy/paste it and rename it to zip and flash it with twrp.

Reboot and install the apk.

Launch the app and let it update the tablet and reboot.

Then install xtrem-battery-saver in magisk as a module.

Here below my config.

While on low power mode, we are changing the CPU governors to powersave (android should do that while on power saving mode but just to be sure…).

While on screen off, we are disabling cpu2 to 7 and setting cpu governors to powersave on cpu0 to 1. Also we setting lower priority on google play services. Last but not least, we are forcing doze mode to light.

This rather aggressive config paid off : i can spend a whole day on screen off without losing any battery power.

version=2
delay=3
log_file=/sdcard/XtremeBS.log
log_level=1

screen_off={
handle_cores=cpu0 cpu1
disable_cores=cpu2 cpu3 cpu4 cpu5 cpu6 cpu7
handle_gms=nice
kill_wifi=true
keep_on_charge=true
doze=light
}

low_power={
keep_on_charge=true
handle_cores=auto
disable_cores=false
handle_apps=false
allowlist=/data/local/tmp/XtremeBS/apps.allow
denylist=/data/local/tmp/XtremeBS/apps.deny
handle_gms=false
handle_proc=false
proc_file=/data/local/tmp/XtremeBS/proc.list
low_ram=false
doze=false
kill_wifi=false
}

charging={
}

manual={
}

boot={
}
Avr 132025
 

A few weeks after flashing lineageos 21, i started to experience a massive battery drain : the tablet would lose all its battery power while on sitting idle, screen off, wifi off, on battery saving mode.

Therefore i took a look at the battery stats:

adb shell dumpsys batterystats --reset 

then a couple of hours later

adb shell dumpsys batterystats > [path/]batterystats.txt 

also i took a look at the doze log :

adb shell dumpsys deviceidle 

Based on my reading, I disabled the following packages:

adb shell pm disable-user –user 0 com.android.phone
adb shell pm disable-user –user 0 com.android.dialer
adb shell pm disable-user –user 0 com.android.messaging
adb shell pm disable-user –user 0 com.android.cellbroadcastreceiver

And just to be sure these do not interfere with doze mode:

adb shell dumpsys deviceidle sys-whitelist -com.android.messaging
adb shell dumpsys deviceidle sys-whitelist -com.android.cellbroadcastreceiver
adb shell dumpsys deviceidle sys-whitelist -com.android.cellbroadcastreceiver.module
adb shell dumpsys deviceidle sys-whitelist -com.android.emergency