Juin 082014
 

Here below a video illustrating the previous article.

On the proto board, you’ll notice a 74HC595 controlling a ULN2803 plugged to 8 leds.

I use the below array of byte to have the up and down effect

  dataArray[0] = 0xFF; //11111111
  dataArray[1] = 0xFE; //11111110
  dataArray[2] = 0xFC; //11111100
  dataArray[3] = 0xF8; //11111000
  dataArray[4] = 0xF0; //11110000
  dataArray[5] = 0xE0; //11100000
  dataArray[6] = 0xC0; //11000000
  dataArray[7] = 0x80; //10000000
  dataArray[8] = 0x00; //00000000

Juin 072014
 

Still on my journey to a wordclock…

In the previous article, we have seen how to use a shift register to control up to 8 digital outputs (or more if you cascade IC’s).

One drawback in the previous setup is that we had to use one transistor per digital output (to control a device powered by another source).
That is 8 extra transistors, 8*3 extra wires, etc : not very practical and especially if we intend to control several shift registers IC’s. (i plan on using 3 in my wordclock project)

So this is where the ULN2803 comes in : 8 NPN transistors and one common ground in one integrated circuit.

uln2803

See below a refreshed schema (compared to the previous article). Note that I have decided to power my IC’s with my (regulated) Arduino 5v but I could as well have used my battery pack power.
Our 74HC595 will control our ULN2803 (by sending HIGH or LOW on the input) which in turn will drive the current thru each output/led.

uln2803a_bb

the Arduino sketch :

//the pins we are using
int latchPin = 2;
int clockPin = 3;
int dataPin = 4;
 
void setup() {
  //set all the pins used to talk to the chip
  //as output pins so we can write to them
  pinMode(latchPin, OUTPUT);
  pinMode(clockPin, OUTPUT);
  pinMode(dataPin, OUTPUT);
}
 
void loop() {
  for (int i = 0; i < 8; i++) {
 
    //take the latchPin low so the LEDs don't change while we are writing data
    digitalWrite(latchPin, LOW);
 
    //shift out the bits
    shiftOut(dataPin, clockPin, MSBFIRST, i);  
 
    //take the latch pin high so the pins reflect
    //the data we have sent
    digitalWrite(latchPin, HIGH);

    // pause before next value:
    delay(1000);
  }
}
Juin 052014
 

I have a wordclock project.

Before I get there, I need to learn about transistors (see previous article) to handle an external power source for my leds and a shift register to control lots of leds with an Arduino.

Why am I not using the digital pins?
For 2 reasons :
-the digital pins are there to input/output a logic (0/1), not power
-my arduino only has 14 digital pins (I need about 25 output)

So to sum it up, we will use
-an external power source to power on our leds,
-transistors to isolate the external power source from the arduino,
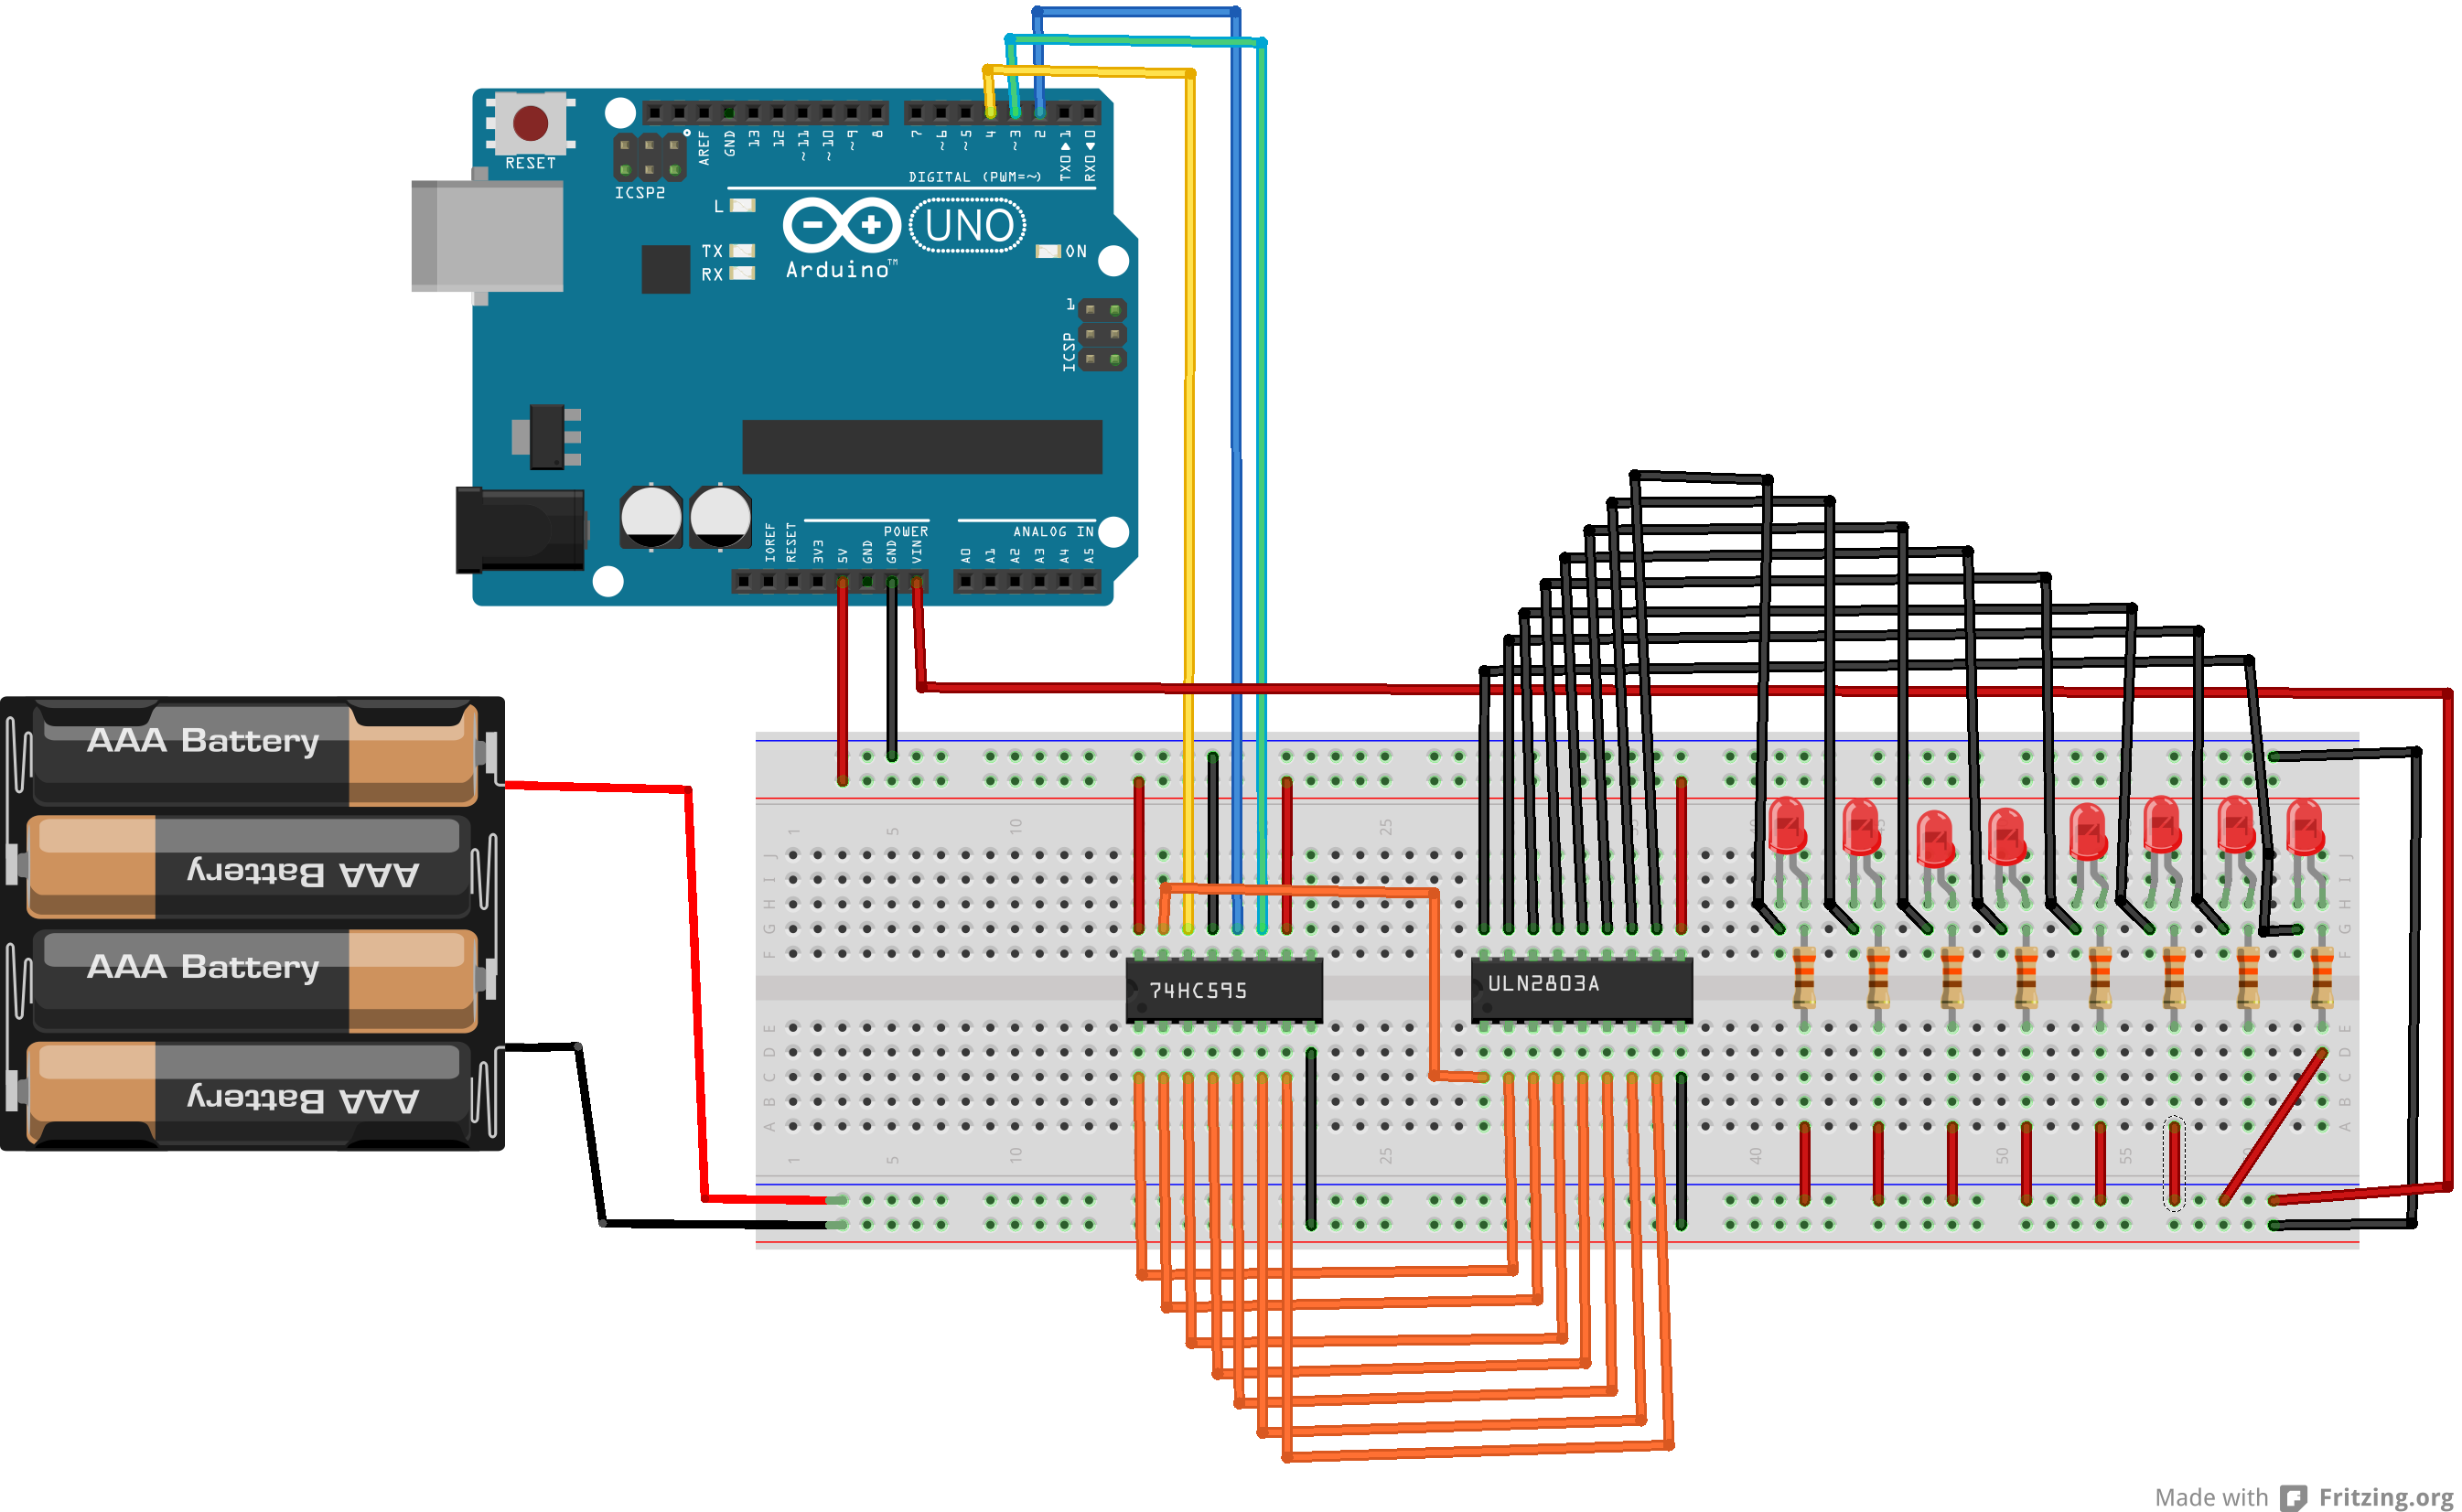
-a shift register (74HC595) to handle 8 outputs at once with only 3 pins.

See below a wiring to use shift registers on two leds (it would be more impressive/significant with 8 leds with I was too lazy to draw it all).
Notice that we also use our external power source to power on the Arduino thru the vin pin.

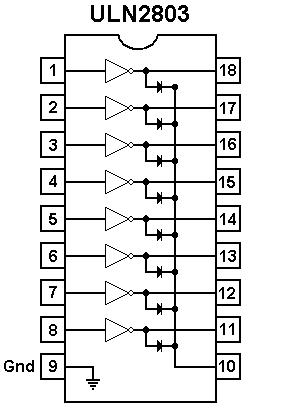
About transistors, next evolution is to replace the serie of transistors by a transistor array like a uln2803a.

74HC595_3_bb


And now the arduino sketch.

note : all led on =b11111111 (255), 7 led on =b0111111, 6 led on=b00111111, etc …

//the pins we are using
int latchPin = 2;
int clockPin = 3;
int dataPin = 4;
 
void setup() {
  //set all the pins used to talk to the chip
  //as output pins so we can write to them
  pinMode(latchPin, OUTPUT);
  pinMode(clockPin, OUTPUT);
  pinMode(dataPin, OUTPUT);
}
 
void loop() {
  for (int i = 0; i < 8; i++) {
 
    //take the latchPin low so the LEDs don't change while we are writing data
    digitalWrite(latchPin, LOW);
 
    //shift out the bits
    shiftOut(dataPin, clockPin, MSBFIRST, i);  
 
    //take the latch pin high so the pins reflect
    //the data we have sent
    digitalWrite(latchPin, HIGH);

    // pause before next value:
    delay(1000);
  }
}
Juin 052014
 

A common mistake with Arduino beginners is to use the board to deliver power .
Altough it is ok for small devices such as sensors, leds, etc, it can only deliver 40ma (per pins) which wont work for more needy devices such as motors.

There comes the transistor which lets a small current control a much larger one and your Arduino can therefore manage devices which are power supplied from a separate source.
There are 2 sort of transistors : the PNP and the NPN.
The PNP will turn on with a LOW signal whereas the NPN will turn with a HIGH signal.

A transistor has 3 pins (looking at the labelled / flat side), from left to right : (C) the collector, (B) the base, (E) the emitter.
The collector is connected to the negative pin of the device. (the positive pin of the device being connected to the positive power supply)
The base is connected to the digital pin of the arduino.
The emitter is connected to the ground.

NPNvsPNP

See below the wiring

transistor2_bb

The the Arduino sketch is rather simple

int Pin = 9;

void setup(){
pinMode(Pin, OUTPUT);
}

void loop(){
digitalWrite(Pin, HIGH);
delay(2000);
digitalWrite(Pin, LOW);
delay(2000);

}
 Posted by at 13 h 34 min