Oct 292023
 

Get your binaries from here.

On your source host, generate a ssh key pair (private and public) : ssh-keygen

Copy your public key on your target host

Add your public key to authorized keys on your target host : cat id_rsa.pub >> .ssh/authorized_keys

SFTP from your source to target host using your private key : sftp –ip=192.168.1.126 –username=jeedom –privatekey=%homepath%\.ssh\id_rsa –local_filename=readme.md –command=put –debug=true

SSH from your source to target host using your private key : ssh –ip=192.168.1.126 –username=jeedom –privatekey=%homepath%\.ssh\id_rsa –debug=true

Note1 : libssh2 will accept private keys in both format (RSA PRIVATE KEY or OPENSSH PRIVATE KEY)

Note2 : on linux, you can convert a public key generated by OpenSSL (in PEM format) to OpenSSH

ssh-keygen -i -m PKCS8 -f public.pem > public.pub

Note3 : libssh2 will accept public keys in OpenSSH format only (but will manage to derive the public key from the private key if you dont provide the public key)

Note4:

You can push your public key like below:

ssh –ip=192.168.1.126 –username=jeedom –password=Mjeedom96 –put –filename=id_rsa.pub

ssh –ip=192.168.1.126 –username=jeedom –password=Mjeedom96 –delay=250 –command= »cat id_rsa.pub >> .ssh/authorized_keys »

or

echo « cat id_rsa.pub >> .ssh/authorized_keys » | ssh –ip=192.168.1.126 –username=jeedom –password=Mjeedom96

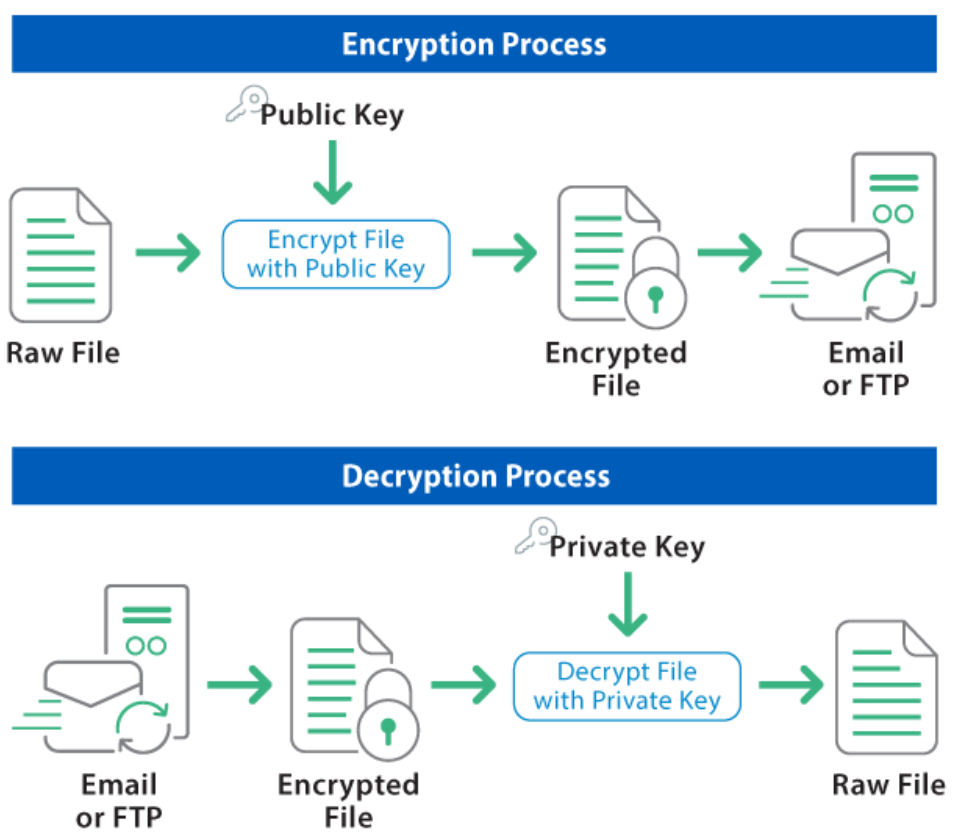
Oct 282023
 

On both hosts:

Install GPG (download from here)

Generate a key pair : gpg –gen-key

List your public keys : gpg –list-keys (optional)

List your secret/private keys : gpg –list-secret-keys (optional)

On the host encrypting (aka the source):

Import your target key (i.e from the host that will decrypt) : gpg –import target.key

Ensure that you have the public key of the target in your trust store : gpg –list-keys

Encrypt your file with the target public key : gpg -e -r target message.txt (or gpg –always-trust -e -r target message.txt if you dont want to be bothered by the public key not being trusted)

note : more details here about user interaction.

On the host decrypting (aka the target):

Export your public key : gpg –export > target.key (to be shared with the source host encrypting)

Decrypt the file with the secret/private key : gpg message.txt.gpg

Jan 172020
 

In previous articles we have seen how to decrypt dpapi blobs.

Dpapi blobs are not always stored in file blobs.
They can be stored in different places like registry, config file, etc and in various formats such as hexadecimal string, but also base64 strings, etc.

Lets have a look at how Windows stores wifi passwords.

These are stored in xml files in C:\ProgramData\Microsoft\Wlansvc\Profiles\Interfaces.
You can easily be found with : dir %programdata% /s /a /b | findstr /i interfaces.

When logged as the user, you can decrypt it with the below command :

NTHASH-win64 /wlansvc /binary:C:\ProgramData\Microsoft\Wlansvc\Profiles\Interfaces\{2799BE4D-A2D4-417D-A774-481DBE1FF7FC}\{98B3A77A-3A5A-44A1-81AE-DDB88A168B24}.xml /system

Good news is that we can also decrypt it these offline.

Run the above command.
NTHASH will tell you that it failed to decrypt it BUT it will dump the blob to data.blob.

From there (and using the same steps as in this article):
-use /decodeblob to identify the masterkey guid
-use /decodemk to decrypt the masterkey (locate it with dir %systemroot%\System32\Microsoft\Protect /s /a /b | findstr /i myguid) using the dpapi system key.
-use /decodeblob again but this time supplying the SHA1 key obtained in previous step
-done 🙂

Juil 252019
 

Create your own filesystem and mount it as either a logical drive or folder. Dokan (https://github.com/dokan-dev/dokany)

Below a simple command line to mount a zip archive on X:
mount.exe /r test.zip /l x /x proxy_7zip.dll

Mount.exe is a generic code/binary independant of the filesystem you wish to create.
The filesystem is implemented in a proxy/dll.

Source code and binaries is available here.

7zip proxy example is here.

NFS proxy example is here.

Screenshot

Juil 252019
 

I had done a few proxies for ImDisk in the past based on the libyal libraries (vmdkqcowvhdewf).

This time, as the VDI image format is quite simple, I made my own proxy for VDI images.

Imdisk + Discutils could achieve the same except that discutils requires .Net 4.0 which is not always available.

As always the command line :

« server » -> devio –dll=proxy.dll;dllopen shm:test_proxy c:\temp\freedos.vdi
« client » -> imdisk -a -t proxy -o shm -o ro -f test_proxy -m x:
Use the start command in front of devio if you want to stuff it all in one batch.

Download/Discuss here.

Juil 222019
 

A demo to run a encrypted xored encrypted PE within the memory of another PE (and therefore possibly bypass anti virus softwares)

See https://github.com/erwan2212/XOR-freepascal about xoring / encrypting a file.

Code is currently set to use cmd.exe (x86/x64) as target host.

host32.exe/host64.exe are also provided in the zip if you wish the modify the code to use a « neutral » host.

Source code and binaries can be found here.

Avr 242019
 

How to rebuild libvmdk (and possibly any VC project) so that it depends on msvcrt.dll and no longer on msvcrtxxx.dll.

Copy/paste from this post for archiving.

-first install VC2008 express (but should be OK with VC2010 express and possibly newer VS platforms)

-install WDK 7.1

-modify your VC2008 IDE settings search paths (include and libraries) by adding WDK 7.1 paths first in the list

XuK0hGN.png

seLkgHG.png

-add msvcrt « legacy translator » library (msvcrt_win2000.obj) to Linker -> Input -> Additional Dependencies for both DLL projects (zlib and libvmdk)

ExRxofS.png

-add specific preprocessor definitions to zlib project :

vsnprintf=_vsnprintf;snwprintf=_snwprintf;open=_open;read=_read;close=_close;write=_write

neDR5uv.png?1

And voila :)

You should end up with the below, i.e a dependency to a msvcrt.dll

lcahBQh.png

Fév 222019
 

Still playing with Windivert (see original article here), this time we will intercept inbound dns traffic and will modify the IP address in DNS replies containing A records.

The program will dynamically look for hostname to ip couples in a config.ini file.

Say that you want labalec.fr to resolve to 192.168.1.144, then you would create the below ini file and launch intercept-dns 53.


[labalec.fr]
ip=192.168.1.144

Additionally, if you set a dos environement variable like set layer=forward, then you can also use this program in a man-in-the-middle attack (which could lead to another article) to divert forwarded traffic.

The source and binary is available on my github.

The code still has some limitations :
-non existing dns a records replies are not handled
-only replies with one answer are handled

Fév 182019
 

Last article of a series of 4 articles.

This time, we will push it a bit further on the certificate side (using SAN field) as modern browsers like Chrome demand this field :

-divert dns traffic to a rogue local dns server : see here

-spoof a remote hostname with our local ip (using tool in step above) – these 2 steps could be skipped if you modify your local hosts file.

-setup a https server locally with a « self signed » certificate (see below)

First our root ca (dont forget to add in your ca store):
openssl genrsa -out rootCA.key 2048
openssl req -x509 -new -nodes -key rootCA.key -sha256 -days 1024 -out rootCA.pem

Lets add it to our root certificate authorities : certutil -enterprise -f -v -addstore « root » rootCA.pem

Second our CSR:
modify our openssl.cnf accordingly : add subjectAltName=DNS:fakedomain.com,DNS:*.fakedomain.com under section v3_req
set the path to your your cnf file with set OPENSSL_CONF=c:\_apps\OpenSSL\ssl\openssl.cnf
generate your csr
openssl genrsa -out device.key 2048
openssl req -new -key device.key -out fakedomain.csr

About the CN, enter « fakedomain.com »

Last, our CRT (the trick is is to point at your cnf or else the SAN field will not be taken care of)
openssl x509 -req -in fakedomain.csr -CA rootCA.pem -CAkey rootCA.key -CAcreateserial -out fakedomain.crt -days 500 -sha256 -extfile c:\_apps\openssl\ssl\openssl.cnf

And tada, launch your chrome browser and browse https://www.fakedomain.com/ and chrome will be happy.

note:

alternative to create a server cert:

openssl req -new -newkey rsa:4096 -days 365 -nodes -x509 -keyout rsaprivate.key -out servercertificate.crt

cat rsaprivate.key servercertificate.crt > my.pem