You have settled a new disk as « dynamic disk » and now you want to go back to basic disk.
But the option is grayed out in the windows disk manager console.
Lets see how to revert to basic disk without losing data, with CloneDisk.
This procedure applies to a MBR disk but a similar procedure can be performed on GPT disk.
Warning here : if you work on a production disk/system, please do a backup/snapshot to eventually be able to roll back your changes.
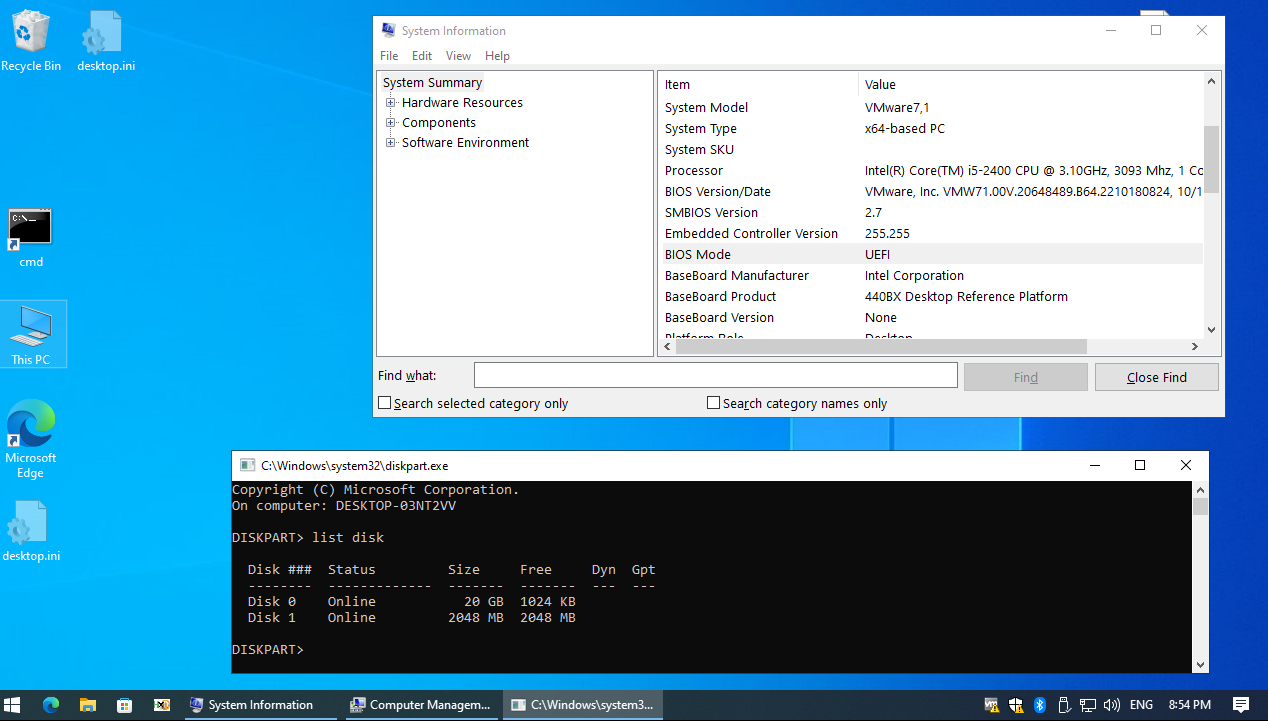
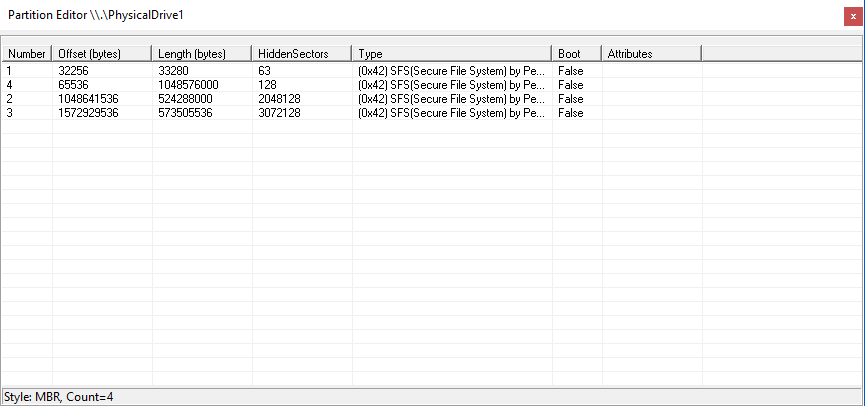
First you want to check the partition table : indeed, you do need a partition table to perform this operation and if your disk is a « data » disk, i.e not a « system » disk, your dynamic disk most probably does not have a partition table to match your existing volumes.
See the below screenshots :
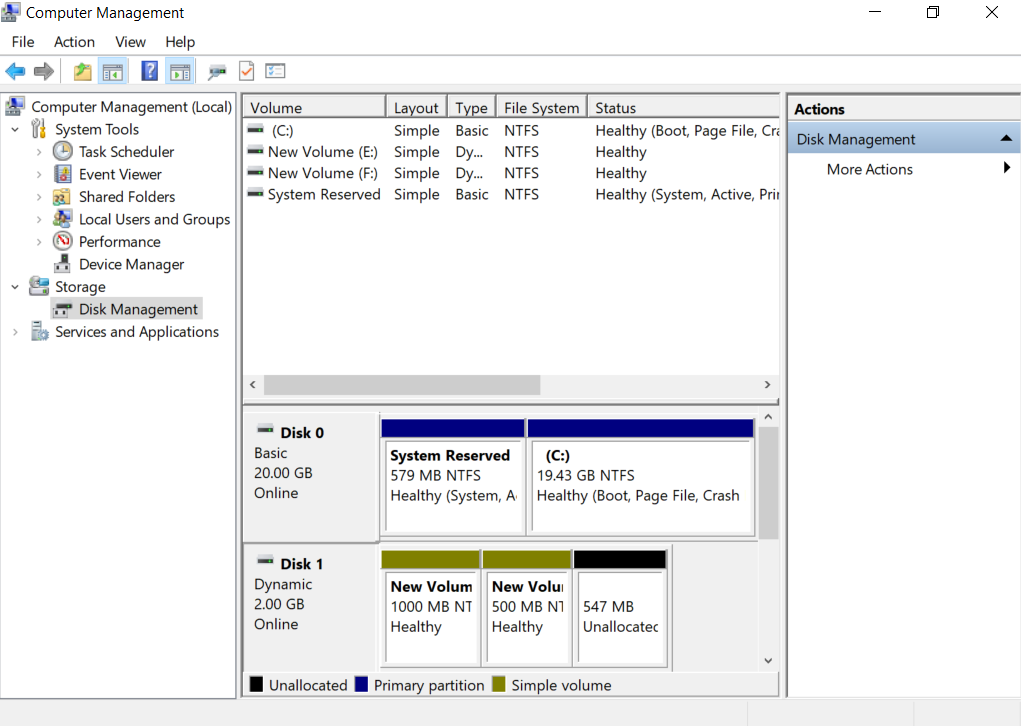
-we have 2 disks (0 & 1) : one basic (system) and one dynamic (data)
-we have 4 volumes (2 on each disk)
-second disk (disk 1) does not have a partition table reflecting its volumes (since it is a dynamic disk)
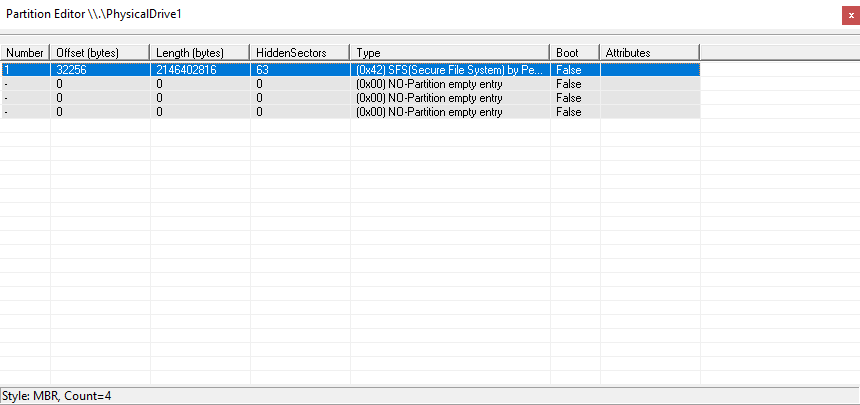
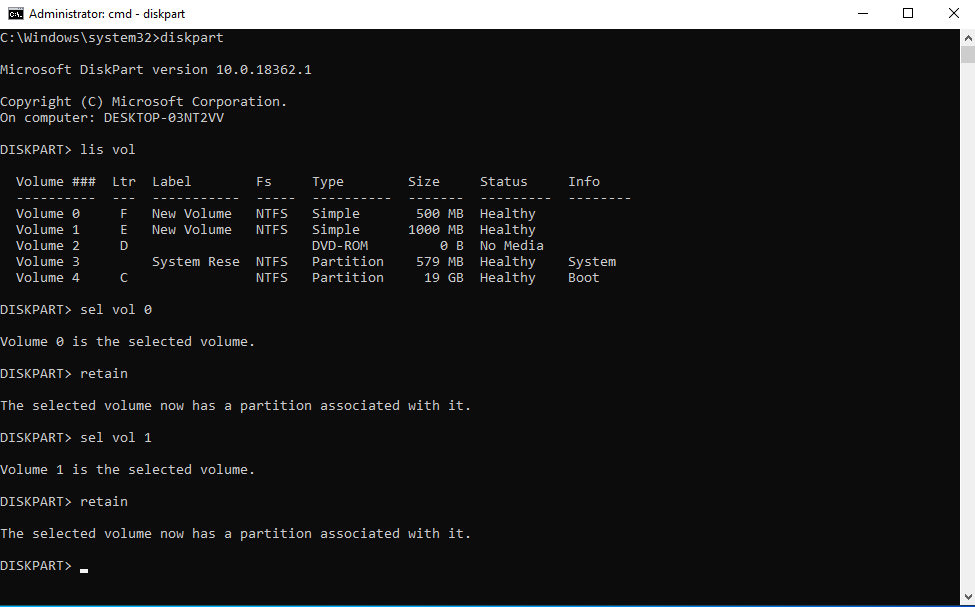
You need to use the « RETAIN » diskpart command to instruct your system to create a partition table for your volumes.
Note that most probably you would not need to perform this task if your disk is a « system » one (partition table will have been taken care of already by the system).
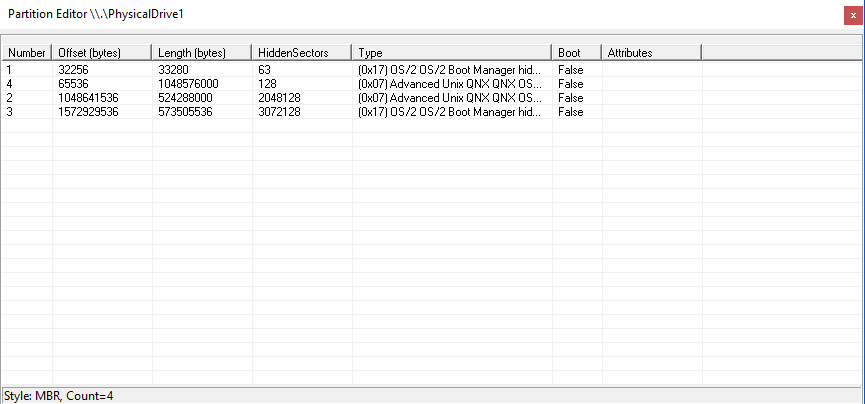
Now, lets have a look at the partition table again.
Much better 🙂
Now lets change the partition type for all partition (0x42 indicating a dynamic disk).
We will change our partitions (here number 4 and 2) to 0x7 aka IFS (for NTFS) and we will hide « dummy » partitions (a left over from the dynamic disk) to 0x17 aka Hidden IFS.
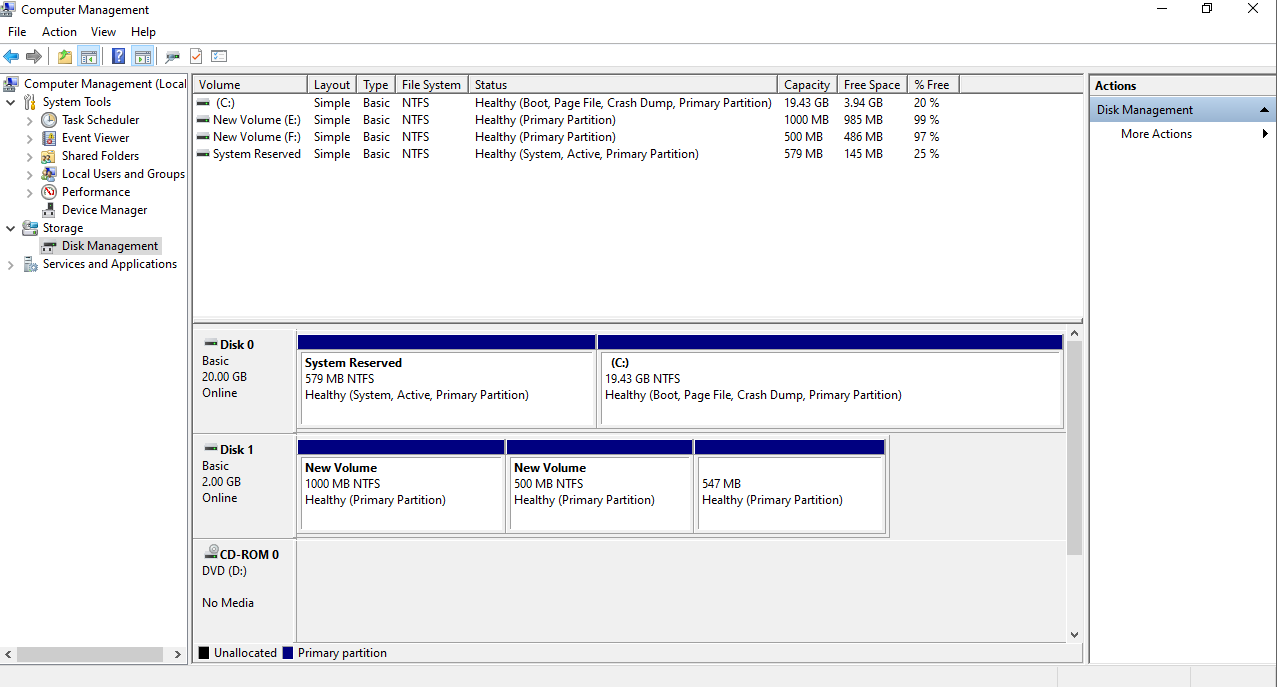
And we will do a offline/online to force the system to refresh its disk (we could/should actually also have performed this change offline and go online once done).
Now lets check our disk management console again and « tada » : our dynamic disk was reverted back to a basic disk 🙂
A while ago, we have seen here how we could play with vhd differencing disks and starwind san free product.
However, the poor scripting capabilities of starwind san free associated with a strict licensing model renders this solution dodgy.
Today lets see how we achieve a better solution with powershell and windows iscsi target capabilities.
First lest have at the script below : all it does is create an iscsi target for the incoming requests if the target does not exist yet thus enabling one to boot many client devices from one unique parent/master.
Note : creating your master image (i.e a windows that can boot over the network using iscsi is not in scope here).
Lets first run tiny pxe server (as admin since we will be calling some low level powershell scripts) and lets call our powershell script from a remote device like this : http://192.168.1.147/iscsi.ps1?aa-bb-cc-dd-ee-ff (replace the ip with whatever your iscsi target is).
You should get a result like this in your browser:
#!ipxe
clear net0.dhcp/gateway:ipv4
set gateway 0.0.0.0
set initiator-iqn iqn.2006-11.1
set keep-san 1
set target ${next-server}
echo TargetName:  aa-bb-cc-dd-ee-ff
echo vhdpath:  C:\_images\aa-bb-cc-dd-ee-ff.vhd
echo iqn:  iqn.1991-05.com.microsoft:aa-bb-cc-dd-ee-ff
echo iscsi target configured, enjoy !
sanboot --keep iscsi:${target}:tcp:3260:0:iqn.1991-05.com.microsoft:aa-bb-cc-dd-ee-ff
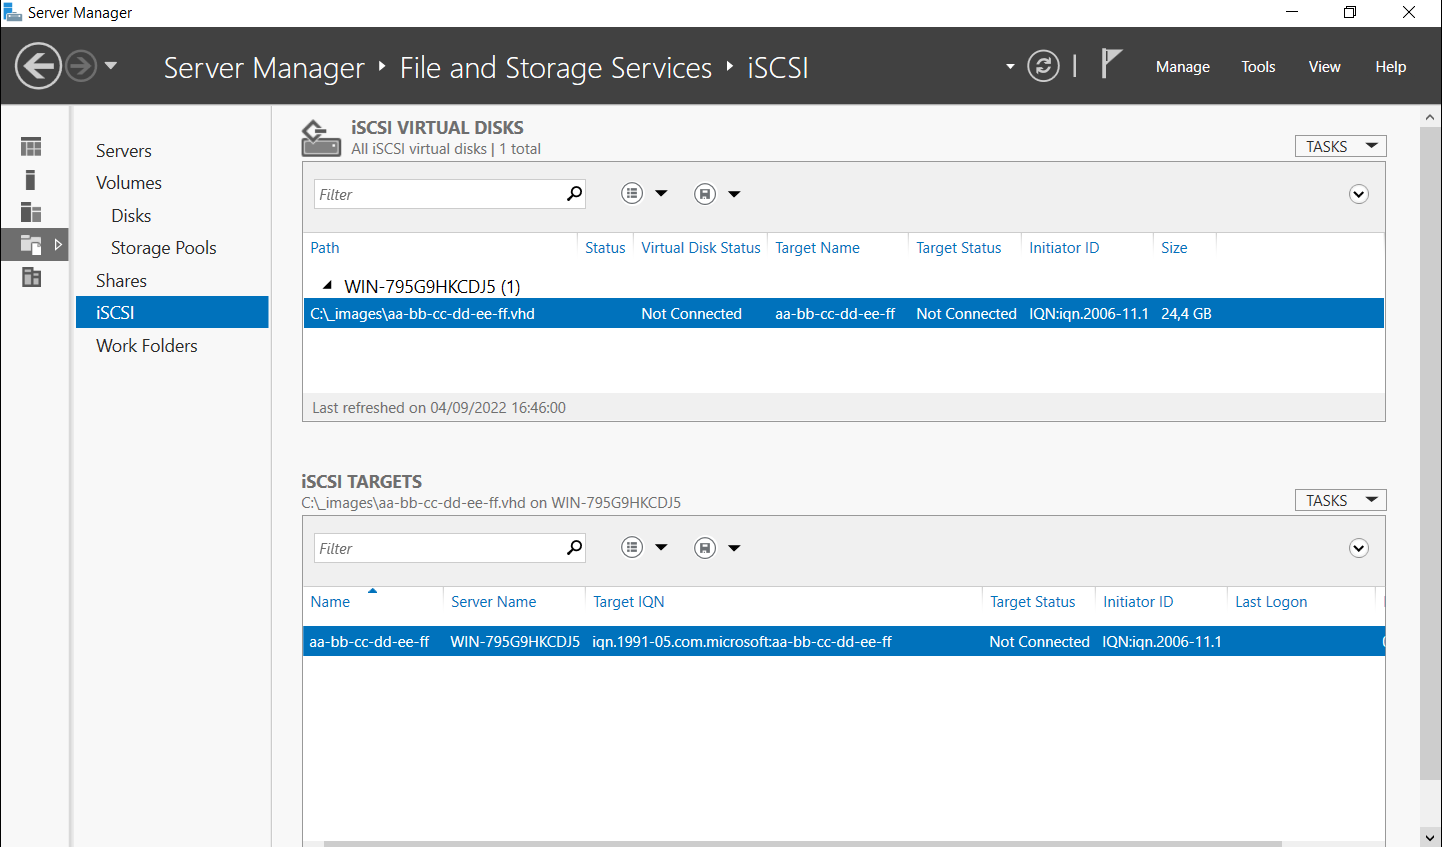
And your iscsi target should look like this :
You are now ready to boot your devices by setting your second stage bootloader in TPS like this : http://@opt54/iscsi.ps1?@mac .
Every pxe boot device will get a new image if it dos not exist yet or will boot from its image if it exists.
side notes:
-when cloning an existing system to iscsi, you may want to disable LWF (browse to \SYSTEM\CurrentControlSet\Control\Class\{4D36E972-E325-11CE-BFC1-08002BE10318}, identify your nic, and remove any line containing {B70D6460-3635-4D42-B866-B8AB1A24454C})
-when installing a new system to iscsi, you may want to disable PagingFiles (browse to \SYSTEM\ControlSet001\Control\Session Manager\Memory Management and clear the string « PagingFiles ») – tip here, use setup.exe /noreboot from winpe and then use regedit to open your \windows\system32\config\system hive.
On the command line :
-Lets create a volume shadow copy : vscsc.exe -wait f:
In CloneDisk :
-lets assign a x: logical drive letter to our shadow volume copy (step 1 below) -> this step is optional
-lets backup this x: logical drive, or dosdevice if you did not assign a letter, to a file (step 2 below)
You can now restore from this file but also open it in 7zip, mount it with imdisk, etc.
Supports multi-boot iso : x86 and EFI.
Support ISO9660, UDF, Joliet or any combination of these 3 filesystems.
Supports isolinux (checksum will be taken care of).
Tested successfully with Grub4Dos.
Mkiso is native (no external dependencies), standalone, built in on windows builtin imapi2.