Mar 292014
 

Lately I had cloned a physical XP installation to run it into VirtualBox.

It went fine except for the network drivers.

Rather than looking for the right driver over internet (which can be a painful process sometimes) I decided to use DriverPacks and dpinst from Microsoft.

1-Download the proper driverpack (lan, wlan, storage, etc) for the correct O.S (nt5,nt6,x86,x64).
2-Unzip it to a folder (c:\drivers for exemple).
Note1 : I mounted my disk image offline to inject my files.
Note2 : for a physical machine, best would be to stuff it all on a USB key.
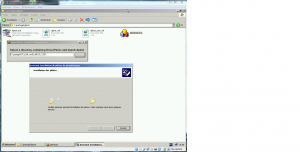
3-And run dpinst from the command line (dpinst /path c:\drivers) OR use my GUI (here) to make it easier.

And voila, all needed drivers will be installed 🙂

dpinst

 Posted by at 18 h 49 min
Mar 232014
 

This is IpTools Version 2.

Version 1 started in 1999 (initially written in VB6, then rewritten in Delphi).
The developpement was very active at first (the first 6 years).
Then life went busy and the tool did not evolve much apart from bug fixes.
Original page for version 1 is here.

I have decided to give it a second chance, first in rewritting completely the interface which was initially build around a network sniffer.
I also removed all screens which I believe were not related to network matters.
Next step is to review all components used and migrate to Delphi XE 32/64 bits.

The tool is now divided in 6 categories (for now) over 50 screens (!) :
-Scan
-Microsoft Services
-System
-Servers
-Clients
-Spoof

Here below some screenshot which should be self explanatory :

iptoolsv2_6

iptoolsv2_5

iptoolsv2_4

iptoolsv2_3

iptoolsv2_2

iptoolsv2_1

Download it here
Contact me here

 Posted by at 20 h 52 min
Mar 162014
 

I got myself a rotary potentiometer at dx.com and decided to come up with a basic article.

First, lets have a quick look at the below schematic to understand how a potentiometer works.

analogin_potentiometer


Now, lets plug it to our arduino and while we are it, lets use its retrieved value (thru analogread) to dim a led (thru analogwrite).

potentiemter_bb


Now lets have a look at the arduino sketch


byte potPin=0; //Analog 0 connected to the potentiometer
byte LEDPin=6; //Connected to LED on Pin 6
float potValue=0; //Value returned from the potentiometer
float v=0; //voltage (0-5v)

void setup(){
  Serial.begin(9600);
  pinMode(LEDPin, OUTPUT); //Set Pin 6 as an Output
}
 
void loop(){
  
  potValue = analogRead(potPin)/4; //Read the potentiometer, convert it to 0 - 255
  Serial.println(potValue,0);
  v=potValue*5/255; //to calculate the voltage send out on pin6
  Serial.println(v, 2);
  analogWrite(LEDPin, potValue); //Write the converted potentiometer value to LED pin
  delay(100);
}

here we go : rotate your potentiometer and see your led dim in and out

 Posted by at 16 h 53 min
Mar 152014
 

This is a simple GUI to FSCTL_GET_RETRIEVAL_POINTERS Microsoft API.

The idea is to read all clusters belonging to a file, then map these clusters on the logical drive where this file is located, and from there re assemble all clusters and save them to a new destination file.

Thanks to this method, one can save/copy a file which is in use since we « raw » read clusters from a logical drive.

This has been tested with success on \boot\bcd and \windows\system32\config\sam, files which you cannot copy in a « normal » mode.

Beware that using this method, you could end up with a corrupted dump since the file could be modified while you are reading it.

Get it on github here.

extents

 Posted by at 16 h 15 min
Mar 142014
 

In a previous article, I played with an arduino combined with a TI CC1101.

The CC1101 is a great and cheap chip to send datas over the air at frequencies below 1ghz, using different modulations.
You can tweak a great many options which should make this chip work with many other devices.

I had been looking for weeks (months actually…) to use ASK/OOK modulation in order to link it with my chacon temperature/humidity sensors or even with my RFXTRX433 (from RFXCOM).

It seems I finally managed to find the right settings for ASK/OOK : my two devices now talk to each other (@433mhz) using this modulation 🙂

I believe I am still a long way from talking to my chacon or rfxcom devices but still, I made some progress.

Before I forget, here below my settings : it could be helpful for some other geeks out there.

Now if someone out there manage to interface his cc1101 with an ASK/OOK device, please let me know !

/*
# Sync word qualifier mode = 30/32 sync word bits detected
# CRC autoflush = false
# Channel spacing = 199.951172
# Data format = Normal mode
# Data rate = 4.79794
# RX filter BW = 101.562500
# PA ramping = false
# Preamble count = 4
# Whitening = false
# Address config = No address check
# Carrier frequency = 433.919830
# Device address = 0
# TX power = 0
# Manchester enable = true
# CRC enable = true
# Deviation = 25.390625
# Packet length mode = Variable packet length mode. Packet length configured by the first byte after sync word
# Packet length = 255
# Modulation format = ASK/OOK
# Base frequency = 433.919830
# Channel number = 0
*/
void config2()
{
byte PA_TABLE[]= {0x00,0x60,0x00,0x00,0x00,0x00,0x00,0x00,};

cc1101.writeReg(CC1101_IOCFG0,0x06);
cc1101.writeReg(CC1101_FIFOTHR,0x47);
cc1101.writeReg(CC1101_PKTCTRL0,0x05);
cc1101.writeReg(CC1101_FSCTRL1,0x06);
cc1101.writeReg(CC1101_FREQ2,0x10);
cc1101.writeReg(CC1101_FREQ1,0xB1);
cc1101.writeReg(CC1101_FREQ0,0x3B);
cc1101.writeReg(CC1101_MDMCFG4,0xF5);
cc1101.writeReg(CC1101_MDMCFG3,0x83);
cc1101.writeReg(CC1101_MDMCFG2,0x33);
cc1101.writeReg(CC1101_DEVIATN,0x15);
cc1101.writeReg(CC1101_MCSM0,0x18);
cc1101.writeReg(CC1101_FOCCFG,0x16);
cc1101.writeReg(CC1101_WORCTRL,0xFB);
cc1101.writeReg(CC1101_FREND0,0x11);
cc1101.writeReg(CC1101_FSCAL3,0xE9);
cc1101.writeReg(CC1101_FSCAL2,0x2A);
cc1101.writeReg(CC1101_FSCAL1,0x00);
cc1101.writeReg(CC1101_FSCAL0,0x1F);
cc1101.writeReg(CC1101_TEST2,0x81);
cc1101.writeReg(CC1101_TEST1,0x35);
cc1101.writeReg(CC1101_TEST0,0x09);

//thid 1 is needed otherwise only first packets has data
cc1101.writeReg(0x07,0x00); // packet automation control

//notice the burst mode to write beyong the first position (0) ...
cc1101.writeBurstReg(CC1101_PATABLE,PA_TABLE,8);
}
 Posted by at 19 h 24 min
Mar 142014
 

I recentely got myself a cheap laser tag at dx.com.

I decided to test the following : a laser detector, i.e detect thru a photo resistor (also called light dependent resistor) when my laser beam is interrupted.

First lets have a look at the wiring

LDR_bb

Then lets have a look at the code (change the extension to ino or pde) : laser_detector

And last, lets see it run : see the led going off each time our laser beam gets away from the photo resistor.

 Posted by at 15 h 36 min
Mar 122014
 

About SystemRescueCD :

Description: SystemRescueCd is a Linux system rescue disk available as a bootable CD-ROM or USB stick for administrating or repairing your system and data after a crash. It aims to provide an easy way to carry out admin tasks on your computer, such as creating and editing the hard disk partitions. It comes with a lot of linux software such as system tools (parted, partimage, fstools, …) and basic tools (editors, midnight commander, network tools). It can be used for both Linux and windows computers, and on desktops as well as servers. This rescue system requires no installation as it can be booted from a CD/DVD drive or USB stick, but it can be installed on the hard disk if you wish. The kernel supports all important file systems (ext2/ext3/ext4, reiserfs, btrfs, xfs, jfs, vfat, ntfs), as well as network filesystems (samba and nfs).

Now as you have understood by now, whenever I can, I skip burning CD/DVD’s and will at worse use a USB stick or at best use PXE Boot.

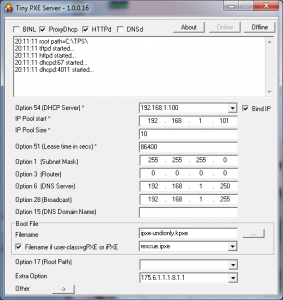
Lets use TinyPXE Server + iPXE.

First lets prepare our iPXE script (save it to rescue.ipxe)


#!ipxe
set boot-url http://${next-server}
kernel ${boot-url}/sysrcd-4.1.0/isolinux/rescue32 dodhcp netboot=${boot-url}/sysrcd-4.1.0/sysrcd.dat
initrd ${boot-url}/sysrcd-4.1.0/isolinux/initram.igz
boot

Then lets prepare our files

Extrat the content of SystemRescueCD iso to /sysrcd-4.1.0, next to TinyPXE Server.
You can use 7Zip for this operation.

Now, lets setup TinyPXE Server

rescue

Now, lets boot !

 Posted by at 20 h 20 min
Mar 112014
 

In previous article, we have seen how to make a bootable disk image using CloneDisk.

Lets see now how to boot this disk image thru PXE boot with TinyPXE Server.

1-Prepare the the IPXE script
2-Setup TinyPXE Server
3-PXE Boot !

1-Prepare the IPXE script and save it as disk.ipxe

Pretty simple

#!ipxe
set boot-url http://${next-server}
initrd ${boot-url}/test.vhd
kernel ${boot-url}/memdisk raw
boot

2-Setup TinyPXE Server

Next to pxesrv.exe, in the same folder, you must have the following files :
-disk.ipxe (see previous item)
-ipxe-undionly.kpxe (in TPS zip file)
-memdisk (in TPS zip file)
-test.vhd (see previous article)

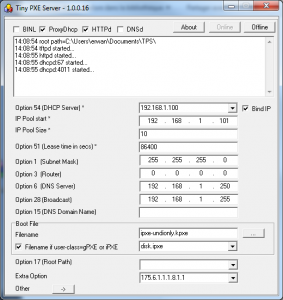
Now set TinyPXE Server as follow

tps_howto1

3-PXE boot

 Posted by at 14 h 15 min
Mar 112014
 

There are times where you need to make a bootable disk image, to boot from pxe, or from a boot loader (grub4dos, ms bootmgr, etc).

Lets see how to make it quick and easy with CloneDisk :

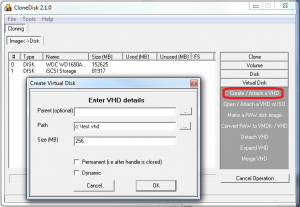
1-Lets create and attach a virtual disk
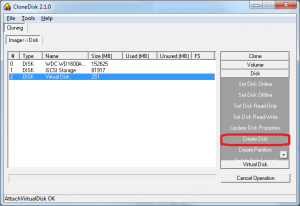
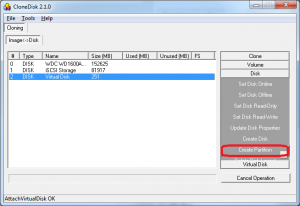
2-Lets create a disk
3-Lets create a partition
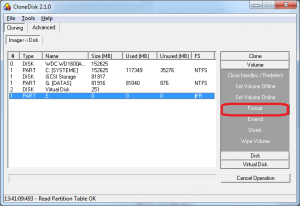
4-Lets format it
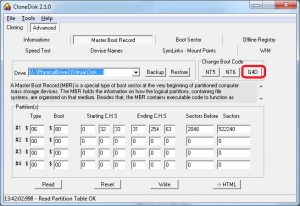
5-Lets install grub4dos as bootloader
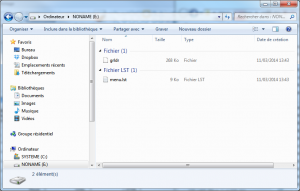
6-Lets copy/paste grldr and menu.lst

1-Lets create and attach a virtual disk
->ignore the parent field
->fill in the path field
->indicate the size (in MB)
->lets go for a fixed one (vs dynamic)

clonedisk_howto1

2-Lets create a disk (i.e initialise)

clonedisk_howto2

3-Lets create a partition
->CloneDisk will use the whole disk size and will make the partition active

clonedisk_howto3

4-Lets format it (FAT or FAT32, NTFS works too)

clonedisk_howto4

5-Lets install grub4dos as bootloader in the MBR

clonedisk_howto5

6-Do not close CloneDisk yet (or else your new virtual logical drive will away) and copy/paste grldr and menu.lst (in CloneDisk zip file)

clonedisk_howto6

You got yourself a bootable disk image, feel free to add your own content.
Even better, since we used a VHD format, you can later on expand this virtual disk.

In a next tutorial, we will see how to PXE boot this virtual disk.

 Posted by at 13 h 46 min
Mar 102014
 

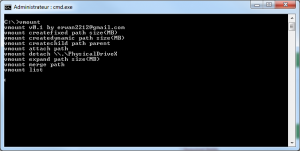
For some time I needed a tool to create, attach, detach, etc MS Virtual Disk HardDrives (VHD) from the command line.
Sure I could do it using diskpart or MS VhdMount but I was always lacking this or that…

Therefore, based on CloneDisk source code, I took 5 mns to write vMount.
It uses MS native virtdisk API available with Windows 7 (x86/x64) and up

Command line arguments :

vmount createfixed path_to_vhd size(MB)
vmount createdynamic path_to_vhd size(MB)
vmount createchild path_to_child path_to_parent
vmount attach path_to_vhd [NOLETTER]
vmount attach path_to_iso
vmount detach \\.\PhysicalDriveX
vmount detach path_to_vhd
vmount expand path_to_vhd size(MB)
vmount compact path_to_vhd
vmount merge path_to_child
vmount disks [filter]
vmount partitions [filter]
vmount mount x: \device\harddiskX\partitionX
vmount umount letter
vmount online disk_id
vmount offline disk_id
vmount ro disk_id
vmount rw disk_id
vmount attributes disk_id

Regards,
Erwan

Discuss it here.
vmount

 Posted by at 21 h 45 min