Mar 122014
 

About SystemRescueCD :

Description: SystemRescueCd is a Linux system rescue disk available as a bootable CD-ROM or USB stick for administrating or repairing your system and data after a crash. It aims to provide an easy way to carry out admin tasks on your computer, such as creating and editing the hard disk partitions. It comes with a lot of linux software such as system tools (parted, partimage, fstools, …) and basic tools (editors, midnight commander, network tools). It can be used for both Linux and windows computers, and on desktops as well as servers. This rescue system requires no installation as it can be booted from a CD/DVD drive or USB stick, but it can be installed on the hard disk if you wish. The kernel supports all important file systems (ext2/ext3/ext4, reiserfs, btrfs, xfs, jfs, vfat, ntfs), as well as network filesystems (samba and nfs).

Now as you have understood by now, whenever I can, I skip burning CD/DVD’s and will at worse use a USB stick or at best use PXE Boot.

Lets use TinyPXE Server + iPXE.

First lets prepare our iPXE script (save it to rescue.ipxe)


#!ipxe
set boot-url http://${next-server}
kernel ${boot-url}/sysrcd-4.1.0/isolinux/rescue32 dodhcp netboot=${boot-url}/sysrcd-4.1.0/sysrcd.dat
initrd ${boot-url}/sysrcd-4.1.0/isolinux/initram.igz
boot

Then lets prepare our files

Extrat the content of SystemRescueCD iso to /sysrcd-4.1.0, next to TinyPXE Server.
You can use 7Zip for this operation.

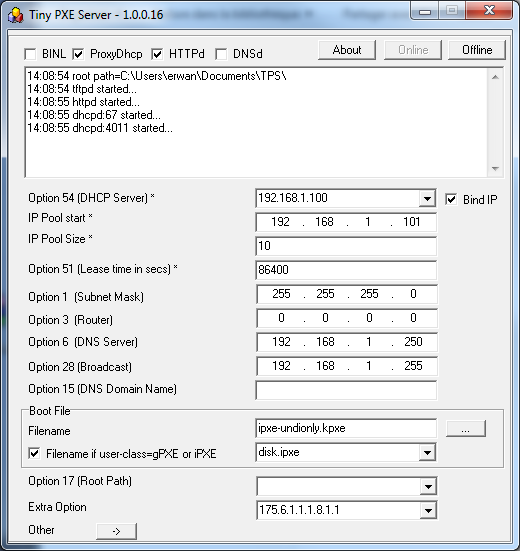
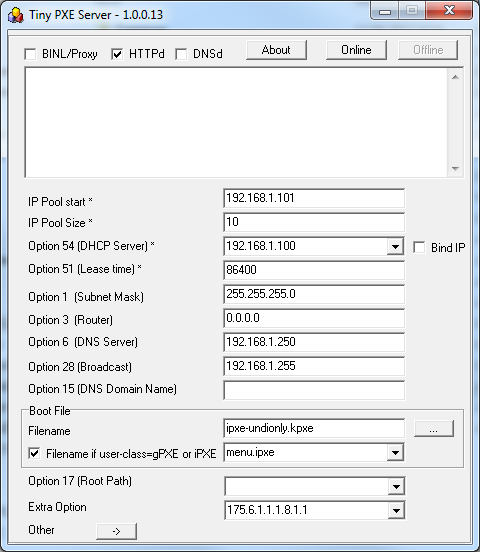
Now, lets setup TinyPXE Server
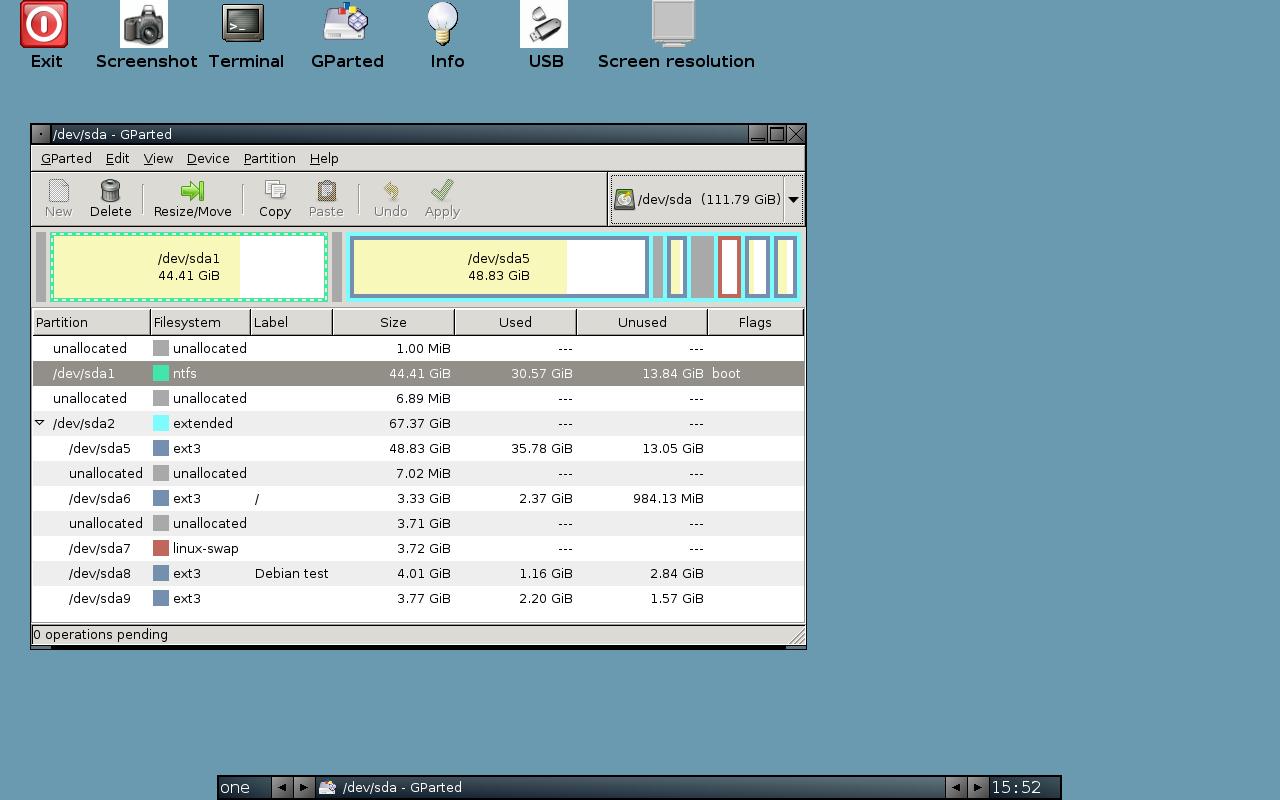
rescue

Now, lets boot !

 Posted by at 20 h 20 min
Mar 112014
 

In previous article, we have seen how to make a bootable disk image using CloneDisk.

Lets see now how to boot this disk image thru PXE boot with TinyPXE Server.

1-Prepare the the IPXE script
2-Setup TinyPXE Server
3-PXE Boot !

1-Prepare the IPXE script and save it as disk.ipxe

Pretty simple

#!ipxe
set boot-url http://${next-server}
initrd ${boot-url}/test.vhd
kernel ${boot-url}/memdisk raw
boot

2-Setup TinyPXE Server

Next to pxesrv.exe, in the same folder, you must have the following files :
-disk.ipxe (see previous item)
-ipxe-undionly.kpxe (in TPS zip file)
-memdisk (in TPS zip file)
-test.vhd (see previous article)

Now set TinyPXE Server as follow

tps_howto1

3-PXE boot

 Posted by at 14 h 15 min
Jan 112014
 

There are times where you may not have a dvd drive or media available, or else, you may also want to perform some tasks before triggering the windows setup.

Agenda

  • Prepare winpe with QuickPE
  • Prepare the ipxe script
  • Prepare the PXE server with TinyPxe Server
  • Boot to winpe and Install windows
  • Reboot and complete the installation on the local drive

Prepare winpe with QuickPE

You can either use MS WAIK (winpe3), or MS ADK (winpe4) or an existing windows setup DVD or ISO file.
Launch _run_me.cmd and make your choice.

quickpe_menu

Prepare the ipxe script

The following will attach an iscsi drive and will boot your winpe


#!ipxe
dhcp net0
set boot-url http://${dhcp-server}
initrd ${boot-url}/images/winpe4.iso
kernel ${boot-url}/memdisk iso raw
boot

Prepare the PXE server with TinyPxe Server

Use ipxe-undionly.kpxe as « boot file name » and the above script (name it install.ipxe) as « filename if user-class=iPXE »

tinypxeserver

Boot to Winpe

Now lets network boot (pxe as first device in the bios).
Computer will pxe boot, load ipxe, then load your script.
The script will boot into winpe.

Now we are ready to perform the installation : map a drive thanks to PeNetwork (in the tinyshell launchbar) and map a network share containing your windows installation files.
You could eventually script this part (in batch file) :

net use \\servername\sharename /user:username password
\\servername\sharename\setup.exe

Note1 : CloneDisk can also mount a virtual dvd drive from an iso file (only in winpe4).

Note2 : Rather than launching the setup.exe from the windows DVD, you can also apply a wim file to the target drive using imagex (or clonedisk).
If so, then remember that you need to prepare the drive (partition active, boot sector …).
Example code using imagex (we’ll assume the partition has been made active already) :

Imagex /apply \\servername\sharename\install.wim 1 c:
bcdboot c:\windows /s c:
bootsect /nt60 c: /mbr

Launch the windows setup and let it run.

Reboot to local drive

Windows should the complete the installation, and reboot one last to your windows desktop.

See below a video demonstrating the above steps.

 Posted by at 14 h 51 min
Oct 162013
 

Here below a step by step to PXE boot Linux Mint over NFS

needed :
ipxe
tiny pxe server
winnfsd
Mint

1/Prepare the Linux Mint files

open mint.iso in winrar (or any other iso reading capable tool).
extract casper folder to x:\pxe\iso\mint (or any path that suit you)

2/Prepare NFS Server

launch winnfsd with the following :
winnfsd.exe -id 0 0 x:\pxe\iso\mint

note : adapt the above path with your own path

3/Prepare iPXE Script

#!ipxe
set nfs-server ${next-server}
kernel /ISO/mint/casper/vmlinuz root=/dev/nfs boot=casper netboot=nfs nfsroot=${nfs-server}:/x/ISO/mint quiet splash
initrd /ISO/mint/casper/initrd.lz
boot

note : adapt /x/pxe/ISO/mint to your own path.
name it mint.ipxe and put it in x:\pxe

4/Prepare PXE Server

put ipxe-undionly.kpxe in x:\pxe
launch tiny pxe server with the following settings (leave other settings untouched) :
->boot filename = ipxe-undionly.kpxe (use the browse files and folders « … » button)
->filename if user-class=iPXE = mint.ipxe

push the online button

5/Boot !

pxe boot your computer and here we go 🙂

linux-mint-10-lxde

 Posted by at 19 h 25 min
Sep 252013
 

We already saw earlier how to boot ubuntu over ipxe with NFS

Howeber, setting an NFS server in windows is not always a given.

Hence, lets see now how to do it with a CIFS share i.e a simple windows share which Tiny PXE Server can manage for you.
Side note :
-I could make it work only with ubuntu 12.10, not 13.04.
-I could make it work only in plain DHCP mode, not proxydhcp mode.

needed :
ipxe
tiny pxe server
ubuntu

1/ open ubuntu.iso in winrar

(or any other iso reading capable tool)

extract casper folder to x:\pxe\iso\ubuntu.12.10 (or any path that suit you)


2/use the below ipxe script :

#!ipxe
set boot-url http://${dhcp-server}
kernel ${boot-url}/ubuntu.12.10/casper/vmlinuz showmounts toram root=/dev/cifs boot=casper netboot=cifs nfsroot=${cifs-server}/pxe/ubuntu.12.10 NFSOPTS=-ouser=username,pass=password,ro ip=dhcp ro
initrd ${boot-url}/ubuntu.12.10/casper/initrd.lz
boot

In the script above, adapt the username and password.
name it ubuntu.ipxe and put it in x:\pxe

Note :
About that syntax, as there is a controversy, be aware that I did not make it up.
Google it and you’ll find tons of similar examples and/or variants.
See my latest post abou this here.


3/put ipxe-undionly.kpxe in x:\pxe


4/modify config.ini with the following

(so that Tiny PXE Server will create a PXE share automatically for you pointing to your root folder) :
[dhcp]
smb=1


5/launch tiny pxe server with the following settings

(leave other settings untouched) :
tick « httpd »
boot filename = ipxe-undionly.kpxe (use the browse files and folders « … » button)
tick « filename if user-class=gPXE or iPXE » = http://${dhcp-server}/ubuntu.ipxe
push the online button


6/pxe boot your computer and here we go

7/ Notes

The same can be achieved with LinuxMint.

Extract the content of the iso to mint folder and use the ipxe script below :

#!ipxe
set boot-url http://${dhcp-server}
kernel ${boot-url}/mint/casper/vmlinuz showmounts toram root=/dev/cifs boot=casper netboot=cifs nfsroot=${cifs-server}/pxe/mint NFSOPTS=-ouser=username,pass=password,ro ip=dhcp ro
initrd ${boot-url}/mint/casper/initrd.lz
boot

 Posted by at 12 h 47 min
Sep 242013
 

needed :
tiny pxe server
gParted

open gparted.iso in winrar (or any other iso reading capable tool).
extract live folder to x:\pxe\iso\gparted

use the below ipxe script :

#!ipxe
set boot-url http://${dhcp-server}
kernel ${boot-url}/ISO/gparted/vmlinuz boot=live config union=aufs noswap noprompt vga=788 fetch=${boot-url}/ISO/gparted/filesystem.squashfs
initrd ${boot-url}/ISO/gparted/initrd.img
boot

name it gparted.ipxe and put it in x:\pxe

put ipxe-undionly.kpxe in x:\pxe

launch tiny pxe server with the following settings (leave other settings untouched) :
tick « httpd »
boot filename = ipxe-undionly.kpxe (use the browse files and folders « … » button)
tick « filename if user-class=gPXE or iPXE » = http://${dhcp-server}/gparted.ipxe
push the online button

pxe boot your computer and here we go


Gparted

 Posted by at 18 h 51 min
Sep 062013
 

needed :
ipxe
tiny pxe server
winnfsd
ubuntu

1/open ubuntu.iso in winrar or 7zip (or any other iso reading capable tool).
extract casper folder to x:\pxe\iso\ubuntu.13.04 (or any path that suit you)

2/launch winnfsd with the following :
winnfsd.exe -id 0 0 x:\pxe\iso\ubuntu.13.04
note : adapt the above path with your own path

3/use the below ipxe script :

#!ipxe
set boot-url http://${dhcp-server}
kernel ${boot-url}/ISO/ubuntu.13.04/casper/vmlinuz root=/dev/nfs boot=casper netboot=nfs nfsroot=${dhcp-server}:/x/ISO/ubuntu.13.04 ip=dhcp ro
initrd ${boot-url}/ISO/ubuntu.13.04/casper/initrd.lz
boot

note : adapt /x/pxe/ISO/ubuntu.13.04 to your own path.
name it ubuntu.ipxe and put it in x:\pxe

4/put ipxe-undionly.kpxe in x:\pxe

5/launch tiny pxe server with the following settings (leave other settings untouched) :
tick « httpd »
boot filename = ipxe-undionly.kpxe (use the browse files and folders « … » button)
tick « filename if user-class=gPXE or iPXE » = http://${dhcp-server}/ubuntu.ipxe
push the online button

6/pxe boot your computer and here we go

 Posted by at 22 h 43 min