How to create an image of a running windows (xp, 2003 and up) and boot it on SAN using an ISCSI target and gPXE
Steps:
1.Setup pxe server with gpxe
2.Setup iscsi target
3.Install new OS, or transfer existing OS, to a volume that will be shared over iscsi.
4.Install iscsi boot support
5.Boot over iscsi !
6.Summary :
Lets start!
1.Setup bootstrap loader with gpxe
using gpxe boot strap loader (for sanboot option)
Here below I use Tiny Pxe Server.
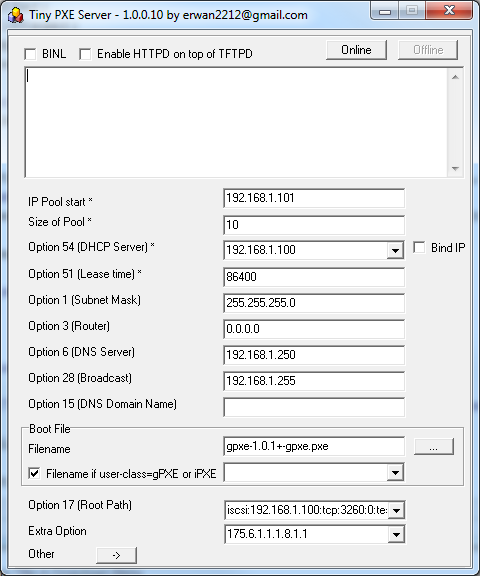
The root path : iscsi:192.168.1.100:tcp:3260:0:test
dhcp extra option : 175.6.1.1.1.8.1.1
we set keep-san=1 (in case we want to install directly to san) and dhcp priority=1 to over rule any dhcp server on your lan.
recommended: do not fill the router field due to a bug within ms iscsi initiator and the gateway (see here)
Note : as an option, you can skip the dhcp/tftp server by using a boot disk (floppy or cdrom) made by gpxe.
Go there Rom-o-matic.net,
-choose floppy image as output format (or cdrom),
-choose « all-drivers » as NIC Type,
-tick time_cmd and digest_cmd,
-and use the following embedded script :
#!gpxe
echo « Greetings! Hit Ctrl-C to bail out. »
sleep 5
echo « Going to DHCP on primary network adapter »
ifopen net0
dhcp net0
clear net0.dhcp/gateway:ipv4
sanboot iscsi:192.168.1.100::::xp
Use the generated boot disk on your physical computer or in your virtual image.
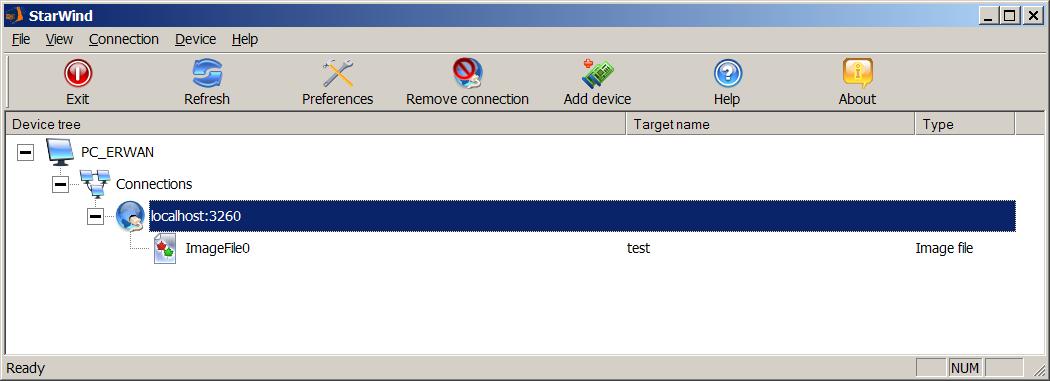
2.Setup iscsi target
–iscsi cake can mount any thing like vhd, vmdk, disk, etc.
–rocket division startwind can mount image files,disks, etc.
–openfiler / freenas can also act as iscsi target but can « only » create disks, not mount them.
The iscsi target can be used either during the installation or for the transfer of an existing windows installation to an iscsi volume.
Here below a screenshot of one xp disk mounted in Starwind (free for one connection).
3.Install new OS, or transfer existing OS, to an image that will be shared over iscsi.
Installation choices :
-(1) install directly to an iscsi target (vista, windows 2008 or windows 7). see howto
-(2) have a vmdk point to a blank img file (monolithic vmdk option) and install thru vmware. See below how to.
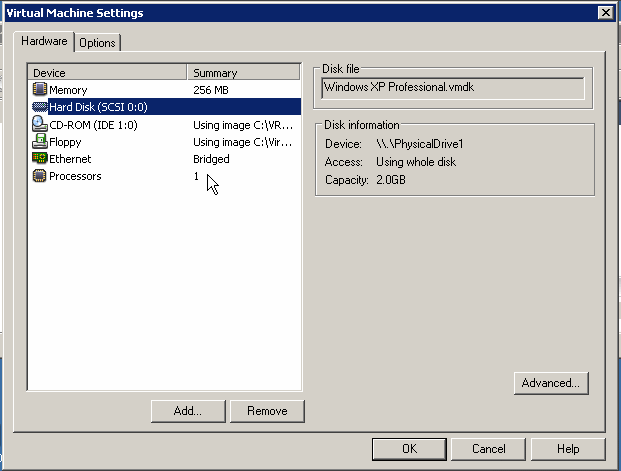
Here below vmware settings to install xp on a physical device (choice 2 above).
Note that \\.\physicaldrive1 is actually a vmdk pointing to my disk image file (which we will use later in starwind).
See lower in that page on how to make that vmdk.
-(3) install to a local physical disk and clone it to an img file afterwards. See below how to.
If you have an existing windows, transfer it to an image file using a one to one disk cloning software.
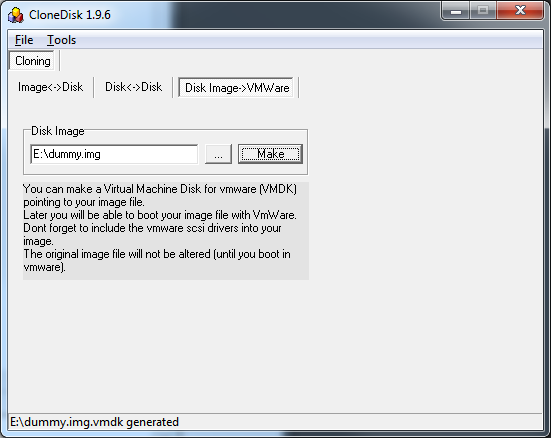
Get clonedisk here : https://erwan.labalec.fr/clonedisk
Backup the physical drive, not the logical drive / partition.
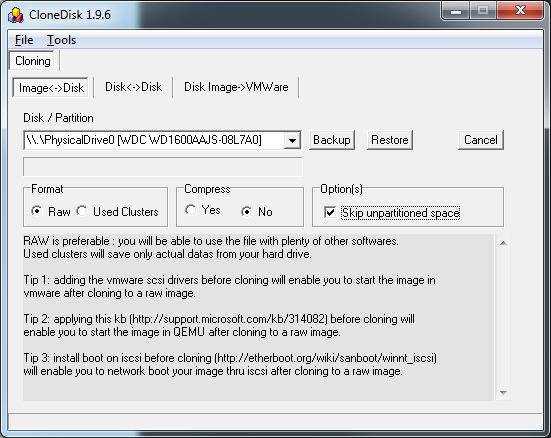
Note1 : CloneDisk can create a vmdk file for you, pointing to the image file of your disk.
You may even be able to boot on your image file from within vmware server.
If so, dont forget to install the scsi vmware driver before cloning and to restart in safe mode on the target vm guest.
Note2 : QEMU can also use the raw image file.
Then apply this http://support.microsoft.com/kb/314082 before launching in QEMU to avoid a 0x7b BSOD.
4.Install iscsi boot support in your operating system (before cloning/transfer)
For xp : http://etherboot.org/wiki/sanboot/winnt_iscsi
Note : once the iscsi initiator installed on XP, dont forget to run the SAN Boot Configurator (http://www.etherboot.org/wiki/sanboot/winnt_iscsi_sanbootconf)
for w2k3: http://etherboot.org/wiki/sanboot/win2k3
Not needed for W2k8, Vista and Windows7 as they support natively iscsi boot.
Note : you have to set the msiscsi service to start=auto (and possibly to add the target to the iscsi initiator?).
(sc config MSiSCSI start= auto)
5.Boot over iscsi !
If not done yet, setup your iscsi target (see step 2) with a prepared image file.
Unless you have an hba with iscsi support or network card with gpxe built in, setup your pxe server (step 1).
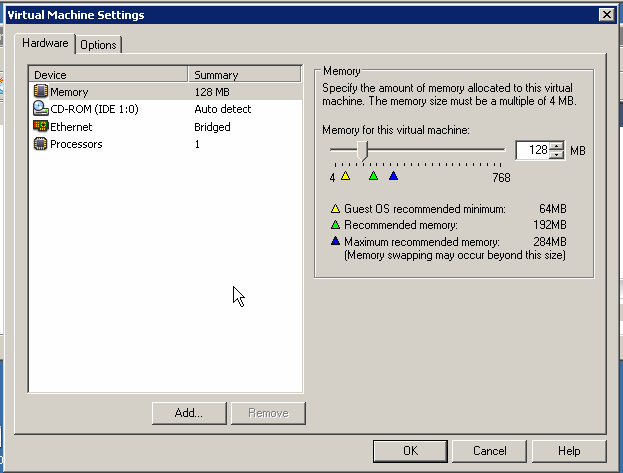
Lets test it in vmware.
See below the vm settings (diskless!)
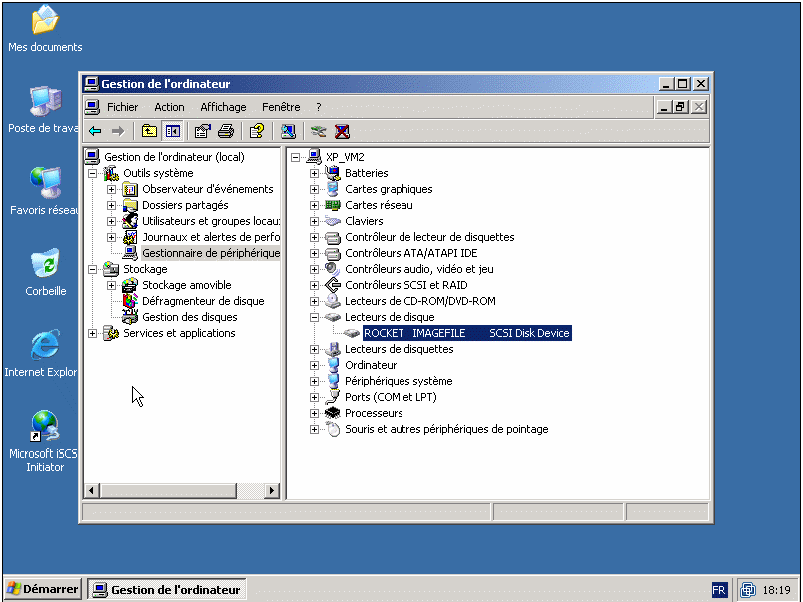
see below the disk seen from Windows , once booted over iscsi.
Constraint : network card needs to be the same before/after in order to boot.
You can add another network card before migrating to another computer, see here http://etherboot.org/wiki/appnotes/port_winnt_sanboot .
6.Summary :
-we have setup a pxe server (dhcp & tftp & gPXE)
-we have setup a scsi target
-we have installed windows to a flat file and served that file thru the iscsi target (in a vmware guest)
-we have setup iscsi boot support in our windows
-we have started a diskless computer (in a vmware guest)
-we have booted on san using the iscsi protocol thanks to gPXE
possible improvements:
-flash your network card with gPXE, turning it into a boot on san device.
see http://www.etherboot.org/wiki/romburning
In that case you dont need a pxe server anymore, config (target and rootpath) is saved directly in the network card.
-flash your motherboard network rom with gPXE.
see http://www.etherboot.org/wiki/biosext
Same idea as above.
-Use a gpxe nic rom in vmware to skip the dhcp/tftp part (nbios.filename vmx parameter).
Same idea as above but virtual…
[…] Here […]