Mar 122014
 

About SystemRescueCD :

Description: SystemRescueCd is a Linux system rescue disk available as a bootable CD-ROM or USB stick for administrating or repairing your system and data after a crash. It aims to provide an easy way to carry out admin tasks on your computer, such as creating and editing the hard disk partitions. It comes with a lot of linux software such as system tools (parted, partimage, fstools, …) and basic tools (editors, midnight commander, network tools). It can be used for both Linux and windows computers, and on desktops as well as servers. This rescue system requires no installation as it can be booted from a CD/DVD drive or USB stick, but it can be installed on the hard disk if you wish. The kernel supports all important file systems (ext2/ext3/ext4, reiserfs, btrfs, xfs, jfs, vfat, ntfs), as well as network filesystems (samba and nfs).

Now as you have understood by now, whenever I can, I skip burning CD/DVD’s and will at worse use a USB stick or at best use PXE Boot.

Lets use TinyPXE Server + iPXE.

First lets prepare our iPXE script (save it to rescue.ipxe)


#!ipxe
set boot-url http://${next-server}
kernel ${boot-url}/sysrcd-4.1.0/isolinux/rescue32 dodhcp netboot=${boot-url}/sysrcd-4.1.0/sysrcd.dat
initrd ${boot-url}/sysrcd-4.1.0/isolinux/initram.igz
boot

Then lets prepare our files

Extrat the content of SystemRescueCD iso to /sysrcd-4.1.0, next to TinyPXE Server.
You can use 7Zip for this operation.

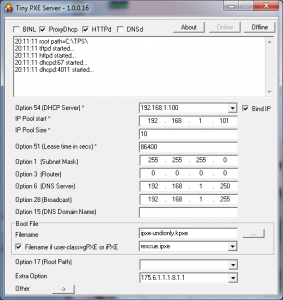
Now, lets setup TinyPXE Server

rescue

Now, lets boot !

 Posted by at 20 h 20 min
Mar 112014
 

In previous article, we have seen how to make a bootable disk image using CloneDisk.

Lets see now how to boot this disk image thru PXE boot with TinyPXE Server.

1-Prepare the the IPXE script
2-Setup TinyPXE Server
3-PXE Boot !

1-Prepare the IPXE script and save it as disk.ipxe

Pretty simple

#!ipxe
set boot-url http://${next-server}
initrd ${boot-url}/test.vhd
kernel ${boot-url}/memdisk raw
boot

2-Setup TinyPXE Server

Next to pxesrv.exe, in the same folder, you must have the following files :
-disk.ipxe (see previous item)
-ipxe-undionly.kpxe (in TPS zip file)
-memdisk (in TPS zip file)
-test.vhd (see previous article)

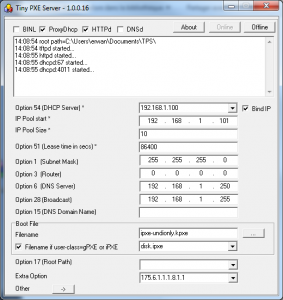
Now set TinyPXE Server as follow

tps_howto1

3-PXE boot

 Posted by at 14 h 15 min
Mar 112014
 

There are times where you need to make a bootable disk image, to boot from pxe, or from a boot loader (grub4dos, ms bootmgr, etc).

Lets see how to make it quick and easy with CloneDisk :

1-Lets create and attach a virtual disk
2-Lets create a disk
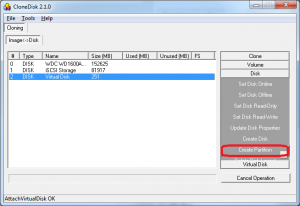
3-Lets create a partition
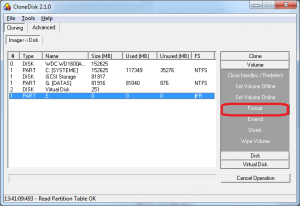
4-Lets format it
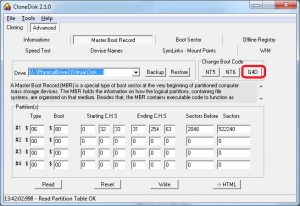
5-Lets install grub4dos as bootloader
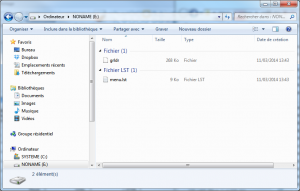
6-Lets copy/paste grldr and menu.lst

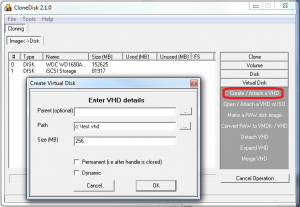
1-Lets create and attach a virtual disk
->ignore the parent field
->fill in the path field
->indicate the size (in MB)
->lets go for a fixed one (vs dynamic)

clonedisk_howto1

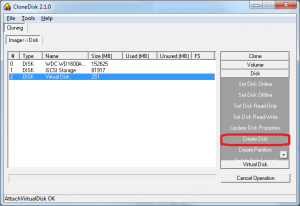
2-Lets create a disk (i.e initialise)

clonedisk_howto2

3-Lets create a partition
->CloneDisk will use the whole disk size and will make the partition active

clonedisk_howto3

4-Lets format it (FAT or FAT32, NTFS works too)

clonedisk_howto4

5-Lets install grub4dos as bootloader in the MBR

clonedisk_howto5

6-Do not close CloneDisk yet (or else your new virtual logical drive will away) and copy/paste grldr and menu.lst (in CloneDisk zip file)

clonedisk_howto6

You got yourself a bootable disk image, feel free to add your own content.
Even better, since we used a VHD format, you can later on expand this virtual disk.

In a next tutorial, we will see how to PXE boot this virtual disk.

 Posted by at 13 h 46 min
Mar 102014
 

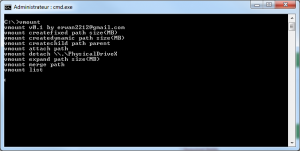
For some time I needed a tool to create, attach, detach, etc MS Virtual Disk HardDrives (VHD) from the command line.
Sure I could do it using diskpart or MS VhdMount but I was always lacking this or that…

Therefore, based on CloneDisk source code, I took 5 mns to write vMount.
It uses MS native virtdisk API available with Windows 7 (x86/x64) and up

Command line arguments :

vmount createfixed path_to_vhd size(MB)
vmount createdynamic path_to_vhd size(MB)
vmount createchild path_to_child path_to_parent
vmount attach path_to_vhd [NOLETTER]
vmount attach path_to_iso
vmount detach \\.\PhysicalDriveX
vmount detach path_to_vhd
vmount expand path_to_vhd size(MB)
vmount compact path_to_vhd
vmount merge path_to_child
vmount disks [filter]
vmount partitions [filter]
vmount mount x: \device\harddiskX\partitionX
vmount umount letter
vmount online disk_id
vmount offline disk_id
vmount ro disk_id
vmount rw disk_id
vmount attributes disk_id

Regards,
Erwan

Discuss it here.
vmount

 Posted by at 21 h 45 min
Mar 092014
 

Today, something easy : lets use a SD Card Reader with our arduino.

Can be useful for instance when you want to log datas such as temperatures or any other sensor.

I use this component from DS : SD Card Slot Socket Reader.

First the wiring : standard SPI (SCK/MOSI/MISO/CS).

sd_bb

Then some arduino skeches taken from the Arduino examples (note that I use CS=10 with my arduino uno, adapt if needed) :

Retrieve basic infos from your SD card and list files
Read and Write to a file (test.txt)
Dump the content from a file (test.txt)

That was it : quick and easy !

 Posted by at 19 h 04 min
Mar 012014
 

The excellent Rufus software got updated to version 1.4.4.

  • Add uncompressed Disk Image support (FreeBSD, FreeNAS, etc.) (NEW)
  • Add right-to-left language support (NEW)
  • Add an alert when multiple partitions are about to be erased (NEW)
  • Add (unofficial) NTFS Compression support (NEW)
  • Add Finnish translation, courtesy of Riku Brander
  • Ignore failure on ISO autorun.inf creation, to keep dumb security applications happy
  • Improve hotplug detection
  • Improve Syslinux v5+ support (requires an internet connection to download extra files)
  • Fix support for latest gparted, ArchLinux, and other Syslinux v5+ based ISOs
  • Fix detection for Toshiba drives (again)
  • Fix UDF Unicode support
 Posted by at 15 h 49 min
Mar 012014
 

I got myself a cheap nokia 5110 lcd screen at dx.com.

Lets see how easy it is to use with an arduino.

First lets get an arduino library here. (put it in your arduino libraries folder).

Then lets have a look at the wiring :

nokia 5110_bb

And now the arduino code (rename txt to ino or pde) : nokia5110_v5

And last, an ugly pic (dont look at soldering points…) :

nokia5110

 Posted by at 14 h 58 min
Fév 232014
 

Arduino : display a clock based on a lcd screen and a RTC
Arduino : output to a tv (tvout)
Arduino : use a PS2 keyboard
Arduino : send and receive data thru radio frequency (RF433)
Arduino : programming an Arduino Pro Mini with an USB TTL Dongle
Arduino : use an ethernet controller (enc28j60)
Arduino : use it as an infrared remote
Arduino : use a Texas CC1101
Arduino : use your internal atmel 328p temperature

 Posted by at 15 h 52 min
Fév 232014
 

Reading the atmel 328 spec, one can see that its ADC (analog digital converter) has an internal temperature sensor.
Note that this applies to the atmel 168 too.

Although not as accurate as a dedicated temperature sensor (like the DS18B20), it can be useful to keep track of the arduino temp for an few extra bytes.

Note that it will be probably be higher to your environemental temperature : you may have to adjust.
Also, note that it is depending on the voltage / arduino activity : you may have to adjust again.

Here attached how to read the internal temp (rename to ino or pde) : internal_temp
(this was taken from a thread on avrfreaks).

 Posted by at 15 h 40 min
Fév 112014
 

In 2 weeks times, I lost a disk twice in my synology DS210.

First time, the disk was truly giving signs of imminent death.
Because I was using SHR (synology hybrid raid), I could not mount my disk under my ubuntu.

So this is how I got my datas back (right before the disk died for good).
The disk is mounted thru a USB dock bay onto my synology.

-1: locate your disk and raid partition with fdisk -l,
you should get something like this :
/dev/sdx3 588 19457 151569760+ fd Linux raid autodetect

-2: ensure this partition actually contains an MD device with mdadm –examine –scan /dev/sdx3,
you should something like that :
ARRAY /dev/md3 level=raid1 num-devices=2 UUID=db7c8f07:6f0f4570:852c2e22:a378fec9

-3: locate your last active MD device with mdadm –detail –scan,
you should get something like :
ARRAY /dev/md1 metadata=0.90 UUID=f07f5754:cf6f8af4:663cbd89:1480ea74
ARRAY /dev/md2 metadata=1.1 name=ds201j:2 UUID=17f442a7:d767633b:a4fc4e5b:88db9d4b

-> you want to use next free MD device which is MD3.

-4: create a MD device pointing to your partition with mdadm -A –verbose –run /dev/md3 /dev/sdx3

-5 : now mount it with mount /dev/md3 /mnt/usb

You can now retrieve your files in /mnt/usb !!!

Now, like I told you at the beginning at this article, I lost 2 disk in a row in a week time.
The second time, the method above did not work 🙁
This time, UFS Explorer saved my datas.

Hope this can help others…

 Posted by at 20 h 12 min