A must have.
Get it here
Discuss it here
I wanted to find a way to call my kids, with me sitting on ground floor and them, sitting on the top floor of the house.
2 arduino, one acting as transmitter, one acting as receiver and here we go : they would not ignore me anymore 🙂
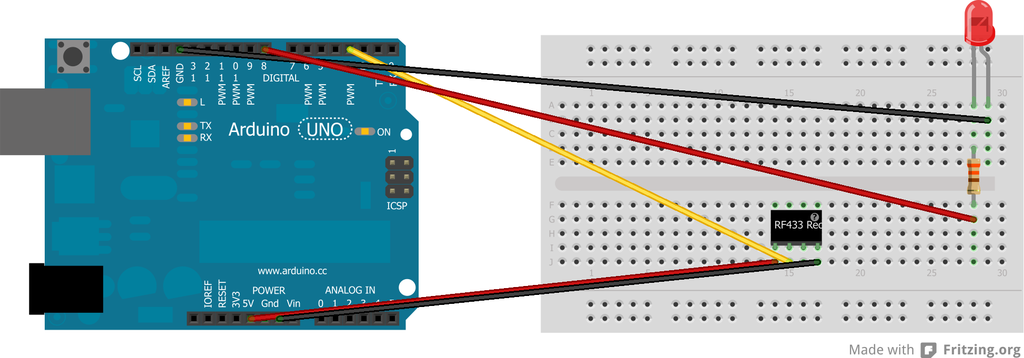
Lets start the transmitter (schema and code) : it has a push button to send the signal and a led to indicate it is transmitting.

#includeconst int led_pin = 11; //const int transmit_pin = 4; //const int transmit_en_pin = 3; const int transmit_pin = 3; //const int transmit_en_pin = 3; const int buttonPin=2; void setup() { pinMode(buttonPin, INPUT); // sets the digital pin as output pinMode(led_pin, OUTPUT); // sets the digital pin as output delay(1000); Serial.begin(9600); // Debugging only Serial.println("setup"); // Initialise the IO and ISR vw_set_tx_pin(transmit_pin); //vw_set_rx_pin(receive_pin); //vw_set_ptt_pin(transmit_en_pin); //vw_set_ptt_inverted(true); // Required for DR3100 vw_set_ptt_inverted(false); vw_setup(2400); // Bits per sec } byte count = 1; void loop() { int reading = digitalRead(buttonPin); if(reading==HIGH) { // digitalWrite(led_pin, HIGH); // Flash a light to show transmitting char msg[7] = {'h','e','l','l','o',' ','#'}; //msg[5]=count; vw_send((uint8_t *)msg, strlen(msg)+1); vw_wait_tx(); // Wait until the whole message is gone Serial.println(count); count = count + 1; delay(500); digitalWrite(led_pin, LOW); } }
Next comes the receiver : it has a buzzer playing a small melody and a led blinking to indicate it is receiving.
#include#include const int led_pin = 8; const int receive_pin = 3; //2 const int buzzer=11; // tableau de mémorisation des notes de la mélodie int melody[] = { NOTE_C4, NOTE_G3,NOTE_G3, NOTE_A3, NOTE_G3,0, NOTE_B3, NOTE_C4}; // tableau de mémorisation de la durée des notes : 4 = noire, 8 = croche, etc.: int noteDurations[] = {4, 8, 8, 4,4,4,4,4 }; void play(){ // boucle pour parcourir les notes de la mélodie for (int thisNote = 0; thisNote < 8; thisNote++) { // thisNote de 0 à 7 // pour calculer la durée de la note, on divise 1 seconde par le type de la note //ainsi noire = 1000 / 4 sec, croche = 1000/8 sec, etc... int noteDuration = 1000/noteDurations[thisNote]; // joue la note sur la broche x pendant la durée voulue tone(buzzer, melody[thisNote],noteDuration); // pour distinguer les notes, laisser une pause entre elles // la durée de la note + 30% fonctionne bien : int pauseBetweenNotes = noteDuration * 1.30; delay(pauseBetweenNotes); // delai entre les notes // stoppe la production de son sur la broche 8 : noTone(buzzer); } } void setup() { pinMode(led_pin, OUTPUT); // sets the digital pin as output pinMode(buzzer, OUTPUT); // sets the digital pin as output delay(1000); Serial.begin(9600); // Debugging only Serial.println("setup"); // Initialise the IO and ISR //vw_set_tx_pin(transmit_pin); vw_set_rx_pin(receive_pin); //vw_set_ptt_pin(transmit_en_pin); //vw_set_ptt_inverted(true); // Required for DR3100 vw_set_ptt_inverted(false); vw_setup(2400); // Bits per sec vw_rx_start(); // Start the receiver PLL running } void loop() { uint8_t buf[VW_MAX_MESSAGE_LEN]; uint8_t buflen = VW_MAX_MESSAGE_LEN; if (vw_get_message(buf, &buflen)) // Non-blocking { int i; // Message with a good checksum received, print it. Serial.print("Got: "); for (i = 0; i < buflen; i++) { Serial.print(buf[i], HEX); Serial.print(' '); } Serial.print(' '); for (i = 0; i < buflen; i++) { Serial.print(char(buf[i])); Serial.print(' '); } Serial.println(); digitalWrite(led_pin, HIGH);delay(1500);digitalWrite(led_pin, LOW);delay(1500); digitalWrite(led_pin, HIGH);delay(1500);digitalWrite(led_pin, LOW);delay(1500); play(); } }
Voila !
This time lets play with Arduino and a ps2 keyboard.
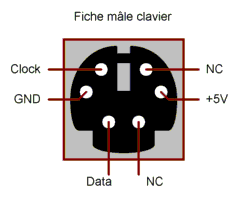
For the record here comes the ps2 male connectors :
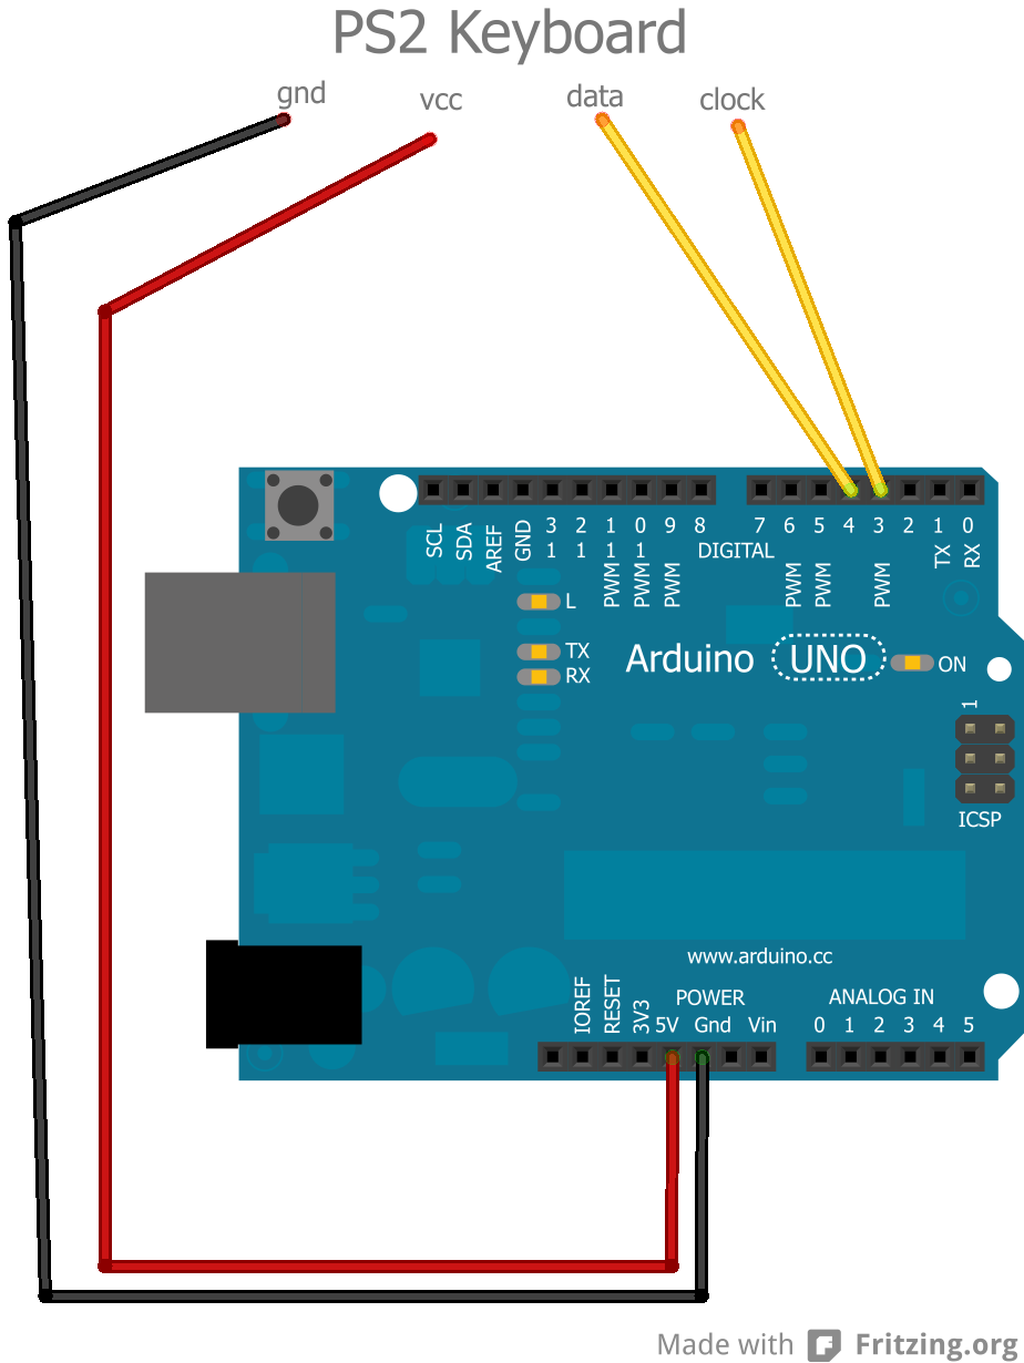
A quick schema :
The sketch :
#include#define KBD_CLK_PIN 3 #define KBD_DATA_PIN 4 PS2Keyboard keyboard; void setup ( ) { keyboard.begin(KBD_DATA_PIN); Serial.begin(9600); delay(1000); } void loop ( ) { if(keyboard.available()) { // reading the "extra" bits is optional byte extra = keyboard.read_extra(); // must read extra before reading the character byte char c = keyboard.read(); boolean ctrl = extra & 1; // is bit 0 boolean alt = extra & 2; // is bit 1 if (ctrl) Serial.print('^'); if (alt) Serial.print('_'); //if (c==PS2_KC_UP) Serial.print("up\n"); //if (c==PS2_KC_DOWN) Serial.print("down\n"); //if (c==PS2_KC_BKSP) Serial.print("backspace\n"); //if (c==PS2_KC_ESC) { Serial.print("escape and reset\n"); keyboard.reset(); } Serial.print(c); //lets print last input char to our serial monitor } }
(the PS2Keyboard library : PS2Keyboard)
A picture (i used female – male proto wires so that I did not have to cut out my ps2 keyboard wire).

Last time we have seen how to use an arduino and a 16*2 lcd screen.
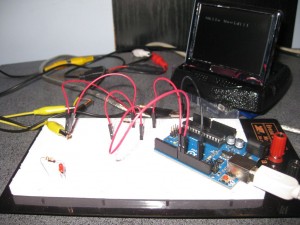
Now lets see to use an arduino and a tvout to a small display screen (2.5 inches) using a RCA connector.
First the wiring
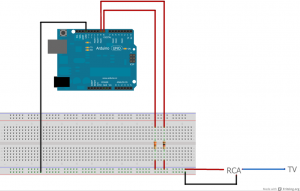
Then the code
#includeTVout TV; unsigned char x, y; void setup ( ) { TV.start_render( _PAL ); } void loop ( ) { TV.clear_screen ( ); TV.print_str ( 10, 10, "Hello World!!!" ); TV.delay ( 60 ); }
TvOut lib can be found here
And finally a picture
I got my arduino for a few days now and here comes my first adventure :
use an arduino + a lcd + a RTC to display a clock.
First lets go with the wiring :

Then the code :
// ds1302 library can be found here : http://www.henningkarlsen.com/electronics // // DS1302: RST / CE pin - Arduino Digital 12 // I/O / DAT pin - Arduino Digital 11 // SCLK pin - Arduino Digital 10 // LCD: DB7 - Arduino Digital 7 // DB6 - Arduino Digital 6 // DB5 - Arduino Digital 5 // DB4 - Arduino Digital 4 // RS - Arduino Digital 8 // E - Arduino Digital 9 // RW to ground? //seems it is better to NOT plug VCC when setting the clock... #include#include // Init the DS1302 //DS1302(ce, data, clock); DS1302 rtc(12,11,10); // Init the LCD LiquidCrystal lcd( 8, 9, 4, 5, 6, 7 ); void set_time() { rtc.setDOW(SUNDAY); // Set Day-of-Week to FRIDAY rtc.setTime(19, 2, 0); // Set the time to 12:00:00 (24hr format) rtc.setDate(13, 1, 2013); // Set the date to August 6th, 2010 } void setup() { Serial.begin(9600); // Set the clock to run-mode, and disable the write protection rtc.halt(false); rtc.writeProtect(false); // Setup LCD to 16x2 characters lcd.begin(16, 2); // The following lines can be commented out to use the values already stored in the DS1302 //set_time(); } void loop() { // Display time centered on the upper line lcd.setCursor(4, 0); lcd.print(rtc.getTimeStr()); // Display abbreviated Day-of-Week in the lower left corner lcd.setCursor(0, 1); lcd.print(rtc.getDOWStr(FORMAT_SHORT)); // Display date in the lower right corner lcd.setCursor(6, 1); lcd.print(rtc.getDateStr()); Serial.print(rtc.getTimeStr()); Serial.print(" "); Serial.print(rtc.getDOWStr(FORMAT_SHORT)); Serial.print(" "); Serial.println(rtc.getDateStr()); // Wait one second before repeating :) delay (1000); }
And finally a nice picture to illustrate it :

Hope you’ll enjoy it as much as I did 🙂
/Erwan
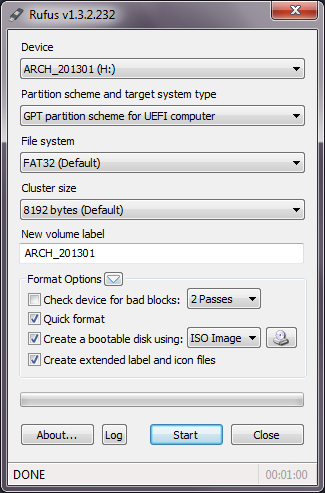
Did some screenshots during installation of these 2 MS products and initiated a discussion here
Native VHD boot is supported.
These are nice alternative for old hardware and/or to setup a quick rdp/web/setop box computer.
Another useful tool to install any windows (from xp to w2kr8) from WinPE (or any win32 environement).
One can also install win7 and up to a usb drive or vhd drive.
Useful too to install Windows7 from WinPE (or any win32 environement) but also to install Windows7 onto a USB disk.
The long awaited IOS5 unthethered is out 🙂
I might give it a try on my IPAD 1…
More here : http://blog.iphone-dev.org/post/14857834236/untethered-holidays
/erwan
Make_PE3 Program to Create Portable Windows 7 PE.
And then use your winpe from a usb key, a cd, thru pxe, etc..
