Mai 062017
 

DiskMgr has been developed primarily for use in a Windows Forensic Environment (WinFE) to provide a user friendly method of changing the following DISK attributes : Offline, Online, Read-Only, Read-Write.

DiskMgr is similar in use to Colin Ramsden’s « Write Protect » application (see here). DiskMgr is available in native Windows 32-bit and 64-bit versions.

Discuss and download here

.

 Posted by at 15 h 44 min
Avr 142017
 

In this post, I shared a quick tool to convert VMDK files to RAW files.
The interface was rather minimalist and limited.
Here comes an updated version which can convert multiple files format (VMDK, VHDI, EWF, VDI) to RAW image disks.

Download it here.

 Posted by at 19 h 06 min
Fév 112017
 

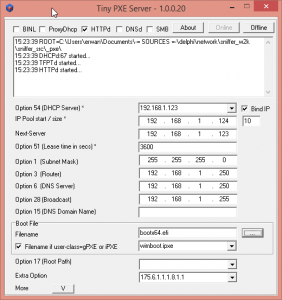
Following a post from 2014 about booting Winpe over PXE on a UEFI computer, see below a different way to proceed.

-Disable secureboot (or else you’ll need to use a signed bootloader)
-Retrieve latest version of IPXE for UEFI, ipxe-snponly-x86-64.efi and rename it bootia64.efi
-run the following command against your BCD : bcdedit.exe /store BCD /set {bootmgr} nointegritychecks yes
-Use the below wimboot.ipxe script based on Wimboot
-set Tiny PXE Server as below screenshot

wimboot.ipxe


#!ipxe
set boot-url http://${dhcp-server}
kernel ${boot-url}/wimboot
initrd ${boot-url}/bootmgfw.efi bootmgfw.efi
initrd ${boot-url}/EFI/MICROSOFT/BOOT/BCD BCD
initrd ${boot-url}/BOOT/BOOT.SDI BOOT.SDI
initrd ${boot-url}/SOURCES/BOOT.WIM BOOT.WIM
boot

 Posted by at 15 h 26 min  Tagged with:
Déc 302016
 

Christmas time…I bought this nice Xiaomi Mi4C phone for my son for quite a cheap price (considering the hardware).

Little I know that this came with a price : my own sweat 🙂

As this is a chinese phone, this is delivered with an operating system which is full of bloatware (if not spyware).
After some mad googling on different forums, I decided to flash (thru fastboot using MiFlash) a MIUI 8 found on miui forum.
I quickly realised my mistake : not only did the OS miss my french native langage, it was still with lots of bloatware and whatsmore was also missing google apps (that was easy to fix).
Much (much) worse : willing to flash another image, I realised that I had locked the recovery AND fastboot : in short, no way back…except maybe get the unlock code from Xiaomi which can take 2 weeks to come (and sometimes is even denied by Xiaomi).

So here I was with a brand new shiny phone in a poor state (to be fair it was still working nicely even with the bootloader locked and the operating system in english).

Here below the steps I used to remediate to this situation :

1-Put the phone in « emergency download mode » : while in fastboot mode, send fastboot oem edl.

2-At this stage, use MiFlash 2015.10.28 (latest version did not work for me) and flash a fastboot miui image on version 6.1.7 since it contains a non locked fastboot (google search libra_images_6.1.7)

3-Exit the EDL mode (long power press) and let the image install

4-Go back to fastboot mode and send : fastboot oem unlock

5-Still while in fastboot mode, install TWRP (google search twrp libra) : fastboot flash recovery twrp.img / fastboot boot twrp.img

6-Flash a recovery image thru TWRP (i recommend a xiaomi.eu image)

extra:
you can check the status of your phone with the fastboot command : fastboot oem device-info.

Déc 282016
 

DNSPING uses windows dnsquery function to measure the time it takes for a nameserver to process and reply to your dns query.

This can be useful to monitor and/or troubleshoot DNS performance issues.

Result can easily be piped into a text file and later processed by excel or libreoffice calc (fixed space delimiter).


dnsping 192.168.1.250 www.google.fr 5
timestamp query result ttl duration
00:59:11 www.google.fr [216.58.210.227] TTL:219 time:47
00:59:16 www.google.fr [216.58.210.227] TTL:214 time:0
00:59:21 www.google.fr [216.58.210.227] TTL:209 time:0
00:59:26 www.google.fr [216.58.210.227] TTL:204 time:15

Tool can be downloaded here.

Erwan

Déc 282016
 

Been a while since last article.

A quick one to post a tool I have been using lately to quickly convert VMDK to raw disks.
Indeed it is sometimes easier/quicker to install an operating system in a virtual environement but afterwards you may want to convert the vmware disk (vmdk) to a raw disk so that you can write it to another physical media (usb, hard drive, etc).

Thanks to libvmdk, a library written by Joachim Metz, it is easy to write a quick graphical frontend that will read a vmdk and write it back to a raw image.

VMDK2RAW can be downloaded here.

Erwan

 Posted by at 0 h 42 min  Tagged with:
Jan 032016
 

In a previous article, we had managed to snif & record RF signals, decode it and reproduce it with an arduino.

Thus, even if you can visualize the wav form in Audacity (or any other sound editor), it is not easy to « read » the signal.

The attached software (source code provided) will not only display the wave form, but also shape it as a « square » form and eventually provide a textual reading (high for xx ms, low for xx ms, …).

This makes it easier to reproduce (from an arduino) or eventually make a better guess at what the signal (or part of it) actually is.

Below :

1-the original wave form

2-the square form

3-a textual reading of the worm

Hope this helps others 🙂

 Posted by at 17 h 17 min
Déc 132015
 

Last ESP8266 example for the day (credit goes here) : a web server turning a lef off and on.


#include 
 
const char* ssid = "livebox0";
const char* password = "password";
 
int ledPin = 2; // GPIO2
WiFiServer server(80);
 
void setup() {
  Serial.begin(115200);
  delay(10);
 
  pinMode(ledPin, OUTPUT);
  digitalWrite(ledPin, LOW);
 
  // Connect to WiFi network
  Serial.println();
  Serial.println();
  Serial.print("Connecting to ");
  Serial.println(ssid);
 
  WiFi.begin(ssid, password);
 
  while (WiFi.status() != WL_CONNECTED) {
    delay(500);
    Serial.print(".");
  }
  Serial.println("");
  Serial.println("WiFi connected");
 
  // Start the server
  server.begin();
  Serial.println("Server started");
 
  // Print the IP address
  Serial.print("Use this URL to connect: ");
  Serial.print("http://");
  Serial.print(WiFi.localIP());
  Serial.println("/");
 
}
 
void loop() {
  // Check if a client has connected
  WiFiClient client = server.available();
  if (!client) {
    return;
  }
 
  // Wait until the client sends some data
  Serial.println("new client");
  while(!client.available()){
    delay(1);
  }
 
  // Read the first line of the request
  String request = client.readStringUntil('\r');
  Serial.println(request);
  client.flush();
 
  // Match the request
 
  int value = LOW;
  if (request.indexOf("/LED=ON") != -1)  {
    digitalWrite(ledPin, HIGH);
    value = HIGH;
  }
  if (request.indexOf("/LED=OFF") != -1)  {
    digitalWrite(ledPin, LOW);
    value = LOW;
  }
 
// Set ledPin according to the request
//digitalWrite(ledPin, value);
 
  // Return the response
  client.println("HTTP/1.1 200 OK");
  client.println("Content-Type: text/html");
  client.println(""); //  do not forget this one
  client.println("");
  client.println("");
 
  client.print("Led pin is now: ");
 
  if(value == HIGH) {
    client.print("On");
  } else {
    client.print("Off");
  }
  client.println("

"); client.println("Click here turn the LED on pin 2 ON
"); client.println("Click here turn the LED on pin 2 OFF
"); client.println(""); delay(1); Serial.println("Client disonnected"); Serial.println(""); }
Déc 132015
 

In previous article, we have seen how to talk to a 8266 thru serial.

We could do the same from an arduino and therefore use this module as a slave.
But why introduce a second MCU when the ESP8266 itself is a MCU?

Our arduino IDE can actually program such a MCU (next to the atmega series).
For this you will need latest arduino ide (version 1.6.4 and up).
You will also need to add support for the ESP8266 : see here how to do this.

Once done you are ready to program your MCU.
Dont forget to pull GPIO0 down but also to reset your MCU when entering the flash phase (or else you’ll get « error: espcomm_open failed »).
Once flashed, set GPIO0 free.

See below our arduino ide flashing the blink demo.