Mar 162014
 

I got myself a rotary potentiometer at dx.com and decided to come up with a basic article.

First, lets have a quick look at the below schematic to understand how a potentiometer works.

analogin_potentiometer


Now, lets plug it to our arduino and while we are it, lets use its retrieved value (thru analogread) to dim a led (thru analogwrite).

potentiemter_bb


Now lets have a look at the arduino sketch


byte potPin=0; //Analog 0 connected to the potentiometer
byte LEDPin=6; //Connected to LED on Pin 6
float potValue=0; //Value returned from the potentiometer
float v=0; //voltage (0-5v)

void setup(){
  Serial.begin(9600);
  pinMode(LEDPin, OUTPUT); //Set Pin 6 as an Output
}
 
void loop(){
  
  potValue = analogRead(potPin)/4; //Read the potentiometer, convert it to 0 - 255
  Serial.println(potValue,0);
  v=potValue*5/255; //to calculate the voltage send out on pin6
  Serial.println(v, 2);
  analogWrite(LEDPin, potValue); //Write the converted potentiometer value to LED pin
  delay(100);
}

here we go : rotate your potentiometer and see your led dim in and out

 Posted by at 16 h 53 min
Mar 142014
 

In a previous article, I played with an arduino combined with a TI CC1101.

The CC1101 is a great and cheap chip to send datas over the air at frequencies below 1ghz, using different modulations.
You can tweak a great many options which should make this chip work with many other devices.

I had been looking for weeks (months actually…) to use ASK/OOK modulation in order to link it with my chacon temperature/humidity sensors or even with my RFXTRX433 (from RFXCOM).

It seems I finally managed to find the right settings for ASK/OOK : my two devices now talk to each other (@433mhz) using this modulation 🙂

I believe I am still a long way from talking to my chacon or rfxcom devices but still, I made some progress.

Before I forget, here below my settings : it could be helpful for some other geeks out there.

Now if someone out there manage to interface his cc1101 with an ASK/OOK device, please let me know !

/*
# Sync word qualifier mode = 30/32 sync word bits detected
# CRC autoflush = false
# Channel spacing = 199.951172
# Data format = Normal mode
# Data rate = 4.79794
# RX filter BW = 101.562500
# PA ramping = false
# Preamble count = 4
# Whitening = false
# Address config = No address check
# Carrier frequency = 433.919830
# Device address = 0
# TX power = 0
# Manchester enable = true
# CRC enable = true
# Deviation = 25.390625
# Packet length mode = Variable packet length mode. Packet length configured by the first byte after sync word
# Packet length = 255
# Modulation format = ASK/OOK
# Base frequency = 433.919830
# Channel number = 0
*/
void config2()
{
byte PA_TABLE[]= {0x00,0x60,0x00,0x00,0x00,0x00,0x00,0x00,};

cc1101.writeReg(CC1101_IOCFG0,0x06);
cc1101.writeReg(CC1101_FIFOTHR,0x47);
cc1101.writeReg(CC1101_PKTCTRL0,0x05);
cc1101.writeReg(CC1101_FSCTRL1,0x06);
cc1101.writeReg(CC1101_FREQ2,0x10);
cc1101.writeReg(CC1101_FREQ1,0xB1);
cc1101.writeReg(CC1101_FREQ0,0x3B);
cc1101.writeReg(CC1101_MDMCFG4,0xF5);
cc1101.writeReg(CC1101_MDMCFG3,0x83);
cc1101.writeReg(CC1101_MDMCFG2,0x33);
cc1101.writeReg(CC1101_DEVIATN,0x15);
cc1101.writeReg(CC1101_MCSM0,0x18);
cc1101.writeReg(CC1101_FOCCFG,0x16);
cc1101.writeReg(CC1101_WORCTRL,0xFB);
cc1101.writeReg(CC1101_FREND0,0x11);
cc1101.writeReg(CC1101_FSCAL3,0xE9);
cc1101.writeReg(CC1101_FSCAL2,0x2A);
cc1101.writeReg(CC1101_FSCAL1,0x00);
cc1101.writeReg(CC1101_FSCAL0,0x1F);
cc1101.writeReg(CC1101_TEST2,0x81);
cc1101.writeReg(CC1101_TEST1,0x35);
cc1101.writeReg(CC1101_TEST0,0x09);

//thid 1 is needed otherwise only first packets has data
cc1101.writeReg(0x07,0x00); // packet automation control

//notice the burst mode to write beyong the first position (0) ...
cc1101.writeBurstReg(CC1101_PATABLE,PA_TABLE,8);
}
 Posted by at 19 h 24 min
Mar 142014
 

I recentely got myself a cheap laser tag at dx.com.

I decided to test the following : a laser detector, i.e detect thru a photo resistor (also called light dependent resistor) when my laser beam is interrupted.

First lets have a look at the wiring

LDR_bb

Then lets have a look at the code (change the extension to ino or pde) : laser_detector

And last, lets see it run : see the led going off each time our laser beam gets away from the photo resistor.

 Posted by at 15 h 36 min
Mar 092014
 

Today, something easy : lets use a SD Card Reader with our arduino.

Can be useful for instance when you want to log datas such as temperatures or any other sensor.

I use this component from DS : SD Card Slot Socket Reader.

First the wiring : standard SPI (SCK/MOSI/MISO/CS).

sd_bb

Then some arduino skeches taken from the Arduino examples (note that I use CS=10 with my arduino uno, adapt if needed) :

Retrieve basic infos from your SD card and list files
Read and Write to a file (test.txt)
Dump the content from a file (test.txt)

That was it : quick and easy !

 Posted by at 19 h 04 min
Mar 012014
 

I got myself a cheap nokia 5110 lcd screen at dx.com.

Lets see how easy it is to use with an arduino.

First lets get an arduino library here. (put it in your arduino libraries folder).

Then lets have a look at the wiring :

nokia 5110_bb

And now the arduino code (rename txt to ino or pde) : nokia5110_v5

And last, an ugly pic (dont look at soldering points…) :

nokia5110

 Posted by at 14 h 58 min
FĂ©v 232014
 

Arduino : display a clock based on a lcd screen and a RTC
Arduino : output to a tv (tvout)
Arduino : use a PS2 keyboard
Arduino : send and receive data thru radio frequency (RF433)
Arduino : programming an Arduino Pro Mini with an USB TTL Dongle
Arduino : use an ethernet controller (enc28j60)
Arduino : use it as an infrared remote
Arduino : use a Texas CC1101
Arduino : use your internal atmel 328p temperature

 Posted by at 15 h 52 min
FĂ©v 232014
 

Reading the atmel 328 spec, one can see that its ADC (analog digital converter) has an internal temperature sensor.
Note that this applies to the atmel 168 too.

Although not as accurate as a dedicated temperature sensor (like the DS18B20), it can be useful to keep track of the arduino temp for an few extra bytes.

Note that it will be probably be higher to your environemental temperature : you may have to adjust.
Also, note that it is depending on the voltage / arduino activity : you may have to adjust again.

Here attached how to read the internal temp (rename to ino or pde) : internal_temp
(this was taken from a thread on avrfreaks).

 Posted by at 15 h 40 min
Sep 222013
 

In  a previous article, we have seen how to use RF433 chips with Arduino.

Pros for these chips are they are cheap and easy to use, cons is that they provide little or no tuning.

Hence, lets play a bit now with 2 texas cc1101 : with this component, we can play with the frequency (from 315 to 915), the modulation (ask, fsk, etc) and tons of other parameters.

You can use smartRF (optional) to dive into parameters.

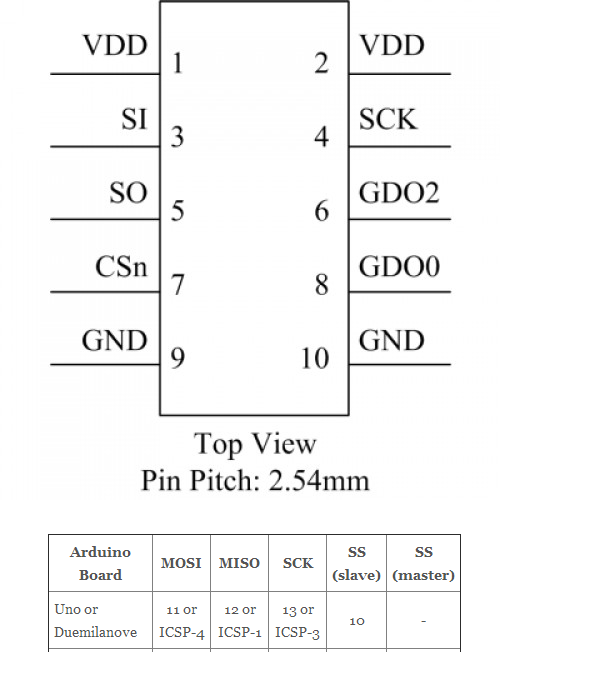
First lets start with the pins of the cc1101.

spi

Here how it will connect to the arduino uno board (see here for other boards) :

cc1101_2_bb

To use the CC1101, you will need the panstamp library here.

Note that it will also work with the elechouse library here.

The initial thread on the Arduino forum.

Now lets have a look at the sketches.

Sending

#include "EEPROM.h"
#include "cc1101.h"

CC1101 cc1101;

// The LED is wired to the Arduino Output 4 (physical panStamp pin 19)
#define LEDOUTPUT 7

// counter to get increment in each loop
byte counter;
byte b;
//byte syncWord = 199;
byte syncWord[2] = {199, 0};

void blinker(){
digitalWrite(LEDOUTPUT, HIGH);
delay(100);
digitalWrite(LEDOUTPUT, LOW);
delay(100);
}

void setup()
{
Serial.begin(38400);
Serial.println("start");

// setup the blinker output
pinMode(LEDOUTPUT, OUTPUT);
digitalWrite(LEDOUTPUT, LOW);

// blink once to signal the setup
blinker();

// reset the counter
counter=0;
Serial.println("initializing...");
// initialize the RF Chip
cc1101.init();

//cc1101.setSyncWord(&syncWord, false);
cc1101.setSyncWord(syncWord, false);
cc1101.setCarrierFreq(CFREQ_433);
cc1101.disableAddressCheck();
//cc1101.setTxPowerAmp(PA_LowPower);

delay(1000);

Serial.print("CC1101_PARTNUM "); //cc1101=0
Serial.println(cc1101.readReg(CC1101_PARTNUM, CC1101_STATUS_REGISTER));
Serial.print("CC1101_VERSION "); //cc1101=4
Serial.println(cc1101.readReg(CC1101_VERSION, CC1101_STATUS_REGISTER));
Serial.print("CC1101_MARCSTATE ");
Serial.println(cc1101.readReg(CC1101_MARCSTATE, CC1101_STATUS_REGISTER) & 0x1f);

Serial.println("device initialized");
//Serial.println("done");
}

void send_data() {
CCPACKET data;
data.length=10;
byte blinkCount=counter++;
data.data[0]=5;
data.data[1]=blinkCount;data.data[2]=0;
data.data[3]=1;data.data[4]=0;
//cc1101.flushTxFifo ();
Serial.print("CC1101_MARCSTATE ");
Serial.println(cc1101.readReg(CC1101_MARCSTATE, CC1101_STATUS_REGISTER) & 0x1f);
if(cc1101.sendData(data)){
Serial.print(blinkCount,HEX);
Serial.println(" sent ok :)");
blinker();
}else{
Serial.println("sent failed :(");
blinker();
blinker();
}
}

void loop()
{
send_data();
delay(4000);
}

Receiving

#include "EEPROM.h"
#include "cc1101.h"

// The LED is wired to the Arduino Output 4 (physical panStamp pin 19)
#define LEDOUTPUT 4

// The connection to the hardware chip CC1101 the RF Chip
CC1101 cc1101;

byte b;
byte i;
byte syncWord = 199;
long counter=0;
byte chan=0;

// a flag that a wireless packet has been received
boolean packetAvailable = false;

void blinker(){
digitalWrite(LEDOUTPUT, HIGH);
delay(100);
digitalWrite(LEDOUTPUT, LOW);
delay(100);
}

/* Handle interrupt from CC1101 (INT0) gdo0 on pin2 */
void cc1101signalsInterrupt(void){
// set the flag that a package is available
packetAvailable = true;
}

void setup()
{
Serial.begin(38400);
Serial.println("start");

// setup the blinker output
pinMode(LEDOUTPUT, OUTPUT);
digitalWrite(LEDOUTPUT, LOW);

// blink once to signal the setup
blinker();
// initialize the RF Chip
cc1101.init();

cc1101.setSyncWord(&syncWord, false);
cc1101.setCarrierFreq(CFREQ_433);
cc1101.disableAddressCheck(); //if not specified, will only display "packet received"
//cc1101.setTxPowerAmp(PA_LowPower);

Serial.print("CC1101_PARTNUM "); //cc1101=0
Serial.println(cc1101.readReg(CC1101_PARTNUM, CC1101_STATUS_REGISTER));
Serial.print("CC1101_VERSION "); //cc1101=4
Serial.println(cc1101.readReg(CC1101_VERSION, CC1101_STATUS_REGISTER));
Serial.print("CC1101_MARCSTATE ");
Serial.println(cc1101.readReg(CC1101_MARCSTATE, CC1101_STATUS_REGISTER) & 0x1f);

attachInterrupt(0, cc1101signalsInterrupt, FALLING);

Serial.println("device initialized");
}

void ReadLQI()
{
byte lqi=0;
byte value=0;
lqi=(cc1101.readReg(CC1101_LQI, CC1101_STATUS_REGISTER));
value = 0x3F - (lqi & 0x3F);
Serial.print("CC1101_LQI ");
Serial.println(value);
}

void ReadRSSI()
{
byte rssi=0;
byte value=0;

rssi=(cc1101.readReg(CC1101_RSSI, CC1101_STATUS_REGISTER));

if (rssi >= 128)
{
value = 255 - rssi;
value /= 2;
value += 74;
}
else
{
value = rssi/2;
value += 74;
}
Serial.print("CC1101_RSSI ");
Serial.println(value);
}

void loop()
{
if(packetAvailable){
Serial.println("packet received");
// Disable wireless reception interrupt
detachInterrupt(0);

ReadRSSI();
ReadLQI();
// clear the flag
packetAvailable = false;

CCPACKET packet;

if(cc1101.receiveData(&packet) > 0){
if(!packet.crc_ok) {
Serial.println("crc not ok");
}

if(packet.length > 0){
Serial.print("packet: len ");
Serial.print(packet.length);
Serial.print(" data: ");
for(int j=0; j<packet.length; j++){
serial.print(packet.data[j],hex);
serial.print(" ");
}
serial.println(".");

 }
}
 // Enable wireless reception interrupt attachInterrupt(0, cc1101signalsInterrupt, FALLING);
}
}
Voila :)
You know should not a bit better on the cc1101 pins, on how to connect it to the arduino and you have basic code to developp your projects.
 Posted by at 18 h 14 min
Août 302013
 

A quick article around my adventures with the Arduino.

This time, lets play with infrared.

More precisely lets catch IR signals and send them back.

The IR sensor can be found here.
The IR emitter can be found here.

You can use 2 arduino or built it all on one arduino (if so, add a object.enableIRIn() after each send or you wont be able to receive after the 1st send).

Here below the wiring and a quick and dirty sketch for sending.

Now go and place with your remotes !

ir_receiver_sender_bb


Sketch to send signals with your IR emitter.

/*
* IR LED must be connected to Arduino PWM pin 3.
*/

#include 

IRsend irsend;

void setup()
{
Serial.begin(9600);
}

void send(int code)
{
for (int i = 0; i < 3; i++) {
irsend.sendNEC(code, 32); // code, length
delay(40);
}
}

void loop() {
send(0x11223344);
delay(5000);
}
Août 122013
 

Here below a quick how to use an arduino and a cheap enc28j60 ethernet module (5€).

Can be handy to built a quick web server and some sensors (like a ds18b20 for example).

below the wiring :

enc28j60_bb

below a sketch using the ethercard library (provided with Arduino GUI) :

// Present a "Will be back soon web page", as stand-in webserver.
// 2011-01-30  http://opensource.org/licenses/mit-license.php
 
#include 

#define STATIC 0  // set to 1 to disable DHCP (adjust myip/gwip values below)

#if STATIC
// ethernet interface ip address
static byte myip[] = { 192,168,1,200 };
// gateway ip address
static byte gwip[] = { 192,168,1,1 };
#endif

// ethernet mac address - must be unique on your network
static byte mymac[] = { 0x74,0x69,0x69,0x2D,0x30,0x31 };

byte Ethernet::buffer[500]; // tcp/ip send and receive buffer

char page[] PROGMEM =
"HTTP/1.0 200 OK\r\n"
"Content-Type: text/html\r\n"
"Retry-After: 600\r\n"
"\r\n"
""
  ""
    "my web page"
  ""
  ""
    "

hello world !

" "" "" ; void setup(){ Serial.begin(38400); Serial.println("\n[backSoon]"); if (ether.begin(sizeof Ethernet::buffer, mymac) == 0) Serial.println( "Failed to access Ethernet controller"); #if STATIC ether.staticSetup(myip, gwip); #else if (!ether.dhcpSetup()) Serial.println("DHCP failed"); #endif ether.printIp("IP: ", ether.myip); ether.printIp("GW: ", ether.gwip); ether.printIp("DNS: ", ether.dnsip); } void loop(){ // wait for an incoming TCP packet, but ignore its contents if (ether.packetLoop(ether.packetReceive())) { memcpy_P(ether.tcpOffset(), page, sizeof page); ether.httpServerReply(sizeof page - 1); } }
 Posted by at 14 h 21 min